Inside: Show your love of Star Wars with this Star Wars DIY bowling set, complete with Star Wars printable stormtrooper faces.
The force is still alive.
In fact, it’s actually be growing. Every time I turn around I see another reference to Star Wars.
Obviously, the people at Disney are very clever marketers.
My son will be at Target and begin to beg for Star Wars themed cereal, at Kohl’s and want their newest boy’s Star Wars shirt or even at CVS and spot a Star Wars themed toothbrush.
Even Pottery Barn Kids has their own line of Star Wars products
The point is, there is no escaping Star Wars fever.
And with a new movie anticipated to be out every few years, I say just embrace it now.
I have the perfect way to do just that.
Your kids will certainly love you forever for making it for them (or until the charm of a new toy wears off ?)
I present to you this Star Wars DIY bowling set:
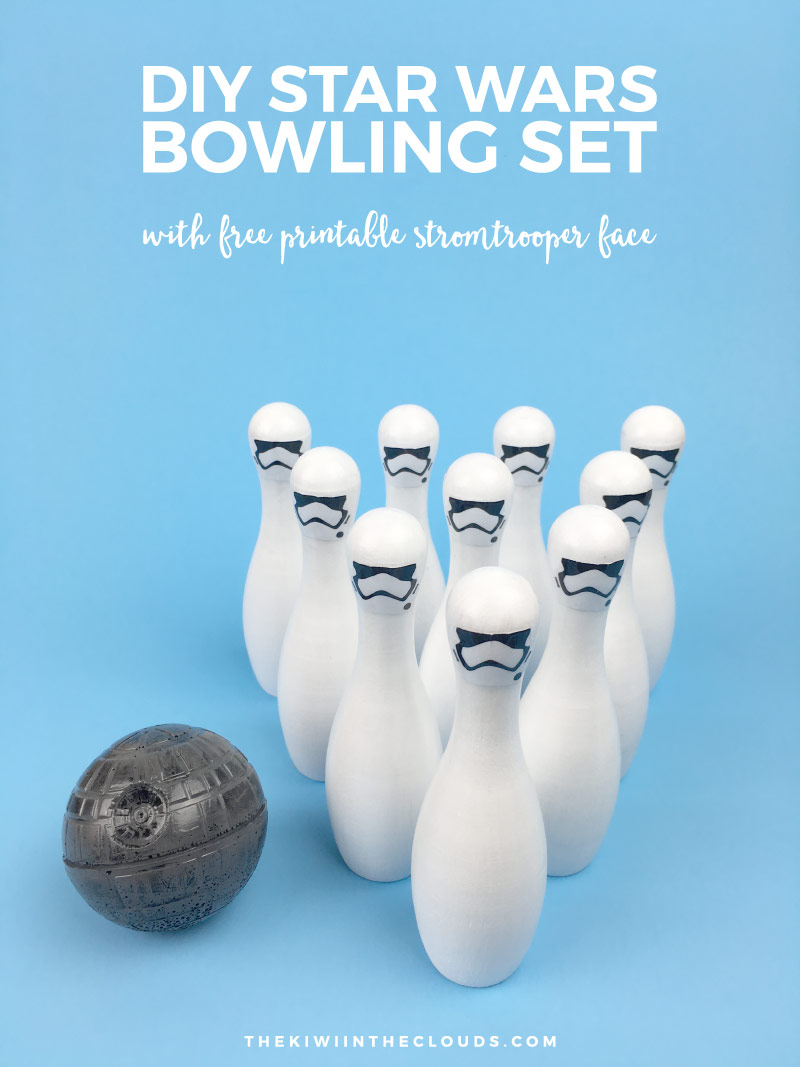

This Star Wars DIY consists of a resin Death Star bowling ball and 10 Stormtrooper bowling pins. Read more below for all the details on how to make one for your Jedi master.
This post contains affiliate links to help better serve your needs. You can read my full disclosure here.
Star Wars DIY Bowling Set
Supplies:
- Death Star Ice Cube Mold
- Easy Cast Resin Kit
- 2 wooden stir sticks
- 2 plastic disposable cups
- Gray Acrylic Paint
- Paintbrush
- Ebony Rub n Buff (optional; adds more depth to the Deathstar)
- 10 Wooden Bowling Pins
- White Acrylic Paint
- FREE printable Stormtrooper faces (link at bottom of post)
- Full Sheet Gloss Sticker Paper
- Gloss Modge Podge
- Varnish Gloss Cover

Star Wars Craft Directions:
Making the Death Star Bowling Ball:
- Gather your Death Star ice cube mold, the resin kit, stir sticks and plastic disposable cups and head to a well-ventilated area.
- Mix resin and hardener according to instructions.
- Pour resin mix into Death Star mold.
- Let sit for at least 48 hours (Amazingly, I had the patience to wait 3 days before checking the mold). Do not risk destroying your bowling ball by taking it out of the mold of early.
- Paint the entire Death Star in several (I used about 3) coats of the gray acrylic paint.
- Optional: If you want to add more depth and dimension to the Death Star, then add the Rub N Buff. Using your finger or a cloth, place a small amount of Rub N Buff (about pea-sized or smaller) on the Death Star and lightly rub all over the mold in a random manner. This will make all the cracks and crevices more prominent.
- Paint the entire Death Star in a few thin coats of varnish gloss to seal.
Note: Don’t worry about air bubbles in the mold. Mine had a ton on the bottom half, but I think it adds more character to the Death Star.
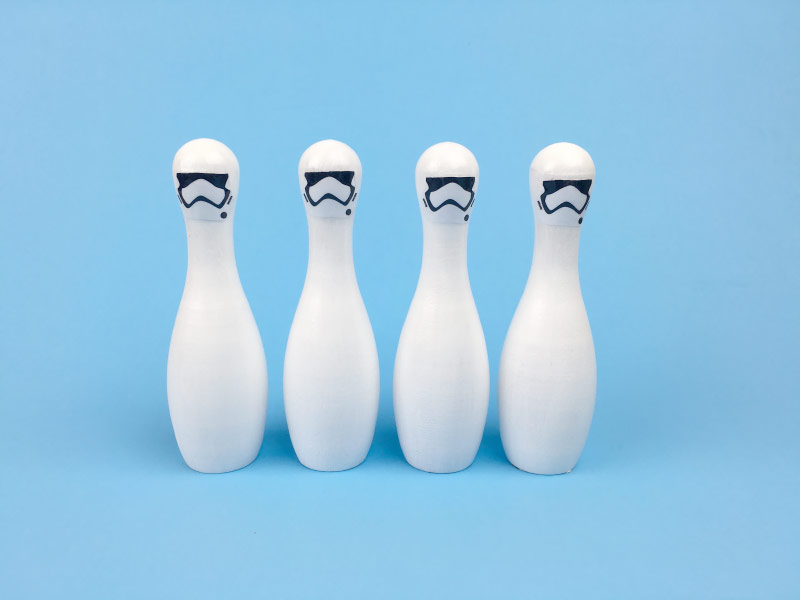
Making the Stormtrooper Pins:
- Paint each of the 10 pins in several (about 4) coats of the white acrylic paint. Let dry completely.
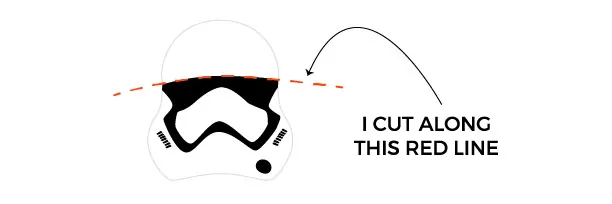
- Print out the Stormtrooper faces on the full sheet sticker paper. Depending on whether you use the same pins I did or not will depend on how well the faces will fit on the pin. In order to minimize creasing of the sticker, I cut off the sticker just above the stormtrooper eyes as illustrated below:

- Place the sticker on the bowling pin and immediately begin to modge podge over the stickers. I waited several hours to modge podge my first group of pins and the stickers were already beginning to peel off of the wood. Paint 1 coat, then let dry to a tacky finish. Soften any creases with your finger and then paint another coat of modge podge on. Let dry completely then add another coat of modge podge to be 100% sure your sticker will stay on.
- After the final coat of modge podge has dried, paint 2-3 thin coats of the varnish gloss cover on, being sure to check for drips (I had one or two, but they were fairly minimal).
Now you have a galactic Star Wars DIY bowling set that is perfect for a Star Wars party, a gift or just to show your kids what an awesome mom you are!
More Star Wars Ideas For Kids:
- Free Star Wars Printables For Kids That Are Out Of This World
- Free Printable Star Wars I Spy To Occupy The Kids
- Free Star Wars Coloring Pages For Kids
Fun Star Wars Kids Activities:


Sam is the crafter and founder of Simple Everyday Mom. She has been featured in Oprah Mag, Good Housekeeping, The Spruce Crafts, Country Living, The Bump and more. Read more.