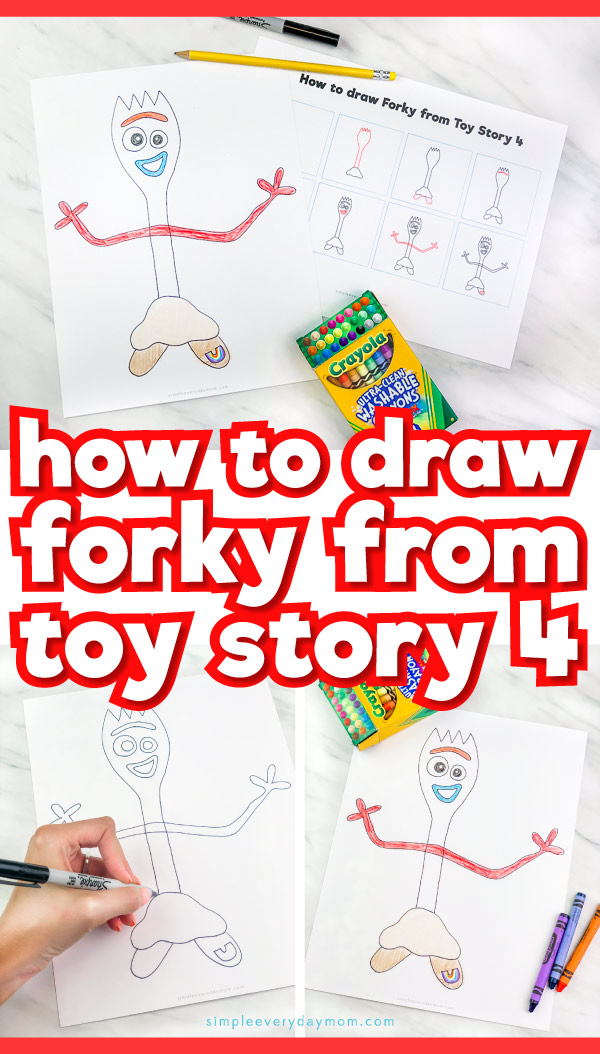
How to Draw Forky From Toy Story 4
All activities require adult supervision. By using this site, you agree to our terms of use. This post may contain affiliate links, sponsored links, and ads. As an Amazon Associate and participant in other affiliate programs, I earn from qualifying purchases.. Read our disclosure policy.

By now hopefully you’ve seen the awesome new Disney movie, Toy Story 4!
It’s a heartwarming story filled with adventure, new friends and plenty of laughs. One new character in particular, Forky the spork toy, really grabbed everyone’s attention.
He’s a funny, trash-loving toy that’ll probably be your child’s favorite new guy.
Today we’re sharing how to draw Forky from Toy Story 4. He’s super simple to make and gives kids great practice drawing!
Read on below to find the step by step drawing tutorial.
Toy Story 4: How To Draw Forky
If you don’t already know, Forky was made by Bonnie during her kindergarten orientation day. She’s scared and worried about how kindergarten will be and whips up little Forky to be her friend and calm her down.
What she doesn’t realize is Forky doesn’t want to be a toy! He just wants to relax in the trash!
This step by step drawing tutorial for kids is great for aspiring little artists who want to learn how to draw Forky.
This post contains affiliate links for your convenience. You can read my full disclosure here.
Drawing Supplies
- Pencil
- Paper
- Eraser
- Drawing guide (download)
- Crayons (optional)
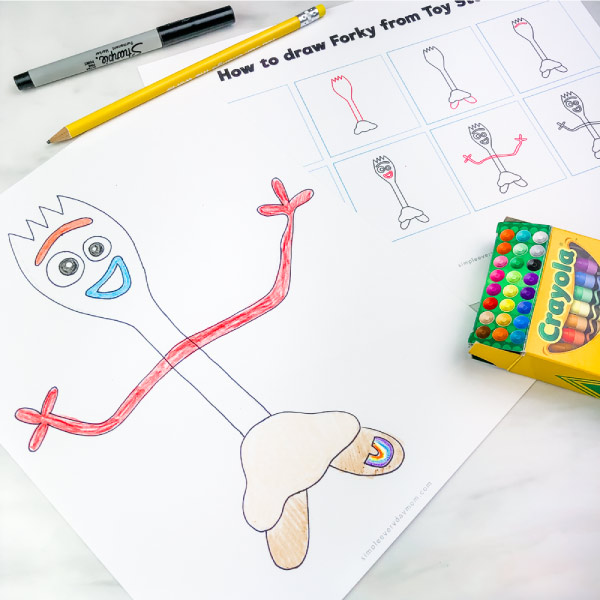
How To Draw Forky Step By Step

Step 1: We’re going to start drawing Forky by sketching out his clay base. Start toward the bottom of your paper and draw a mound of clay with a few bumps on the bottom.
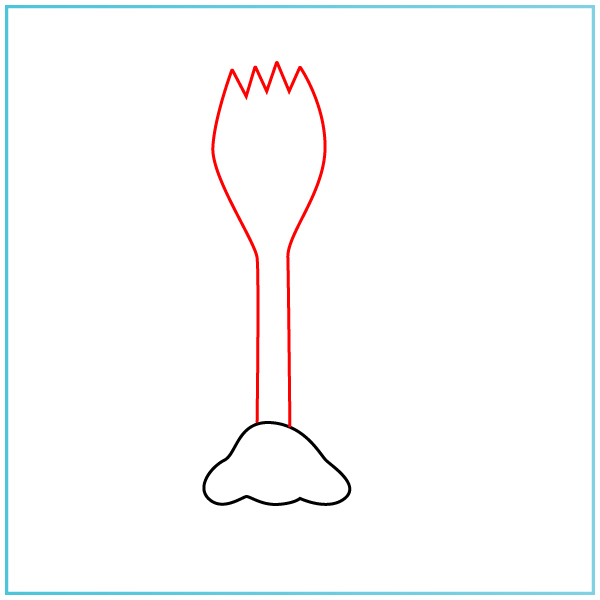
Step 2: Now we’re going to draw the spork. Start at one end of the clay mound and draw the skinny handle. Flare your line outward to make the spork tip and make 4 points at the top. Draw a mirror image of the one side, all the way down to the opposite side of the clay.
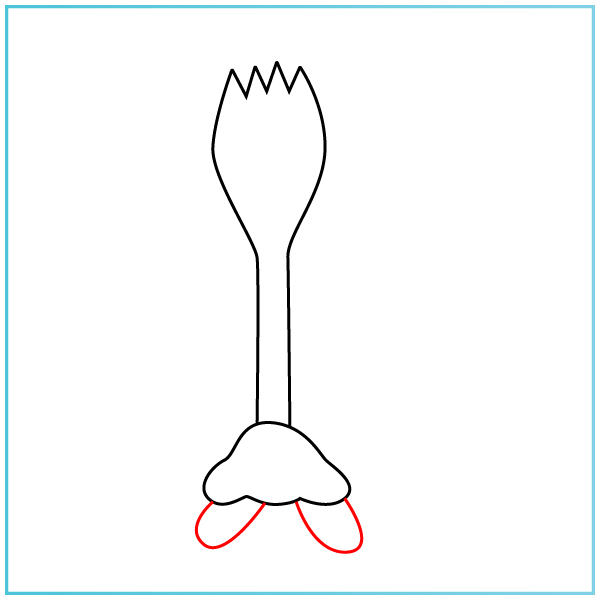
Step 3: We’re moving on to make Forky’s popsicle stick feet. Starting at one end of the clay mound, draw a thin, stretched out oval that ends at the clay base. Repeat for the other foot.
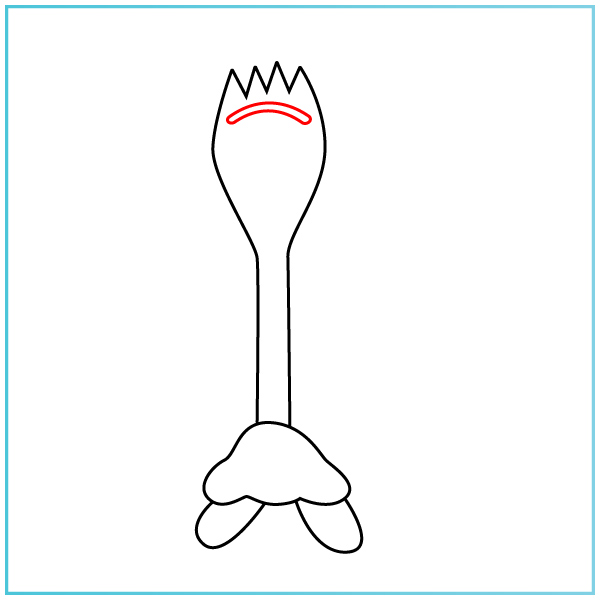
Step 4: This step is super simple! To draw Forky’s eyebrow, make a long, curved rainbow-like shape in the center of his spork head.

Step 5. Next, it’s time to make Forky’s eyes. Unlike many other characters, Forky actually has 2 different sized eyes. Start with the left eye and draw a large circle. Draw the inner pupil smaller and offset, with it moved closer to the right. Make Forky’s right eye about 1/2 as big as his left eye. Draw the inner pupil smaller as well and slightly to the left. This will give him his cute and silly look!
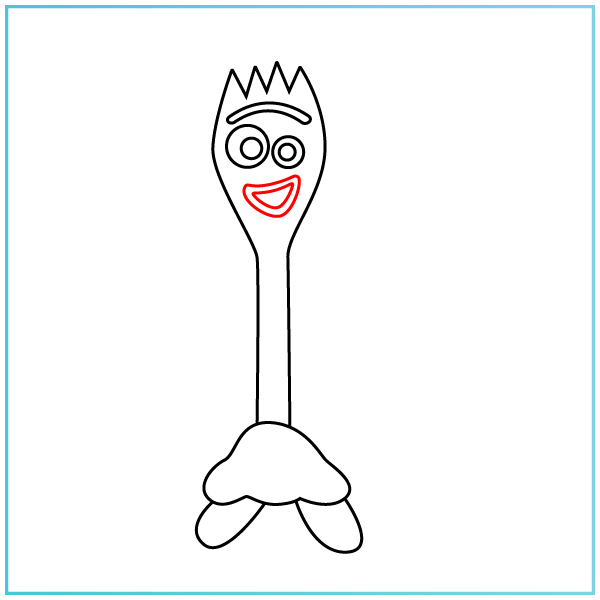
Step 6: We’re making Forky’s smile! Draw a classic open mouthed smile, with rounded edges. Next, make a smaller version of this smile inside the previous one.
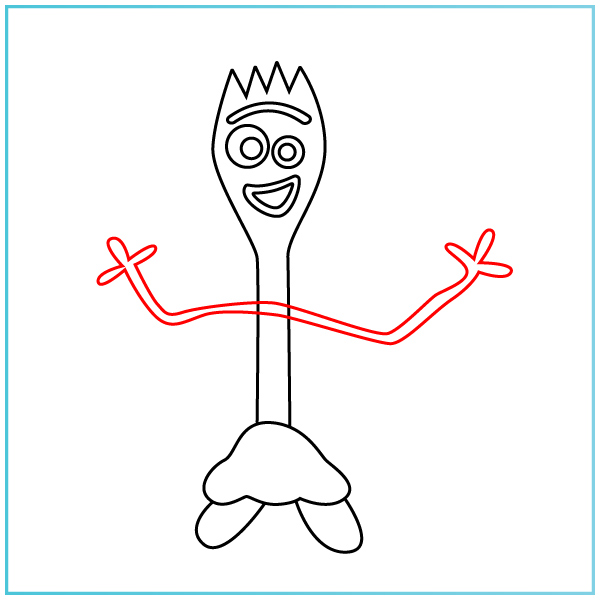
Step 7: We’re getting close! Now you’ll be making Forky’s pipe cleaner arms. To make his arms start on one side and draw one arm at a time. Draw a thin, slightly bent arm with 3 fingers on each hand. Next draw the other arm. Connect the arms in the center of the spork handle.
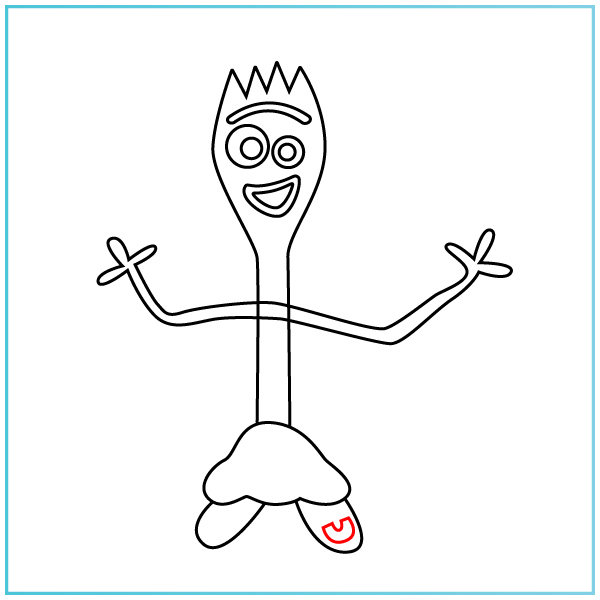
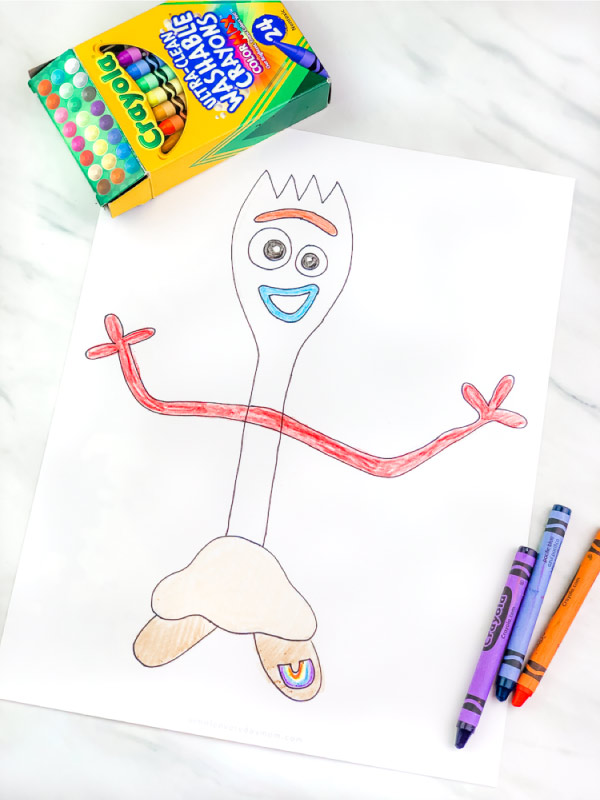
Step 8: This is the last step of drawing! Don’t forget to draw on Forky’s rainbow sticker on his foot. Make a fat “U” shape.

Bonus step: Now it’s time to color Forky in! For Forky’s clay, use a soft brown or dark cream color. Color in his rainbow sticker and color his feet a yellowish brown. You can either leave his body white or color it an off white. Fill in his eyebrow and arms with a bright red. Make his smile a bright blue. Use a soft red to color on the blush of his cheeks on either side of his smile. Color in his pupils black.
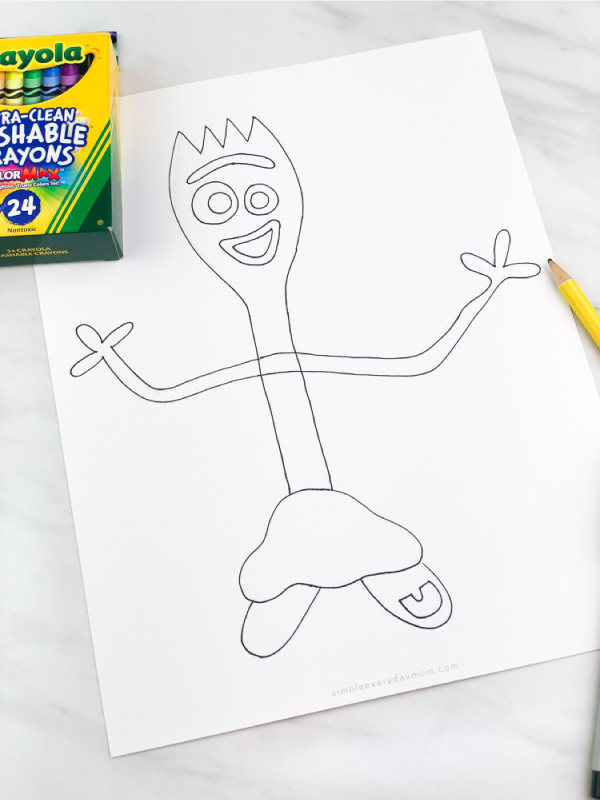
Voila, you’ve done it!
You’ve created your very own Forky drawing.
Customize Your Forky Drawings
Now that you know how to create the basic Forky shape, let you imagination run wild!
You can change the position of Forky’s hands, change his mouth shape and his eyebrows to give him completely new looks. You can also make some other spork friends for him.
Printable Forky Drawing Guides
Don’t forget to enter your email in the form at the end of the page to receive your free drawing guides. One page shows each of the step by step directions displayed above so you can guide your child along the drawing process.
If your children are younger and feeling a bit apprehensive about drawing on their own, we’ve also included a dashed line drawing of Forky. With this printable, your kids will be able to trace Forky and develop a feel for how to make him on their own.
You can encourage them to draw him several times, then see if they can begin to follow the drawing guide to freehand their own Forky drawing!
Share With Us
Did your kids draw their very own Forky? We’re always so excited to see other children’s drawings. Head on over to our Facebook page and post your child’s awesome creations to our wall.
We can’t wait to see how they all look!
More Art Activities For Kids
- Germ Blow Painting Art With Straws
- Handprint Chicken Art For Kids
- Dot Sticker Art Drawing For Kids
- Bubble Painting For Kids
How to Draw Forky From Toy Story 4
Video
Equipment
- Drawing guide (download)
Materials
- Pencil
- Paper
- Eraser
- Crayons optional
Instructions
- We're going to start drawing Forky by sketching out his clay base. Start toward the bottom of your paper and draw a mound of clay with a few bumps on the bottom.
- Now we're going to draw the spork. Start at one end of the clay mount and draw the skinny handle. Flare your line outward to make the spork tip and make 4 points at the top. Draw a mirror image of the one side, all the way down to the opposite side of the clay.
- We're moving on to make Forky's popsicle stick feet. Starting at one end of the clay mound, draw a thin, stretched out oval that ends at the clay base. Repeat for the other foot.
- This step is super simple! To draw Forky's eyebrow, make a long, curved rainbow-like shape in the center of his spork head.
- Next, it's time to make Forky's eyes. Unlike many other characters, Forky actually has 2 different sized eyes. Start with the left eye and draw a large circle. Draw the inner pupil smaller and offset, with it moved closer to the right. Make Forky's right eye about 1/2 as big as his left eye. Draw the inner pupil smaller as well and slightly to the left. This will give him his cute and silly look!
- We're making Forky's smile! Draw classic open mouthed smile, with rounded edges. Next, make a smaller version of this smile inside the previous one.
- We're getting close! Now you'll be making Forky's pipe cleaner arms. To make his arms start on one side and draw one arm at a time. Draw a thin, slightly bent arm with 3 fingers on each hand. Next draw the other arm. Connect the arms in the center of the spork handle.
- This is the last step of drawing! Don't forget to draw on Forky's rainbow sticker on his foot. Make a fat "U" shape.
- Now it's time to color Forky in! For Forky's clay, use a soft brown or dark cream color. Color in his rainbow sticker and color his feet a yellowish brown. You can either leave his body white or color it an off white. Fill in his eyebrow and arms with a bright red. Make his smile a bright blue. Use a soft red to color on the blush of his cheeks on either side of his smile. Color in his pupils black.
Did you make this?
Don’t forget to leave a comment below and make sure to follow on Pinterest, Facebook and TikTok for more!

Meet Sam
Sam is the crafter and founder of Simple Everyday Mom. She has been featured in Oprah Mag, Good Housekeeping, The Spruce Crafts, Country Living, The Bump, and more.


Wonderful lesson
Thanks 🙂
please send forky printable 🙂
Of course! If you put your email in the form at the end of the post, the link will be emailed to you ?