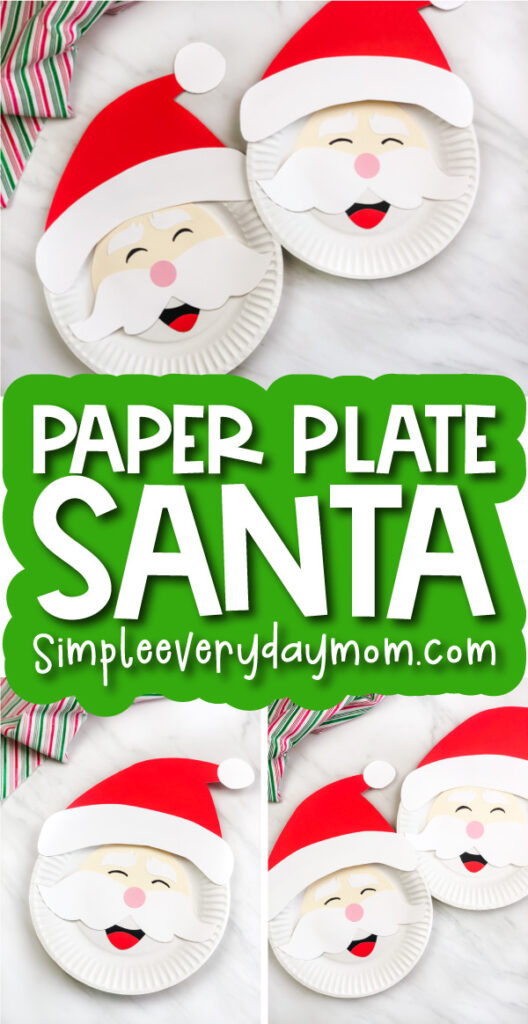
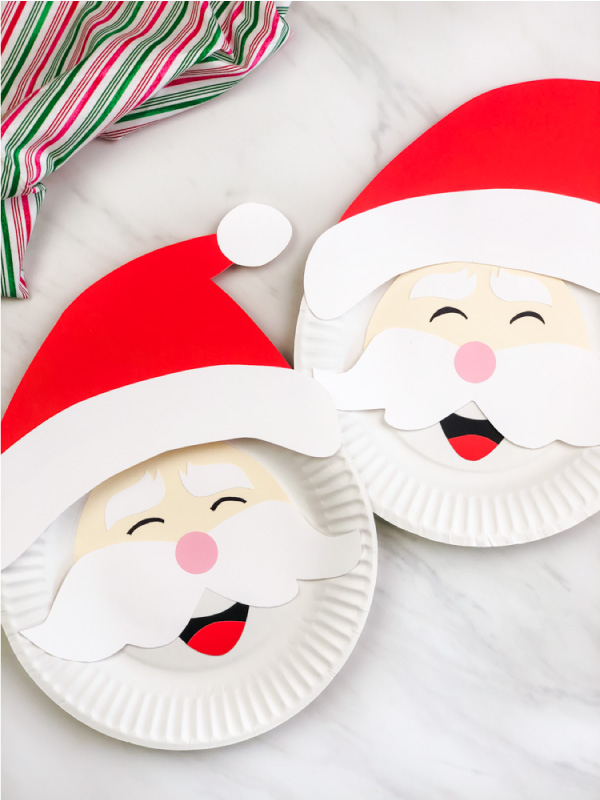
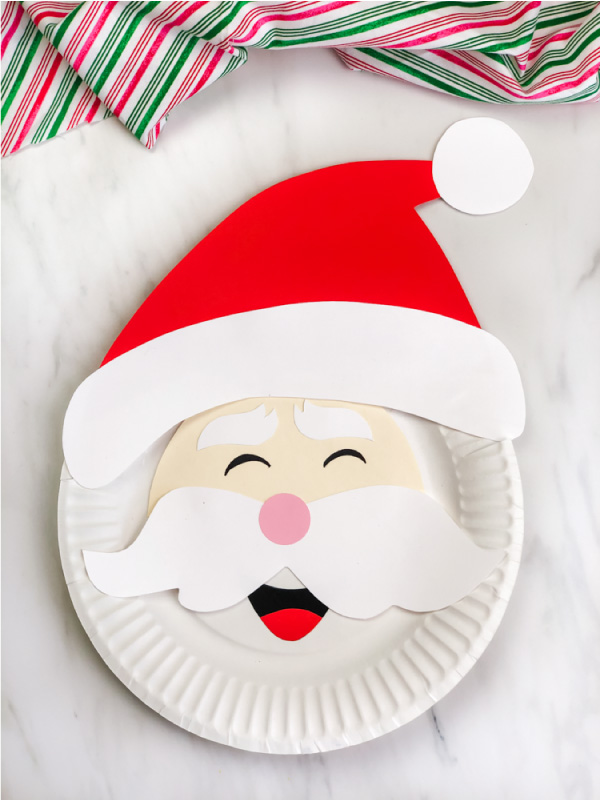
Paper Plate Santa Craft For Kids [FREE Template]
All activities require adult supervision. By using this site, you agree to our terms of use. This post may contain affiliate links. As an Amazon Associate and a participant in other affiliate programs, I earn a commission on qualifying purchases. Read our disclosure policy.
It’s after Thanksgiving, dreary and cold outside, and you need something to do with your kids over the winter break. There just happens to be some leftover paper plates from the big meal.
What’s a mom to do?
How about making this cute and fun paper plate Santa craft for kids?!
It’s the perfect way to keep your kids entertained and excited for the holiday season! Paper plate crafts are always a hit with children and this one is no exception.
Read on below to see how easy it is to make with your kids. We’ve even included some step-by-step photos to guide you along the way. Also, be sure to check out all of our cute Santa activities for even more ideas!
Santa Paper Plate Craft
Supplies
- Paper plate
- Colored card stock
- Scissors
- Glue stick
- Tape
- Black marker
- Santa template (click the “click here to get your freebies” image at the end of the post)
Directions
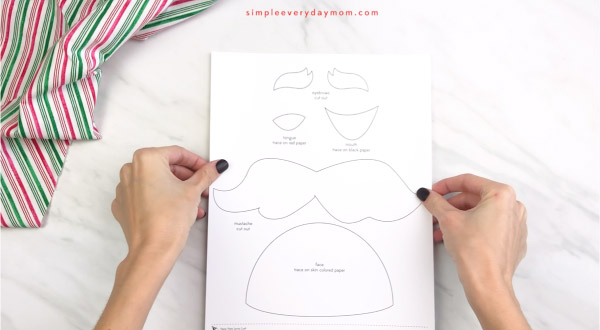
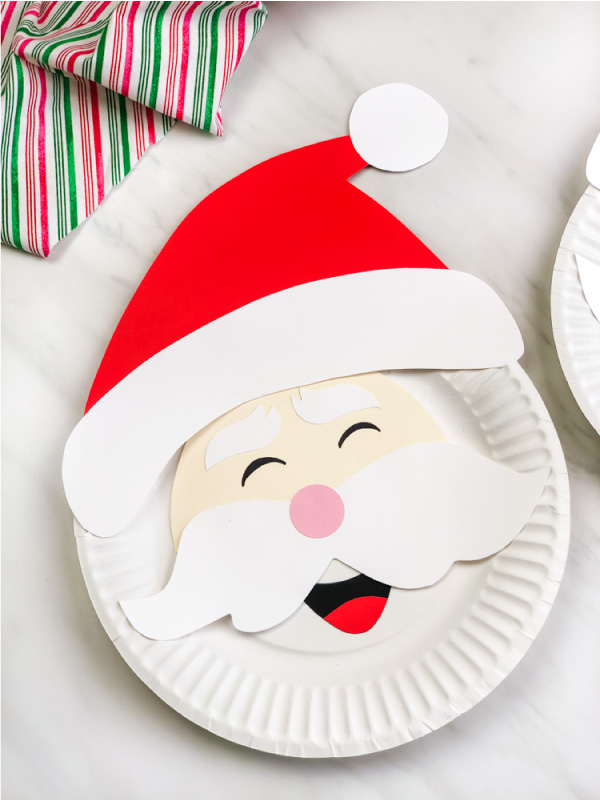
Start by downloading the template and printing it out. Once you have the template printed, gather the materials needed for this fun activity. Get those scissors ready, and let’s help the kids bring this Santa Claus to life!
First, guide your child to glue the bottom of Santa’s hat to the red base.
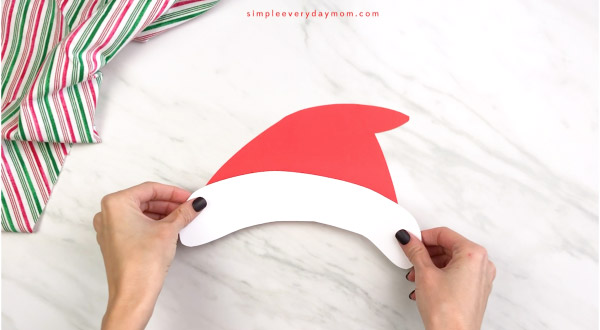
Next, help your child glue the hat puff to the tip of the hat.

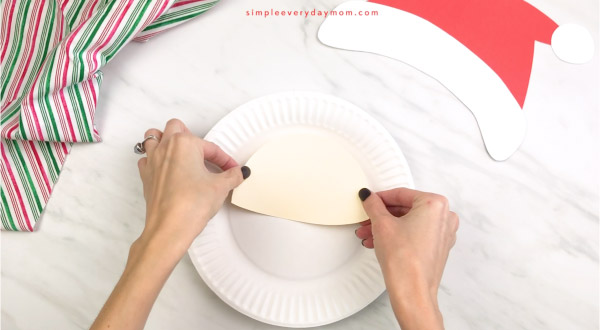
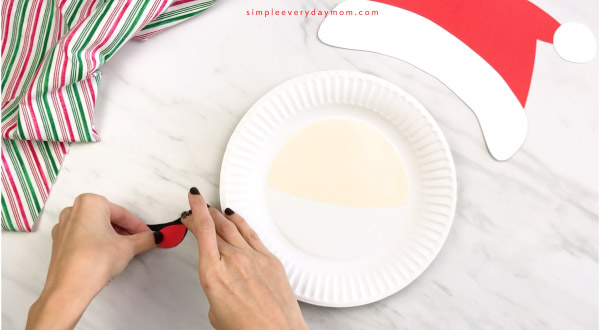
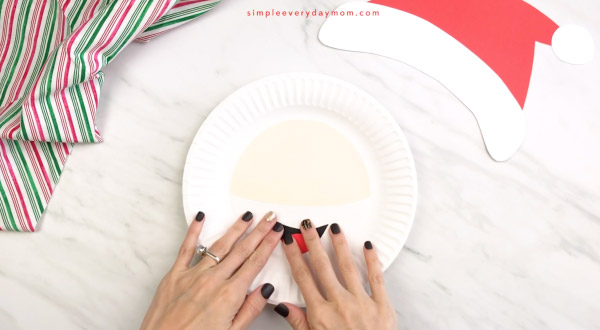
Place the cream face piece at the top of the center circle of the paper plate and glue it in place.
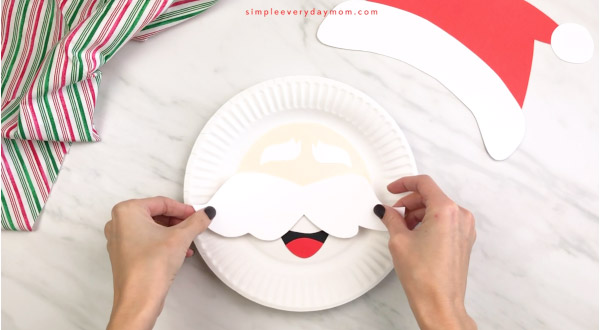
Put the tongue piece on the bottom of the black mouth and glue it down. Cut off any excess paper that hangs off the sides.
Position the mouth towards the bottom of the inner circle of the paper plate and glue it down.
Glue the eyebrows towards the top of the cream face piece.

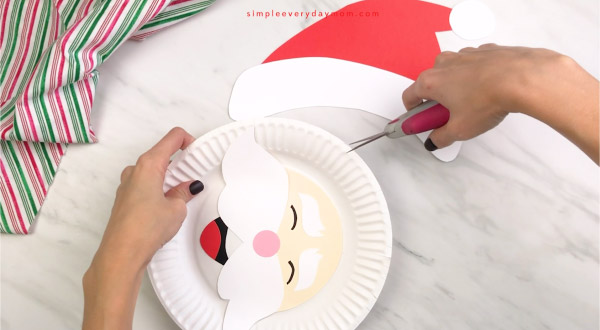
Place the paper mustache on the paper plate so it covers the bottom of the face and glue it in place.
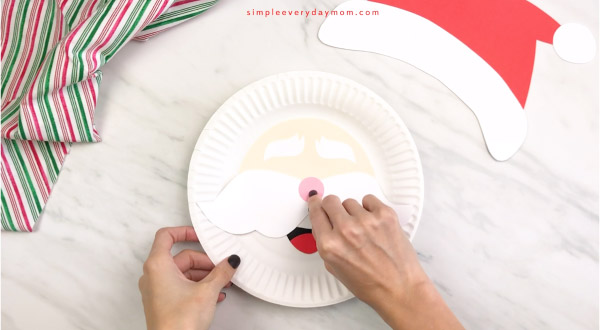
Use a circle punch or scissors to cut out a small pink nose for Santa. Glue it in the middle of the mustache, where it dips in the center.
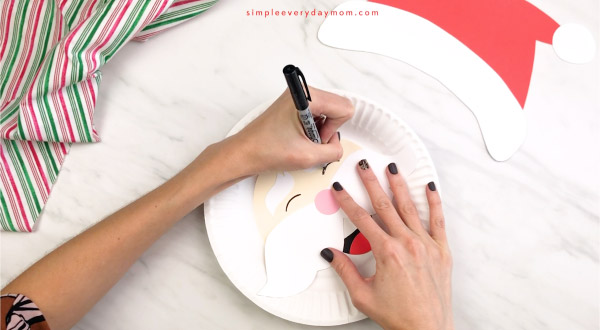
Now, use the black marker to draw eyes on Santa’s face.
Use the scissors to cut a few slits on the top of the paper plate. This is to help flatten the plate and make it easier to secure the hat.
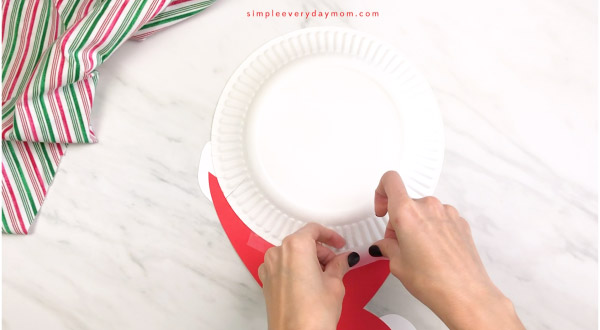
Finally, encourage your child to place the hat shape on the top, then flip the plate over (holding the hat in place) and secure it with tape on the back of the paper plate.
Be sure to check out our Christmas crafts while you’re here! Your kids will love creating more fun crafts like this one!

Simple Christmas Ideas For Kids
There’s so much fun to be had during the Christmas season! Whether you’re creating some holiday magic for your kids or planning activities for a group, we’ve got you covered.
Here are some simple Christmas ideas your kids will love!
Fun Christmas Books To Read Aloud
Reading is one of the best ways to get into the holiday spirit. Your little ones can cozy up with a Christmas-themed book and get lost in a world of magical stories. They’ll also work on their listening and imagination skills as they listen to you read!


Dasher: This wonderfully illustrated Christmas book for kids gives you the back story on one of Santa’s favorite reindeer, Dasher! Girls will especially love to read this since Dasher is a girl.
Construction Site On Christmas Night: Fans of the fun characters of the construction site books have to add this Christmas-themed story to their collection. See how the trucks get ready for Christmas!
How To Catch An Elf: Kids everywhere love the silliness of this Christmas story. The rhymes and the illustrations will draw the kids in as well. This is a Christmas book kids will want to read every year!
Kids Christmas Crafts
Elf Yourself Craft – Don’t let the elves have all the fun this season! With our free printable template, your kids can create an elf version of themselves. They’ll love their festive mini-me – and you’ll love the quiet time as they work on this engaging activity.
Try this Christmas Penguin Craft
Grinch Name Craft – We all know and love the Grinch! He’s the perfect character to inspire creativity and learning. With this cute craft, younger kids can work on their spelling and letter recognition to create a cute piece of holiday decor. It’s a great way to get into the holiday spirit!
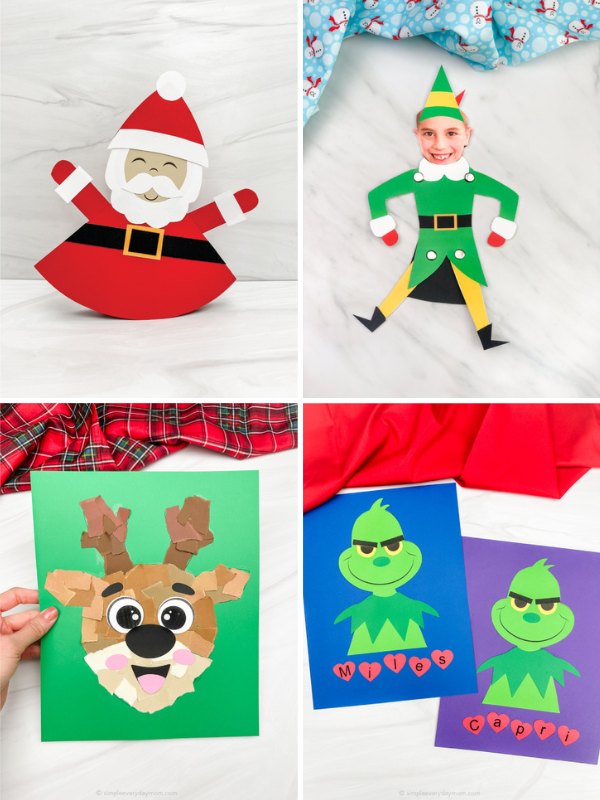
Moving Santa Craft – Get ready to ‘rock’ around the Christmas tree with our moving Santa craft! Kids can create this rockin’ Santa using some simple craft supplies. It’s a fun and easy way to celebrate the holiday season while working on fine motor skills.
Torn Paper Reindeer Craft – Get ready for a hands-on craft perfect for the holiday season! This torn paper reindeer is super fun for young and older children alike. By tearing and pasting the colorful paper, they’ll work on hand-eye coordination and dexterity while creating a cute reindeer masterpiece!


Fun Christmas Activities
Fun Christmas Matching Worksheets
Keep the learning going all season long with our festive Grinch worksheets! We’ve included fun activities, including a letter maze, handwriting practice, and a label the Grinch. These worksheets are perfect for helping young children develop important skills while enjoying some holiday-themed fun.
Storytime is always a favorite for kids, and we love book companion printables to bring the story to life! These How to Catch Santa worksheets are full of fun puzzles and activities that go along with the popular children’s book. They’re a fun way to practice reading comprehension, critical thinking, and fine motor skills!

Our gingerbread man dot to dot pages are the cutest way to practice number recognition and problem-solving skills! Little kids will love counting and connecting the dots to reveal each gingerbread man illustration. Just print and let the fun begin!
Want to add some holiday cheer to your kid’s coloring time? Check out these Christmas coloring pages for a no-prep activity for kids of all ages! From Santa and reindeer to Christmas trees and snowmen, you really can’t get any more festive than this!
Share With Us
Did you make this activity with your kids or students? We’d love to feature them on our social media!
For a chance to have your child’s project featured, simply snap a picture of the completed project and post it to our Facebook page, email it to us directly by clicking here, or use #simpleeverydaymom on your social media!
Paper Plate Santa Craft For Kids
Video
Materials
- Paper plate
- Colored card stock
- Glue stick
- Tape
- Black marker
- Santa template
Instructions
- Download the free Santa Claus craft template, print, and cut out the pieces.
- Begin by gluing the bottom of Santa’s hat to the red base.
- Next, glue the hat puff to the tip of the hat.
- Place the cream face piece at the top of the center circle of the paper plate and glue it in place.
- Put the tongue piece on the bottom of the black mouth and glue it down. Cut off any excess.
- Position the mouth towards the bottom of the inner circle of the paper plate and glue.
- Glue the eyebrows towards the top of the cream face piece.
- Place the white paper mustache on the paper plate so it covers the bottom of the cream face and glue it in place.
- Use a circle punch or scissors to cut out a small pink nose for Santa. Glue in the middle of the mustache, where it dips in the center.
- Now, use the black marker to draw eyes on Santa’s face.
- Use the scissors to cut a few slits on the top of the paper plate. This is to help flatten the plate and make it easier to secure the hat.
- Finish off by placing the hat shape on the top, then flip the plate over (holding the hat in place) and secure it with tape on the back of the paper plate.
Did you make this?
Don’t forget to leave a comment below and make sure to follow on Pinterest, Facebook and TikTok for more!
Free Santa Paper Plate Craft Template


Meet Sam
Sam is the crafter and founder of Simple Everyday Mom. She has been featured in Oprah Mag, Good Housekeeping, The Spruce Crafts, Country Living, The Bump, and more.


Can I have the link for template ? I will be using this for my son’s project. Thanks
Of course! All you need to do is enter your email in the form at the end of this post to have the link sent to you ?
@Sam,
Hello Ms Sam Can I have the link for template ? I will be using this for my son’s project. Thank you so much from Philippines
Of course! All you need to do is enter your email in the form at the end of this post to have the link sent to you ?
yes please
If you’re looking for the template, all you need to do is enter your email in the form at the end of this post to have the link sent to you ?
cant wait to get the santa craft template! Thank you!
You’re welcome!
wow very nice. Can I have free template
Of course! All you need to do is enter your email in the form at the end of the post and the link will be sent to you ?
send the templte please
Of course! All you need to do is enter your email in the form at the end of one of the posts and the link will be sent to you ?
Super cute!
Aw, thanks!
could you email me the santa template please
All you need to do is enter your email in the form at the end of this post and the link will be sent to you ?
It’s realy help my chile to learn crafts activity.
Hi, how can I download the Santa template? help me please.
All you need to do is enter your email in the form at the end of the post and the link will be sent to you ?
Could you please send me the Santa paper plate craft template? It is so cute! thank you!
Of course! Just enter your email in the form at the end of the post and the link will be emailed to you ?
Hello,
Please kindly share the free Santa plate template. Great idea, I plan to do this Christmas craft with my kids.
Of course! Just enter your email in the form at the end of the post and the link will be emailed to you ?
Santa plate template please!
Of course! All you need to do is enter your email in the form at the end of this page and the link will be sent to you ?
Hey, Sam! There isn’t a location to print the directions like all your other Blog posts. Could I get directions emailed to me? Thanks so much!
Ah! Thanks for letting me know! I just added it and you can print it here: https://www.simpleeverydaymom.com/wp-json/mv-create/v1/creations/332/print
I would like this Santa craft for my kids please can you send me the template!
Of course! All you need to do is enter your email in the form at the end of this post and it’ll be emailed to you ?
I did it but I didn’t received anything:(
can you send me the instruction to print it out for Paper plate Santa Claus template I got the template but not instruction
Hi Sandra! The directions are here on the blog page. You can scroll until you get to the How To card and print out the directions there too 🙂
This Santa us the cuties ever!!