Butterfly Name Craft With Free Template
All activities require adult supervision. By using this site, you agree to our terms of use. This post may contain affiliate links, sponsored links, and ads. As an Amazon Associate and participant in other affiliate programs, I earn from qualifying purchases.. Read our disclosure policy.

As the days grow warmer and flowers bloom, butterflies begin to flutter through gardens and fields during spring. Their beautiful wings add a splash of color to the season that everyone enjoys seeing.
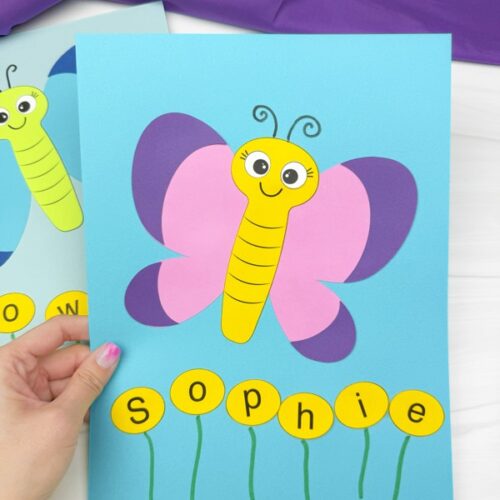
Bring that same beauty indoors when kids make this butterfly name craft!
Kids will create their own colorful butterfly and add a personal touch with flowers that spell out their name. It’s a fun way to mix creativity with letter recognition.
For even more fun with butterflies, explore other creative butterfly crafts for kids that will have them learning and bringing the beauty of spring indoors!

Butterfly Paper Craft
The color possibilities are endless, and each butterfly will be as unique as the child making it!
Kids will strengthen their scissor skills, practice gluing, and learn to follow step-by-step instructions when they create this personalized butterfly craft. As they place each letter on the flowers, they’ll also practice spelling their name.
Use our free editable template to easily type in each child’s name to make setup a breeze. If you’d rather let kids practice their handwriting, the circles can be left blank for them to write in the letters of their names themselves.
Supplies
- Colored cardstock or construction paper
- Scissors
- Glue
- Markers
- Butterfly Template (click the “click here to get your freebies” image at the end of the post)
Directions
Start by downloading and printing the butterfly template, then cut out all the pieces together. This is a great chance to practice those scissor skills!

Take the purple wing decoration and glue it onto the pink wing. This layering adds a fun, decorative look to your butterfly’s wings!

Now, glue the purple wing decoration onto the left wing to complete the butterfly wings. Look at that—your butterfly’s wings are coming to life!

Lay the wings on a background piece of paper and glue them down, leaving space in the middle for the butterfly’s body.

Time to glue the body piece right in the center of the wings. Look at that smile—it’s already looking adorable!

Glue the eyes onto the butterfly’s face. This detail gives your butterfly a cheerful and adorable look!

Use the flower letters to have your child spell out their name at the bottom of the paper.

Grab a green marker to draw stems under each letter, making them look like flowers.

Finish it off by drawing some curly antennae with a black marker. Now your butterfly is ready to flutter!

Look at that adorable butterfly craft! It’s a great way for kids to be creative while practicing their spelling this spring. Be sure to check out more of our name crafts for even more fun ideas!

Spring Books For Kids


Ten Little Ladybugs – This cute book is not only fun to read, but also fun to touch! Kids will want to read this book day after day and it helps them learn to count.
Planting a Rainbow – Kids will have a blast learning about colors and flowers in this colorful and engaging book!
Bee – This peek-through picture book is a fun bedtime book for kids! It’s short and keeps the kids’ attention span.

Spring Arts And Crafts
Butterfly Headband Craft – Your little ones can become fluttering butterflies when they crown themselves with new butterfly headbands. Kids can decorate their wings in any colors they like, then wear their masterpieces and take flight around the room.
It’s a playful way to spark creativity, encourage pretend play, and use their imaginations.
Fork Painted Bee Craft – Buzz into creativity with this cute bee painted with a fork! Instead of a paintbrush, kids will use a fork to create a fuzzy texture to make their bees look like they’re ready to collect pollen.
Our free template and a few simple supplies will have little artists dipping, dabbing, and designing their own bee-autiful pieces of art!
Frog Handprint Craft – Get hopping with this adorable frog made with handprints! Little ones will love seeing their handprints turn into froggy feet for a ribbit-ing good time. As they cut, glue, and create, they’ll build fine motor skills while making a frog that’s uniquely theirs. Download the template and leap into the fun!

Duck Handprint Craft – Quack up some fun with this adorable handprint duckling! Little hands will transform into fluffy feathers as kids create their own duck in bright yellow or like a Mallard duck. It’s a sweet keepsake and a creative way to swim into creative fun. Grab our free template for the finishing details!


Spring Activities For Preschoolers
Spring colors will reveal beautiful butterflies on these printable butterfly color by numbers. Young artists will love watching their colorful creations appear as they follow the numbers and fill in each section.
These no prep pages with three unique designs make learning feel like play while helping kids build fine motor skills, number recognition, and focus. Just grab some crayons or markers, print the pages, and let kids enjoy learning while creating.

Creepy crawly learning fun is sure to be had with these printable preschool bug activities! Included are 19 engaging pages where kids will explore memory games, patterns, handwriting, and more all while having a blast with their favorite creepy crawlies.
Use these printable worksheets at home or in the classroom to make learning feel like play. Colorful flashcards, letter tracing, and scavenger hunts will keep little learners buzzing with excitement. Just print and play!
Try This: Spring Name Craft
Leap into learning with these frog cutting practice worksheets! As kids snip along the lines, they’ll strengthen hand-eye coordination, grip, and focus. These activities go beyond scissor skills – they’ll help little learners count, match, and develop fine motor skills.
Plus, they’ll discover more about these fascinating amphibians along the way! This free printable set includes engaging worksheets that make learning feel like play. Just print, grab some scissors, and start cutting!

These “Spring is Here” printables bring the story of hibernation to life, offering interactive activities for kids aged 3-7. They’ll help build fine motor skills, alphabet recognition, and handwriting practice.
Plus, scissors skills worksheets make it easy to develop coordination while exploring the fascinating world of animals waking up from their winter slumber. Get ready for hours of fun and learning!
Share With Us
Did you make this activity with your kids or students? We’d love to feature them on our social media!
For a chance to have your child’s project featured, simply snap a picture of the completed project and post it to our Facebook page, email it to us directly by clicking here, or use #simpleeverydaymom on your social media!
More Spring Activities
Butterfly Name Craft
Video
Materials
- Colored cardstock or construction paper
- Scissors
- Glue
- Markers
- Butterfly Template
Instructions
- Download the template, print it, and cut out the pieces you need.
- Glue the wing decorations onto the wing piece.
- Lay the wings on the background paper, leaving a space in the middle, and glue them down.
- Glue the body piece in between the wings.
- Glue the eyes onto the butterfly’s face.
- Use the flower letters to spell out the name at the bottom of the butterfly.
- Draw stems under the flowers with a marker.
- Finish by drawing antennae on top of the butterfly’s head.
Did you make this?
Don’t forget to leave a comment below and make sure to follow on Pinterest, Facebook and TikTok for more!
Butterfly Name Craft Template


Meet Sam
Sam is the crafter and founder of Simple Everyday Mom. She has been featured in Oprah Mag, Good Housekeeping, The Spruce Crafts, Country Living, The Bump, and more.


Unable to download craft
Oh, no! Could you tell me what problem you’re running into?
So cute
Aww, thank you!
very cute would love to try this with my kiddos
That’s awesome! All you need to do is click the “Click Here To Get Your Freebie” image at the end of the post and then enter your email in the form and the link will be sent to you. Or if you’re already a subscriber, when you enter your email in the form, it’ll automatically redirect you to the download page ◡̈
These are lovely!
Aw, appreciate that—means a lot!
Such a fun idea for spring. I love anything personalised. Thank you for sharing with us at Handmade Monday 🙂
Aw, thank you! Personalized crafts are the best, especially for spring. Appreciate you joining in!