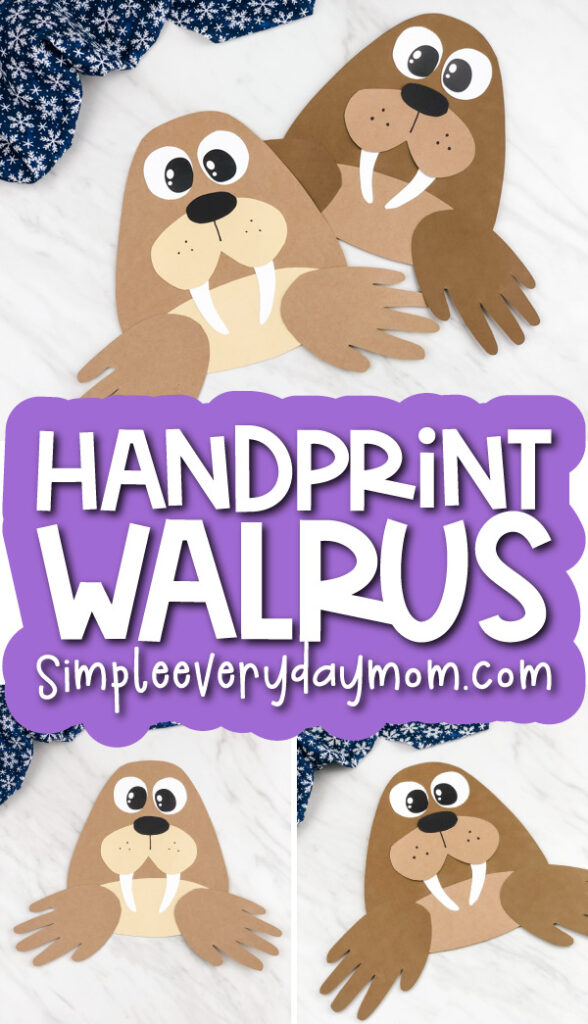
Handprint Walrus Craft For Kids [Free Template]
All activities require adult supervision. By using this site, you agree to our terms of use. This post may contain affiliate links. As an Amazon Associate and a participant in other affiliate programs, I earn a commission on qualifying purchases. Read our disclosure policy.
With winter in full swing and Christmastime coming to a close, it’s the perfect time to switch to winter themed crafts. And while there are tons of different ways you can make winter crafts, we love focusing our crafts on arctic animals.
This handprint walrus craft for kids is a fun and easy craft that the kids will love creating at home or at school. It’s the newest activity we’ve added to our growing collection of winter animal crafts for kids.
We’ve made it super simple to recreate by including our free printable walrus craft template, so don’t forget to download your free copy. Read our simple directions below or watch our step by step video tutorial to see how easy it is.
Walrus Craft For Preschool
Choose Your Download Option
Get your template right now—no ads, no scrolling!
Instant Download
Skip the wait—just $3
Prefer the free version? Just keep reading—the download sign up image is at the end of this post!
Supplies
- Colored cardstock or construction paper
- White card stock
- Black marker
- Scissors
- Glue stick
- Walrus craft template (click the “click here to get your freebies” image at the end of the post)
Directions
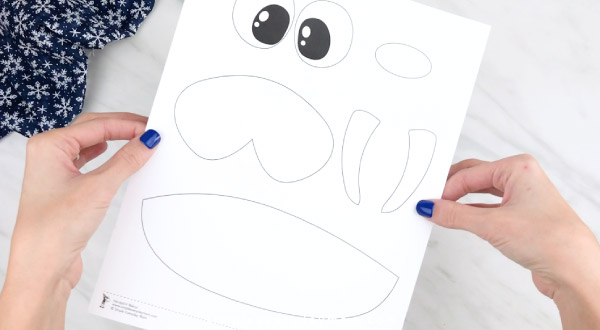
Download the walrus craft template and print it out. There’s an option to print the pieces out on 1-2 pages or print them individually if you want to print them directly onto the colored paper they belong on.
Cut out all your pieces.
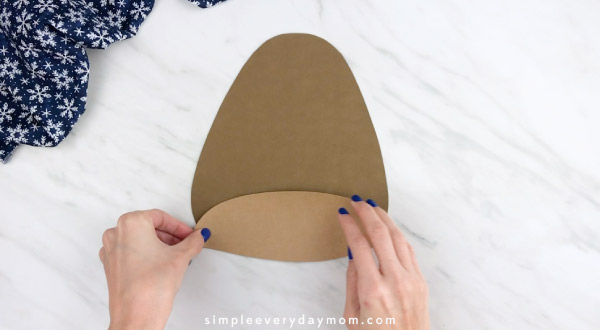
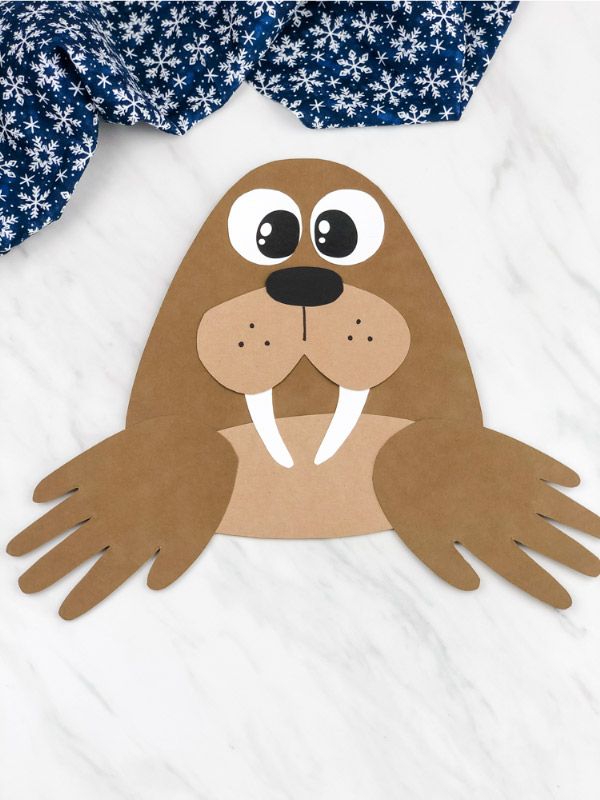
Place the lighter colored walrus belly on the bottom, wider part of the walrus body, and glue it in place. Trim off any excess you may have.
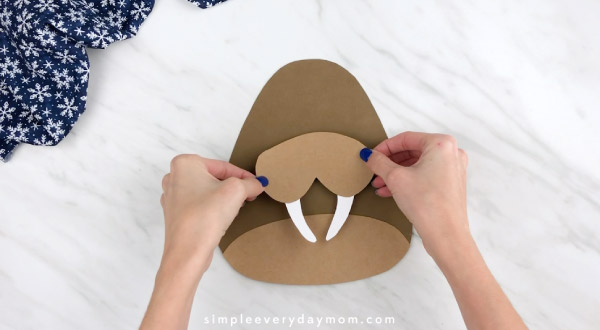
Make the walrus’s muzzle area by gluing the tusks to the back of the muzzle.
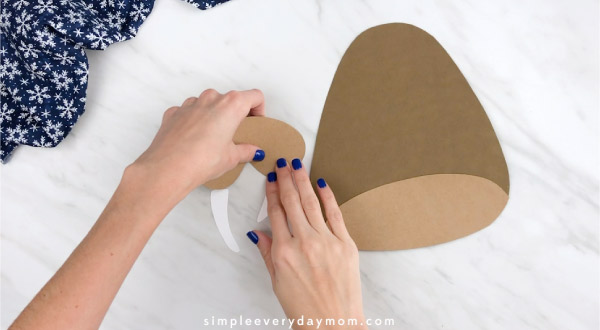
Place the muzzle and tusks just above the lighter belly and glue them in place.
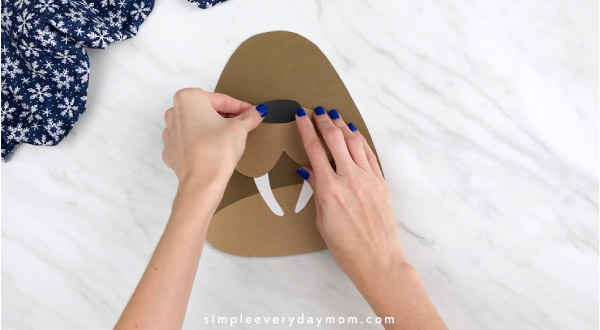
Glue the black nose on the muzzle, with the top part of the nose slightly off the top of the muzzle.
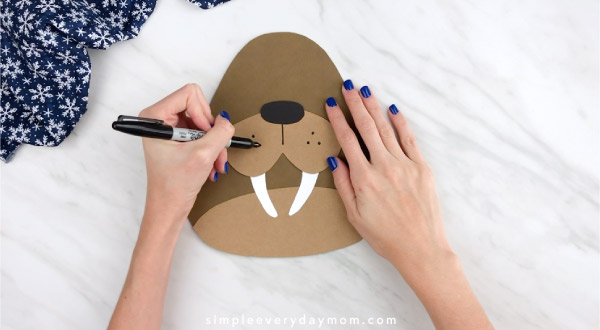
Use the black marker to draw a straight line down an inch or two from the pointy part of the walrus nose. Make some small circles on either side of the nose to represent whisker holes.
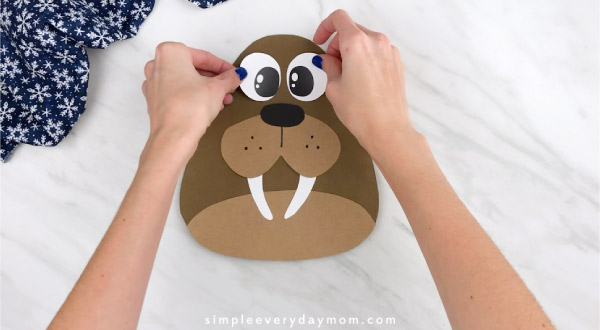
Position the eyes above the nose and glue them in place.
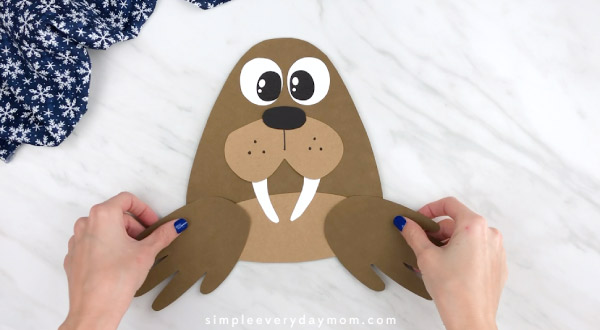
Trace your child’s left and right hands onto the same colored paper you made the walrus’ body from. Cut each one out.
Position the handprints with the thumbs pointing down at a slight angle at the bottom of the walrus’ body. These are the walrus’ flippers. Glue them in place.
Isn’t this walrus so cute?! If you think your kids will love this craft, you should also check out our handprint crafts for kids.
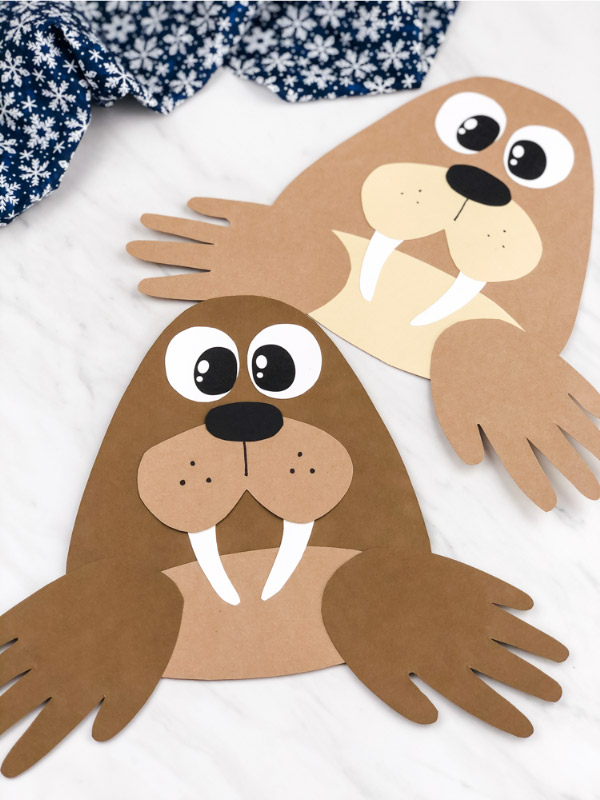
We love both of the ones we made, but our favorite is the dark brown walrus! What kind of walrus will your kids make? Don’t stop at the standard brown walruses. Let your child’s imagination run wild and make a walrus in every color of the rainbow.

Fun Winter Ideas For Kids
Wintertime can be a challenging time to keep little ones engaged and learning from the comfort of home. Stave off boredom by taking advantage of all the wonderful winter activities available – from crafting and to exploring books about cooler climates and learning about winter animals.
These activities can help create opportunities for parents to spend time with their kids while keeping them focused, challenged, and having fun in the process. Whether honing fine motor skills or engaging in imaginative play, there are many ways for everyone in the family to benefit from a winter wonderland at home!
Children’s Winter Books
Go to your local library and pick up these winter books to read with the kids! They’re cute, engaging, and perfect for reading at bedtime. If your kids really love these books, pick them up from Amazon and add them to your home collection.


The Biggest Snowman Ever – When the mayor of Mouseville announces the town snowman contest, Clayton and Desmond claim that they will each make the biggest snowman ever.
The Snowy Day – This story shows a child’s wonder at a new world and the hope of capturing and keeping that wonder forever.
Sneezy The Snowman– Sneezy is COLD! And he’s trying to warm up without success. But, the kids know exactly how to help him!
Winter Crafts For Kids
Photo Eskimo Craft – Winter can be a magical time filled with snow and ice. Dress your little ones up in this adorable Eskimo craft and they’ll look like they have stepped right out of a children’s picture book, ready to explore the winter wonderland! T
Penguin Printable Craft – If you are looking for a fun and creative way to keep your kids entertained and help them practice their scissors skills, why not try a cut and paste penguin craft? It’s a great way for kids to practice gluing pieces together and get familiar with scissors. You’ll love seeing their finished creations proudly displayed on the fridge or around the house – plus it’s a fantastic rainy day activity that is sure to bring out the artist in your young kid!
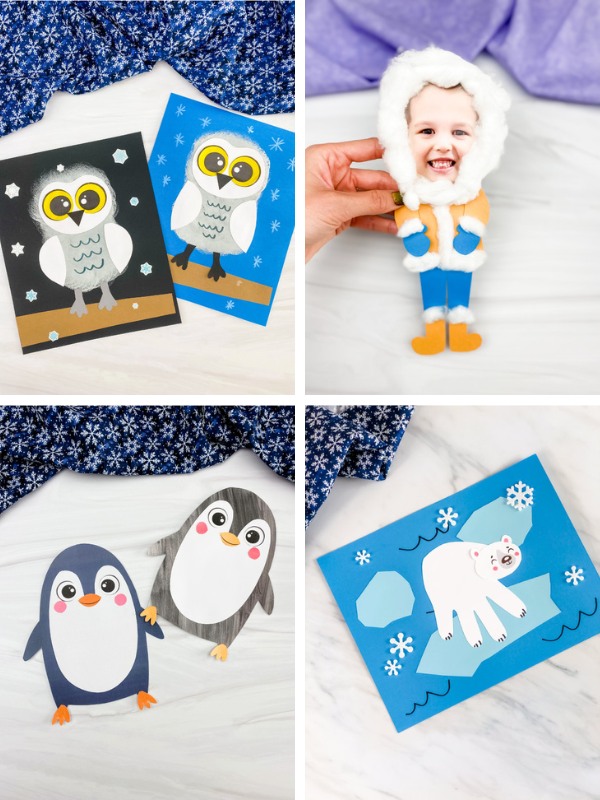
Sponge Painted Snowy Owl Craft – Kids will have a hoot making this simple but oh-so-cute sponge painted snowy owl craft! Its soft, feathery white effect is super easy to achieve by dabbing a paint-soaked sponge over the cardstock. The creative outcome of this fun activity makes it an ideal way for kids to celebrate learning about arctic animals.
Polar Bear Handprint Craft – Kids will love creating their own handprint craft this winter without having to worry about using messy paint. All you’ll need for this fun activity are just a few simple materials such as construction paper, scissors, and glue. Getting creative with this craft is sure to bring lots of smiles and plenty of wintertime joy!
Winter Fun
- Kids will look super cute in this sweet snowman shirt!
- These adorable penguin soaps are great for encouraging kids to wash their hands.
- This penguin playdough kit is great for sensory play!
Share With Us
Did you make this handprint walrus craft with your kids or students? We love seeing how you make our crafts and can’t wait to see how they turn out.
If you have a second, we’d love for you to snap a picture and post it to our Facebook page wall or in our private Facebook group.
Handprint Walrus Craft For Kids
Video
Equipment
- Scissors
Materials
- Colored cardstock or construction paper
- Black marker
- Scissors
- Glue stick
- Walrus craft template
Instructions
- Download the walrus craft template, print, and cut out all of the pieces.
- Place the lighter colored walrus belly on the bottom, wider part of the walrus body, and glue it in place. Trim off any excess paper from the bottom.
- Take the walrus muzzle and glue the tusks to the back of the muzzle.
- Place the muzzle and teeth slightly above the belly and glue them in place.
- Glue the black nose on the muzzle, with the top part of the nose slightly off the top of the muzzle.
- Use the black marker to draw a straight line down an inch or two from the pointy part of the walrus nose. Make some small circles on either side of the nose to represent whisker holes.
- Position the eyes above the nose and glue them in place.
- Trace your child’s left and right hands onto the same colored paper you made the walrus’ body from. Cut each handprint out.
- Position the handprints with the thumbs pointing down at a slight angle at the bottom of the walrus’ body. These are the walrus’ flippers. Glue them in place.
Did you make this?
Don’t forget to leave a comment below and make sure to follow on Pinterest, Facebook and TikTok for more!
Free Handprint Walrus Craft Template


Meet Sam
Sam is the crafter and founder of Simple Everyday Mom. She has been featured in Oprah Mag, Good Housekeeping, The Spruce Crafts, Country Living, The Bump, and more.


thank you!!
You’re welcome!
Where is the box to put your email into get the template??
It’s near the end of the post, above the comments. If you aren’t able to see it, it’s most often because a firewall is blocking it from appearing.
hola me lo podéis enviar por favor.
Of course! All you need to do is enter your email in the form at the end of the post and the link will be sent to you 🙂
cant wait to try this!
Happy to hear that! Hope they enjoy it!
Where do I download the template?
All you need to do is enter your email in the form at the end of this post to have the link sent to you ?
I think it would be wonderful if pictures and videos for children’s crafts were made by photographing and video taping the child doing it.
That would be great! My kids are growing too fast though; they don’t want to do them!
I would love the walrus template. Thanks.
Of course! All you need to do is enter your email in the form at the end of the post to have the link sent to you ?
Is the walrus template available to download?
Yes! All you need to do is enter your email in the form at the end of this post to have the link sent to you ?
Walrus handprint template
Of course! All you need to do is enter your email in the form at the end of this post and it’ll be sent to you ?
@Sam T, it doesn’t exist on our end.
The form is above the comments section, under the heading titled “Free Walrus Template”. If you’re not able to see it, it most likely means you have a firewall or adblocker blocking it from appearing. If you can allow the page or try from a personal device, you should be able to see it. Also, some readers say they’re not able to see it on Chrome, but they can on other browsers. You may be able to try that as well ◡̈
Walrus handprint template
All you need to do is enter your email in the form at the end of this post and it’ll be sent to you ?
Walrus handprint template
All you need to do is enter your email in the form at the end of this post to have the link sent to you ?
Walrus handprint template
All you need to do is enter your email in the form at the end of this post to have the link sent to you ?
walrus handprint template
All you need to do is enter your email in the form at the end of this post and the link will be sent to you ?
Thanks
I love it
You’re very welcome!
This is so cute! It would be so fun to pair with a story book of snowy animals for preschoolers.
Thanks Christina! Great idea!