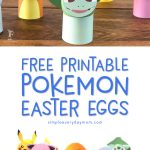
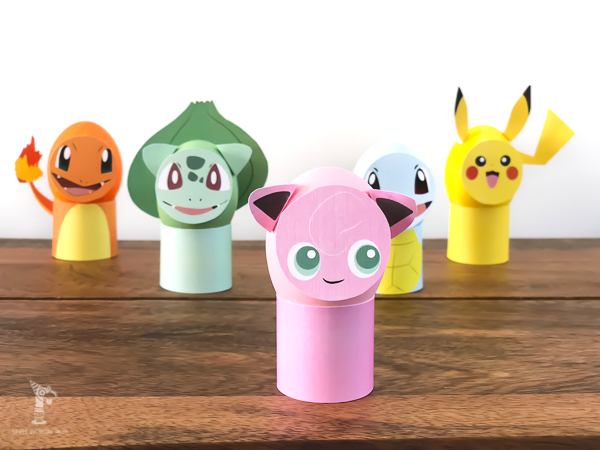
DIY Pokemon Easter Eggs [Free Printable]
All activities require adult supervision. By using this site, you agree to our terms of use. This post may contain affiliate links. As an Amazon Associate and a participant in other affiliate programs, I earn a commission on qualifying purchases. Read our disclosure policy.
Are you ready to add a little Poké-fun to your Easter celebrations?
Get ready for Easter by having the kids create their own DIY Pokemon Easter eggs. It’s the newest addition to our growing collection of easy Easter crafts for kids!
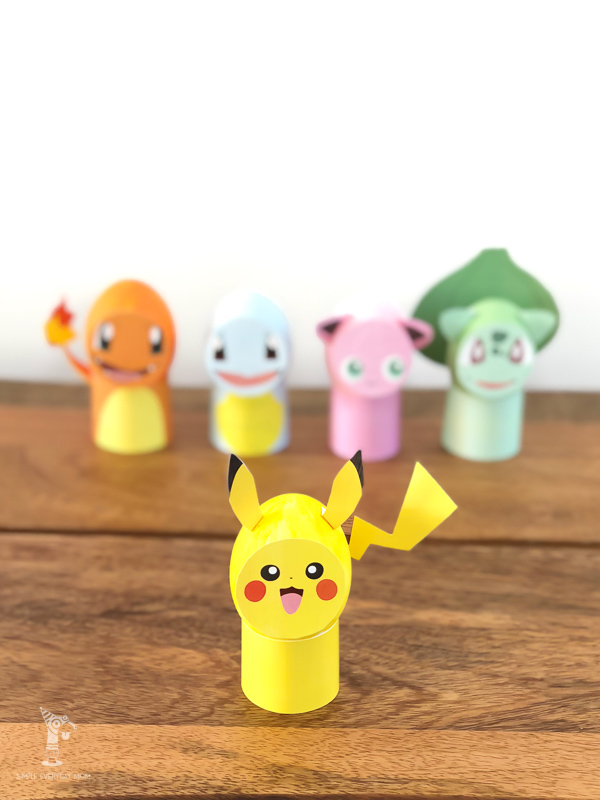
Our DIY Pokemon Easter Eggs are adorable and also super easy to make. With the free printables, you’ll have everything you need to transform ordinary eggs into your favorite Pokemon characters.
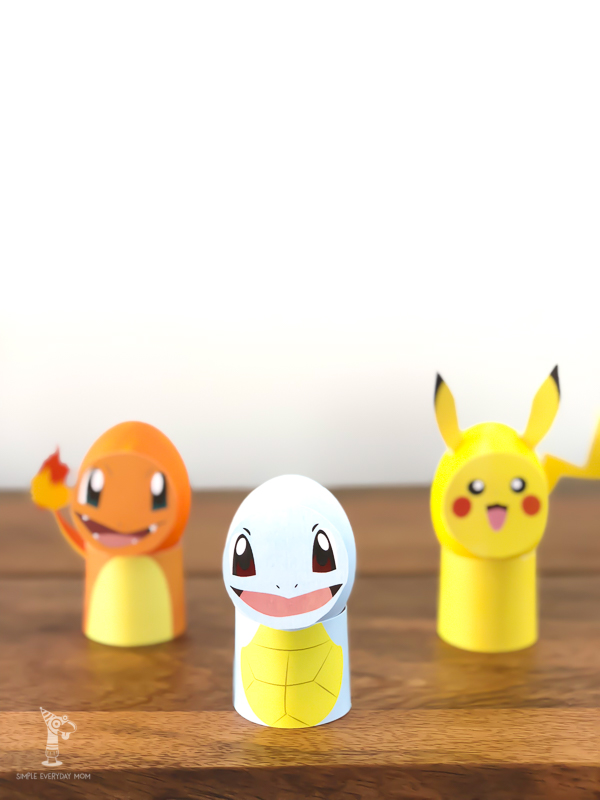
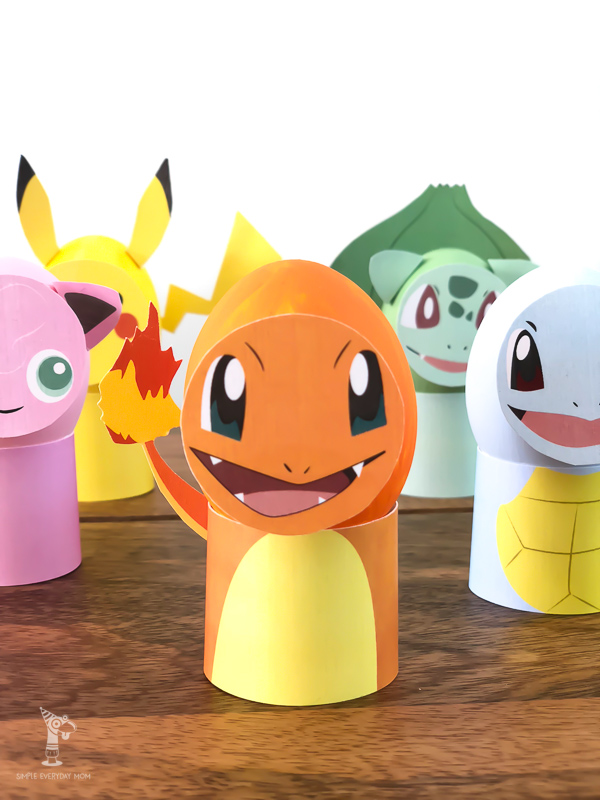
From Pikachu to Bulbasaur, you can make your favorite Pokemon to hide around the garden or house.
But that’s not all! While the kids will enjoy making the eggs, they’ll also be honing their fine motor skills, boosting their creativity, and learning the value of patience as they carefully craft each Pokemon character.
Read on to learn how to create your own at home!
Pokemon Egg Decorating Idea
Before we start, let’s ensure your little ones have supplies. Oh, and don’t forget the most important ingredient—a hefty dose of imagination!
Now, with your kids ready and eager, it’s time to make their favorite Pokemon. Ready? Let’s get cracking!
Supplies
- Pokemon Easter Egg Printables (click the “click here to get this freebie” image at the end to open the form)
- Color Copy Digital Cover Paper (or any thick, white cardstock)
- Scissors
- Paper Trimmer
- Glue Dots
- Eggs
- Acrylic Paint:
- Pikachu: Bright Yellow
- Bulbasaur: Spring Green
- Jigglypuff: Baby Pink
- Squirtle: Sky Mist
- Charmander: Bright Orange
Directions
Before starting egg decorating, let’s get our eggs prepped and perfect for some artistic fun. If your little one is old enough, have them help you hard boil the eggs. It’s a great way to introduce them to cooking!
Or, for a no-cook option, let your kid be the magician and gently blow out the egg’s insides using two tiny holes, one on each end. Just use a sewing needle to make the holes.
And if you want it to be super easy, use the faux eggs linked in the supplies above.
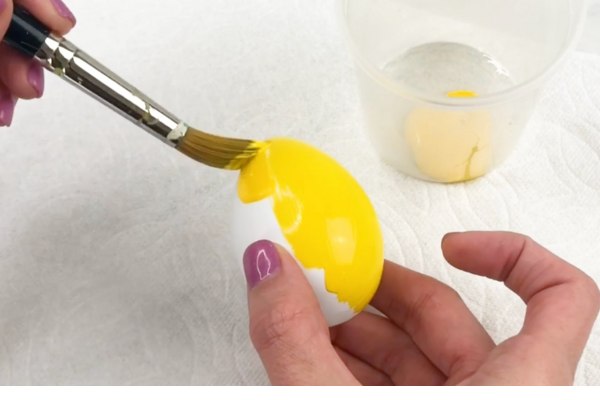
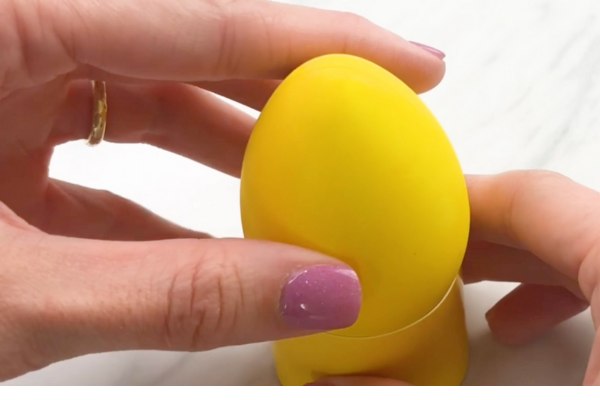
Once your eggs are all set, it’s time to add some color! Guide your kiddo to paint each egg with the color of their choice.
Remember, patience is key, we’re going for about 4-6 thin coats to achieve that smooth, even look. Let your kid take the lead and watch their little masterpiece come to life!
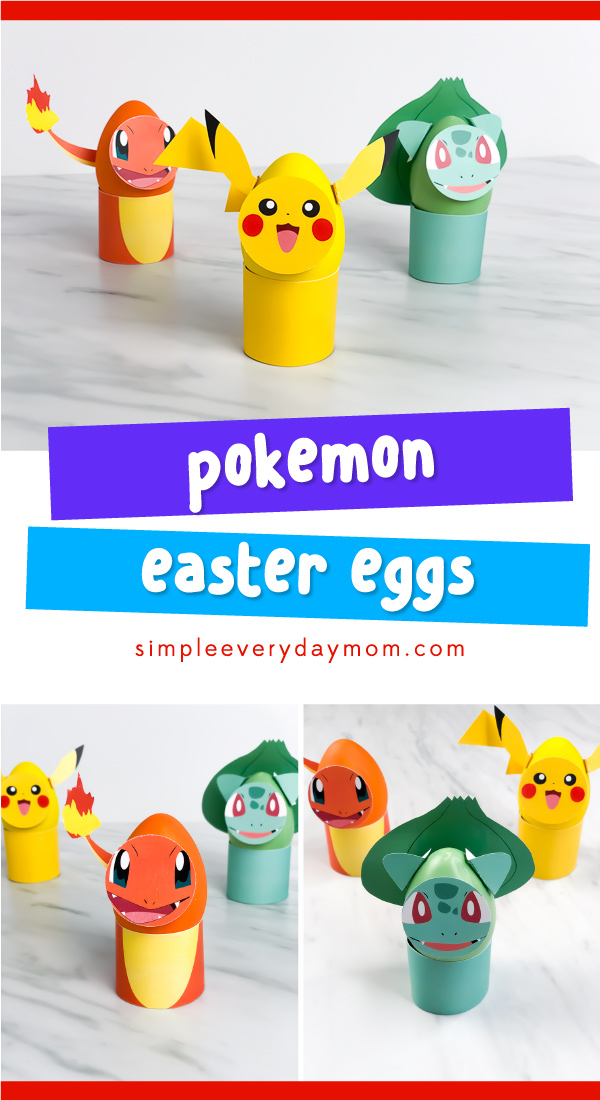
Next, print out all the adorable printables on sturdy white paper. Then, have your kid join in on the cutting fun—snip out the base wraps, heads, ears, and tails, and don’t forget Bulbasaur’s iconic flower.
Now, let’s bring these characters to life! Wrap the base piece around the egg to determine the right size, then secure it with some tape or a glue dot.
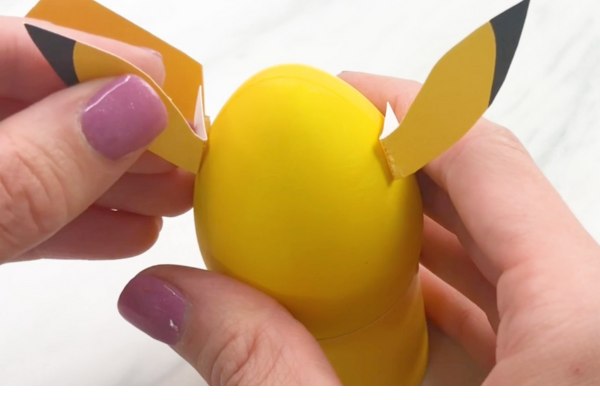
Help your kid place the egg on the base wrap, and then let them glue Pikachu’s tail to the back and bottom of the egg.
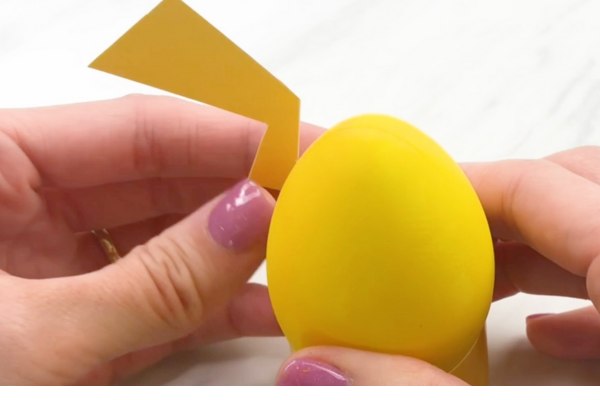
Now we’re going to attach Pikachu’s iconic ears to both sides of the egg. Use Elmer’s glue or hot glue if you don’t want any gaps between the paper and the egg. If you don’t mind a gap, you can use a glue dot to attach them instead.
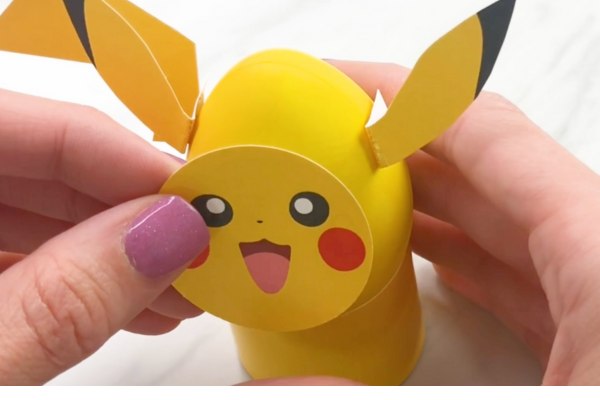
Finally, you’ll grab the face piece and use a glue dot to press it onto the front of the Pikachu egg.
Now your Pokémon egg is done! If you’re looking for more crafting fun, we have some awesome popsicle stick crafts to keep the creativity flowing!
More Easter Activities For Kids
We’ve got a fresh batch of exciting ideas that are sure to keep the kids entertained and engaged this Easter season. From creative crafts to interactive books, we’ve got it all covered!
Below is our carefully curated selection of interesting books, crafts, and printables. These resources are not just fun—they’re also educational! They’re designed to help your kids develop fine motor skills, hand-eye coordination, and more while having a blast.
So, let’s dive in and start the fun!


Books For Kids About Easter


Happy Easter Mouse – Everyone knows Mouse from the classic If You Give A Mouse A Cookie book, but now he’s back and ready to celebrate Easter! Kids will love watching him as he goes on an Easter egg hunt!
Pete the Cat: Big Easter Adventure – Join Pete as he races to help the Easter bunny just in time for Easter! This is another new classic kids rate as a must-have!
It’s Not Easy Being A Bunny – Follow PJ the bunny as he tries to discover what kind of animal he’d rather be instead of a bunny! It’s a silly story with a great lesson.
Printable Easter Crafts
Want more Easter craft ideas for kids? Each of these crafts is designed to be more than just a pastime; they’re stepping stones in developing a range of cognitive and motor skills, wrapped up in layers of Easter fun!
Check out some of our most popular printable Easter crafts:
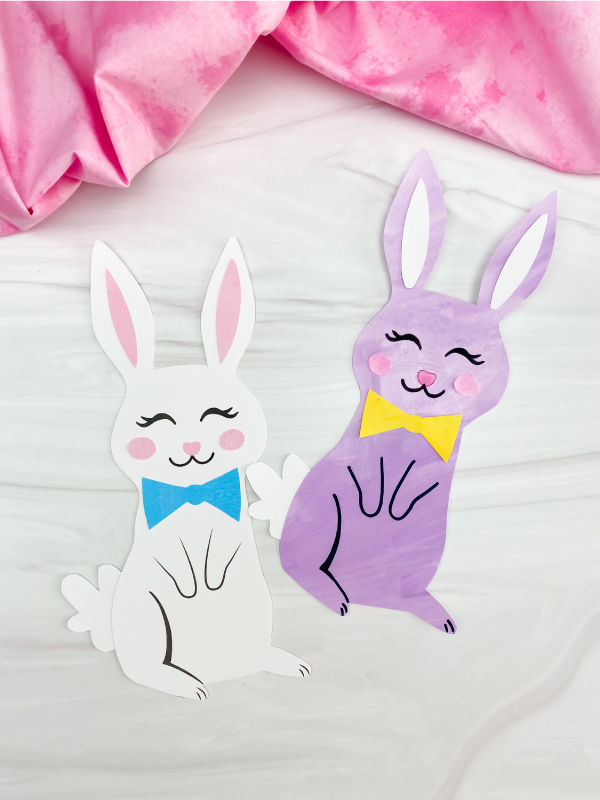
Handprint Bunny Craft: This craft is a hit for its simplicity and adorableness. It’s a simple paper craft and one of our most popular Easter crafts! As kids trace, cut, and glue, they’re enhancing their fine motor skills and learning to follow instructions.
Chick Handprint Card Craft – This cute little chick pairs perfectly with the bunny for a charming Easter display. This craft is a delightful way for children to express their creativity while working on their dexterity and coordination. Plus, it’s a sweet handmade card that family members will treasure.
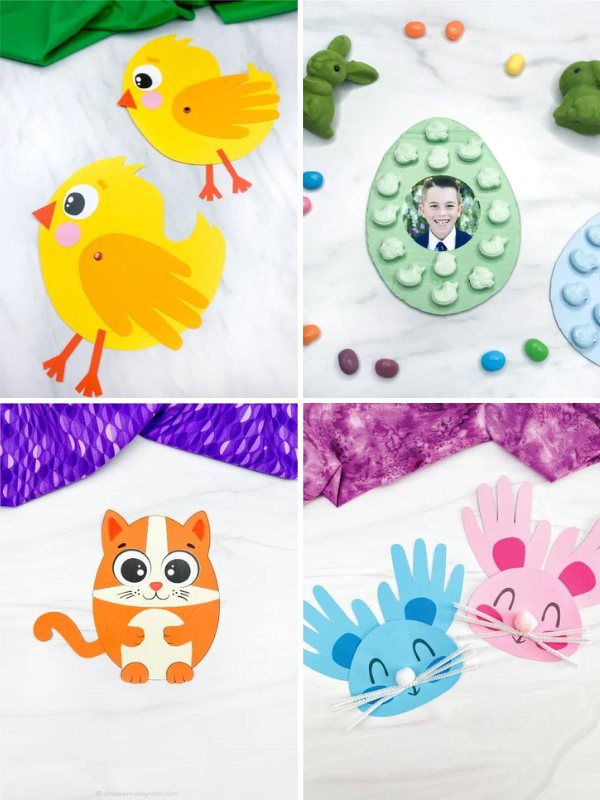
Easter Egg Photo Craft – Do you receive a lot of Easter candy and are unsure what to do with it? Turn those sweets into this cute Easter egg!
This craft is a fantastic way to use leftover candy while making something memorable. It’s a sweet twist on the traditional Easter egg, turning it into a picture-perfect moment.
Easter Egg Cat Craft – For all the cat lovers out there, this idea is purr-fect! It’s a fun, easy, and creative activity that’s perfect for little hands to make and display during the Easter season.
Free Kindergarten Easter Printables
Each printable below is designed to be both fun and educational, ensuring that your kindergartener’s learning journey continues even during the holiday season.
So, check out some of our printables where your child can pick up essential skills while immersed in the festive fun of Easter.
Our chick cutting practice worksheets are a cut above the rest! These sheets may also help improve your kid’s hand-eye coordination and scissor skills.
Then, there’s our adorable bunny worksheets pack. It’s a bunny bonanza with activities like the ‘Label a Bunny’ worksheet, which helps with word recognition and vocabulary. The ‘B is for Bunny’ letter maze and handwriting page are perfect for practicing letter recognition and penmanship.
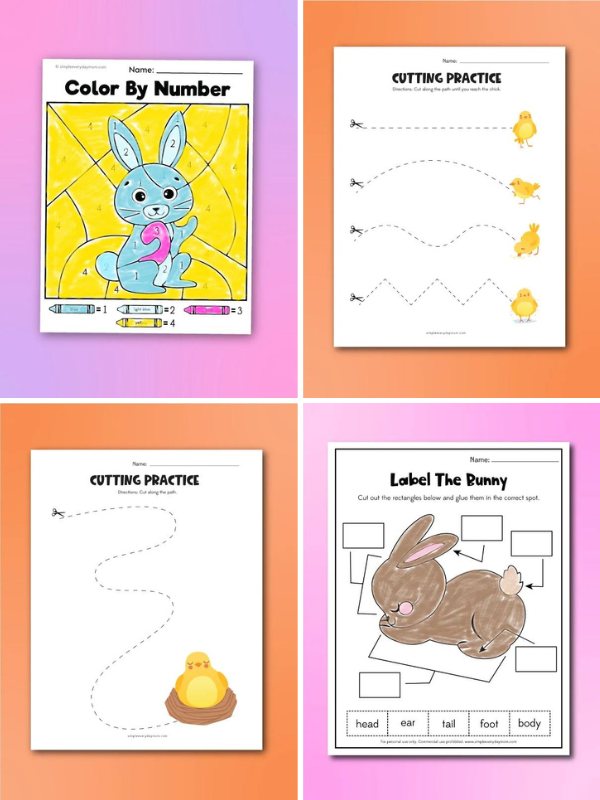
Don’t miss out on our Easter color by numbers! These printables are perfect for helping your child work on fine motor skills and color recognition. They’ll learn to distinguish between different colors and enjoy the satisfaction of revealing a hidden image. Plus, it’s a sneaky way to weave in some number practice, too!
Pick these these Easter counting sheets to make learning numbers as enjoyable as an Easter egg hunt. Each sheet is bursting with activities focused on direction, tracing, coloring, and counting. With the added fun of counting out jelly beans, your child will be mastering numbers before you know it!
Share With Us
Did you make this activity with your kids or students? We’d love to feature them on our social media!
For a chance to have your child’s project featured, simply snap a picture of the completed project and post it to our Facebook page, email it to us directly by clicking here, or use #simpleeverydaymom on your social media!
More Easter Ideas For Kids
DIY Pokemon Easter Eggs
Video
Materials
- Pokemon Easter Egg Printables
- Color Copy Digital Cover Paper or any thick, white cardstock
- Scissors
- Paper Trimmer
- Glue Dots
- Eggs
- Acrylic Paint: bright yellow spring green, baby pink, sky mist, and bright orange
Instructions
- Depending on your kids' ages, you may need to do some prep work to prepare the eggs for decorating. You can hard boil your eggs or use a sewing needle to punch two holes and blow them out. You could also use wooden eggs.
- Once your eggs are prepared, paint each egg the corresponding color.
- I found that painting each egg with about 4-6 thin coats gives a more even look.
- Print out all the printables on thick, heavy, white paper. Cut out the base wraps and the corresponding heads, ears, tails, and Bulbasaur’s flower.
- Wrap the base piece around the egg to determine the size needed, then secure with tape or a glue dot.
- Place the egg on the base wrap and then use a glue dot to secure the tail to the back and bottom of the egg.
- Use Elmer’s glue or a hot glue gun to glue the ears on both sides of the egg, so there won't be any gap. If you don't mind the gap, use a glue dot to attach them.
- Finish up by gluing the face to the front and middle of the egg.
Did you make this?
Don’t forget to leave a comment below and make sure to follow on Pinterest, Facebook and TikTok for more!
Pokemon Easter Egg Printables


Meet Sam
Sam is the crafter and founder of Simple Everyday Mom. She has been featured in Oprah Mag, Good Housekeeping, The Spruce Crafts, Country Living, The Bump, and more.


thanks
my grandson will love this
You’re so welcome! Hope your grandson has a great time with it!
I would love printout but can’t find where I put email
Of course! All you need to do is click the “Click Here To Get Your Freebie” image at the end of the post and then enter your email in the form Once you’ve been confirmed as an email subscriber (by clicking the link in the first email), you simply enter your email in any of the forms and it’ll automatically redirect you to the download page.
Can I have the Pokémon things to cut out for the eggs
Of course! All you need to do is enter your email in the form at the end of this post to have the link sent to you ?
Hi could i please grab the free printable pokemon egg characters ASAP?
Of course! All you need to do is enter your email in the form at the end of the post to have the link sent to you ?
My 10 year old son is obsessed with Pokémon. He is celebrating his birthday this weekend with a Pokémon theme. And since Easter is around the corner, I’m planning on using the printables to create fun decor and treats for his party. I’ll be using chocolate eggs.
How fun! My 10 year old is currently obsessed with Pokemon trading cards right now too! Chocolate eggs sound delicious!
I’d love to make these. how do I get the download?
All you need to do is enter your email in the form at the end of the post and it’ll be sent to you ?
My little neighbors are going to love this craft. They recently had a Pokemon birthday party. Thank you! Cathy
Yay! So glad to here it.
My son used to love Pokemon when he was little (he’s 25 now!). These are so cute. Thank you for sharing your Pokemon Easter Eggs with the Hearth and Soul Link Party. Pinning!
Oh, thanks so much April! And thanks for hosting the link up 🙂
You should consider re-titling this to “kids” will like, rather than stating it is for boys. Pokemon is for everyone and most of the fans I know are actually girls.
Hey Heather! Yes, you’re right, I’m sure there are many girls who love it too. I must be surrounded by too many boys ?
We will be giving these a go over the Easter holidays for sure. They look ok to do even for the non crafty like me!! #brilliantblogposrs
Hey Laura! Lol, yes, they’re so easy 🙂 Thanks for stopping by!
Very cute and I know they will be a big hit with the kids! Pinned and shared. Thanks for linking up at Welcome Spring Link Party.
Hey Carol! Thanks so much and thanks for hosting 🙂
My husband and kids would love this!!
Hi Hil! That’s great to hear. Thanks so much for popping by 🙂