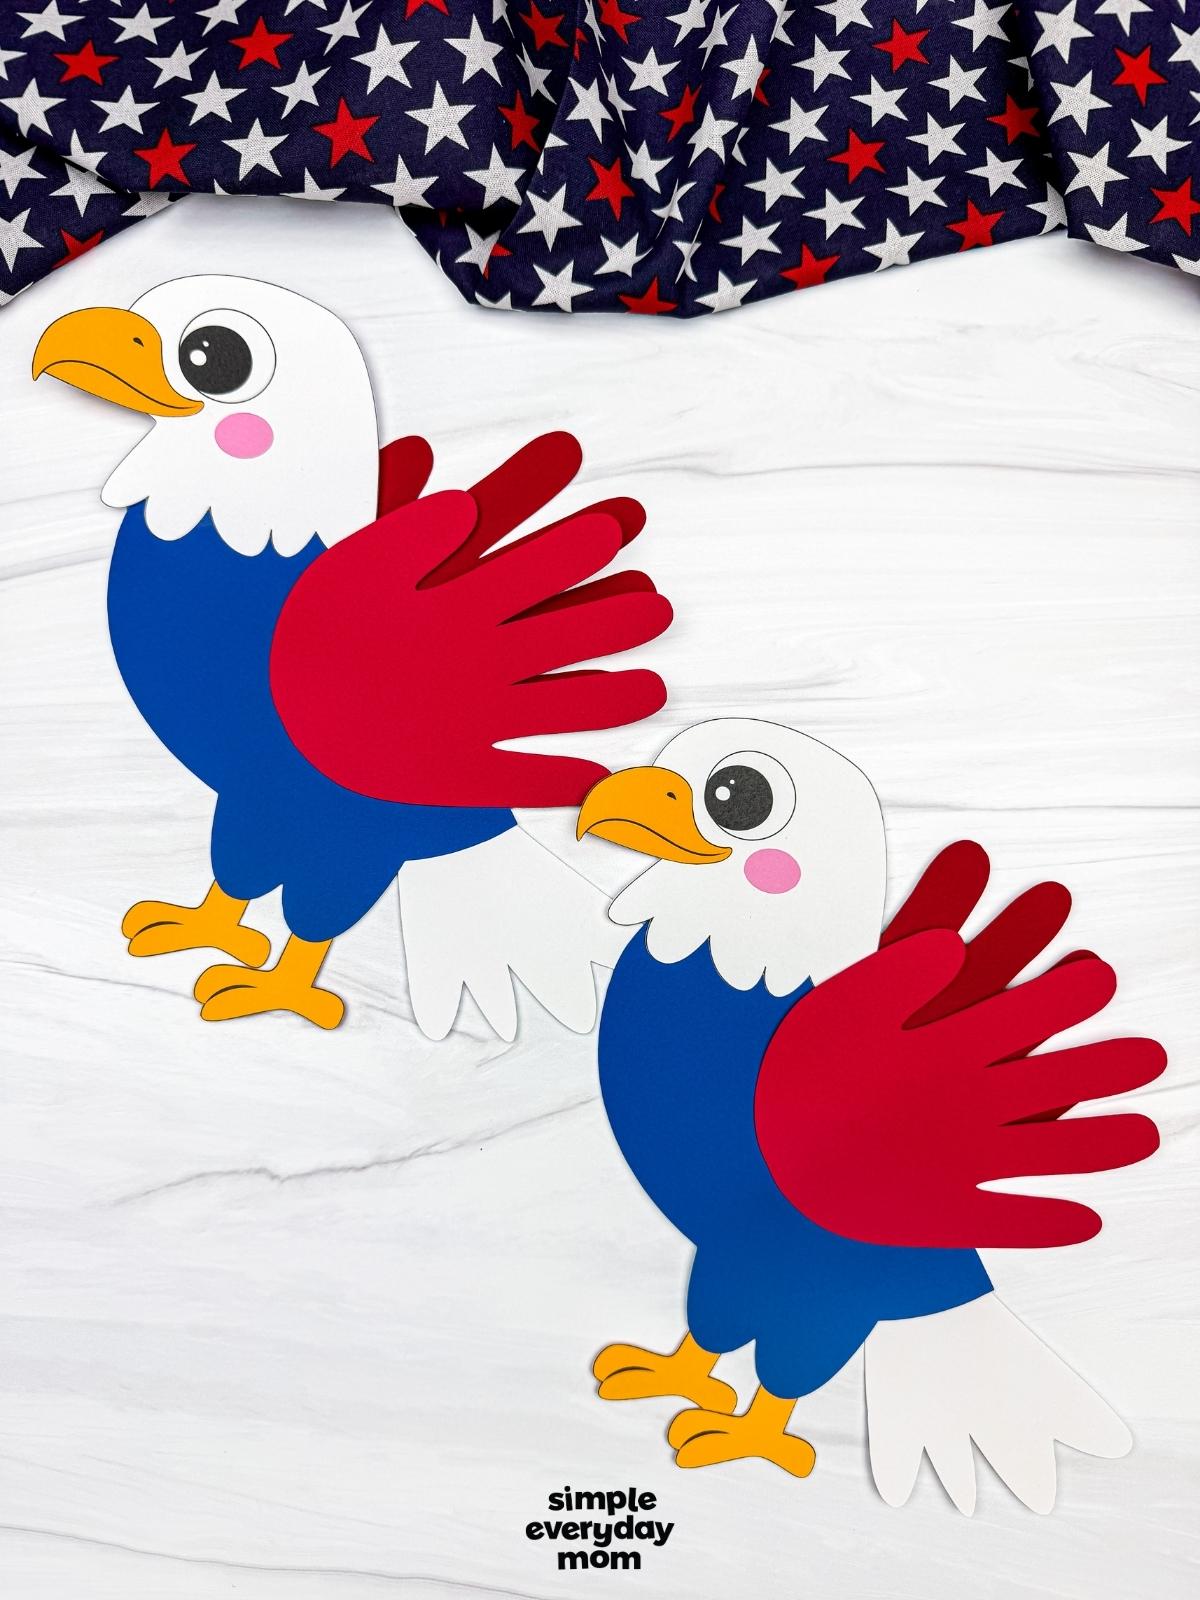
Salt Dough Handprint Christmas Ornaments
All activities require adult supervision. By using this site, you agree to our terms of use. This post may contain affiliate links, sponsored links, and ads. As an Amazon Associate and participant in other affiliate programs, I earn from qualifying purchases.. Read our disclosure policy.

This Christmas preserve your little one’s hand with these salt dough handprint ornament keepsakes.
Once you become a parent, you realize how amazingly fast your children grow! This is exactly why we love handprint crafts for kids.
They are the perfect way to have a sweet reminder of your child’s adorable little hands!
If you want to take a second, slow down and preserve those memories of your children as little ones, you’ll love making these salt dough handprint ornaments. Plus, kids will have blast doing this Christmas art project.
Read on below to see how to transform your child’s handprint into some very cute Christmas characters!
Salt Dough Handprint Ornaments
Salt Dough Supplies
- 2 cups flour
- 1/2 cup salt
- 3/4- 1 cup water
- Non-Stick Rolling pin
- Cookie sheet
- Plastic straw
- Sharp knife
- Parchment paper
Salt Dough Ornaments Recipe
Preheat the oven to 200 degrees. Mix the flour with the salt until it’s fully incorporated.
Add the water a little bit at a time until the mixture is soft and not crumbly.
Using the kneading hook of a stand mixer or your hands, knead the dough for about 5-10 minutes. Roll the dough out to the desired thickness. I did mine about 1/4″ thick.
Press your child’s hand firmly into the dough to get an impression of their hand and cut out around it using the knife.
Use the straw to make a hole in the ornament where the ribbon will be. Note: Be sure not to use my pictures for a reference! I didn’t think about the direction the ornaments would hang and did all the holes in the same spot. Learn from my mistakes 🙂
For the elf, reindeer, and snowmen make the hole towards the top of the middle finger. For the penguin, make the hole in the bottom of the palm.
Place it on the parchment lined cookie sheet and bake for 1-2 hours.
Let cool completely before painting.
Note: If your ornaments are thinner they will bake faster. Just check and make sure the ornaments are fully cooked and not doughy. I didn’t cook one of mine enough and it became cracked after I decorated it.
Decorating Supplies
- Paintbrushes
- Acrylic paint
- Paint pens (optional, but easier for the details)
- Sealant (a spray like this or glaze like this)
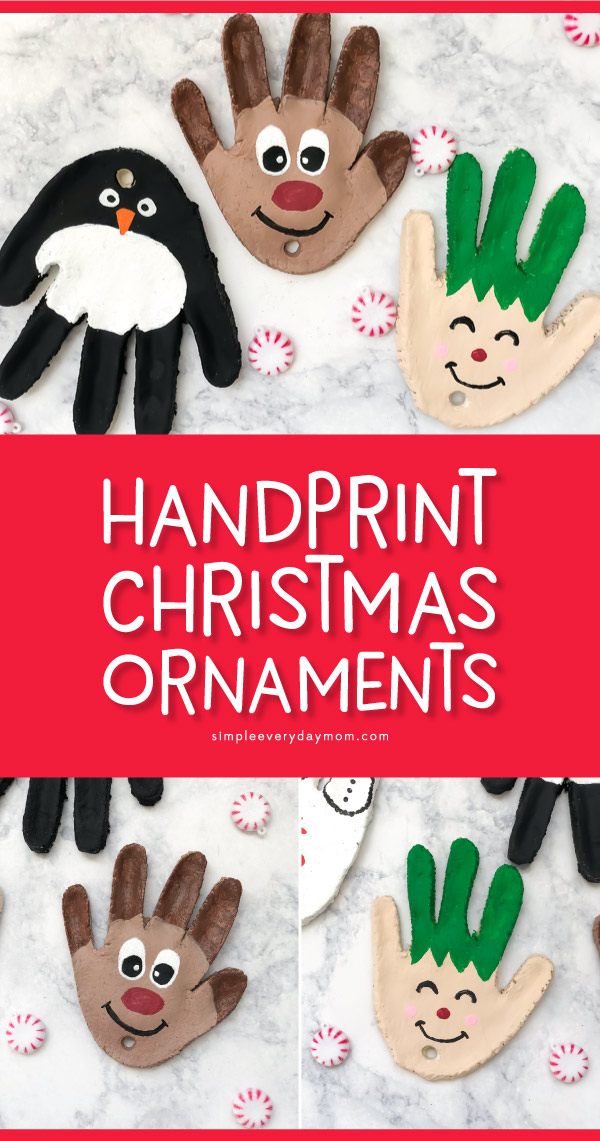
Elf Handprint Ornament
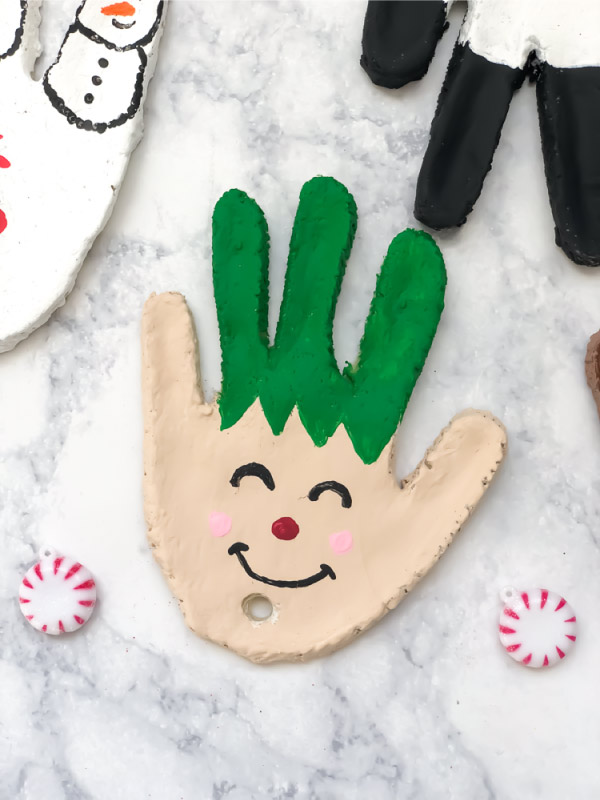
Paint the palm of the hand plus the pinky finger and thumb in a skin tone paint.
Let dry for a minute or two, then paint the three middle fingers a bright green. Extend the paint downward in triangles to make the elf’s hat.
Using the paint pens or a paintbrush, draw two happy eyes, a red nose, pink cheeks, and a smile.
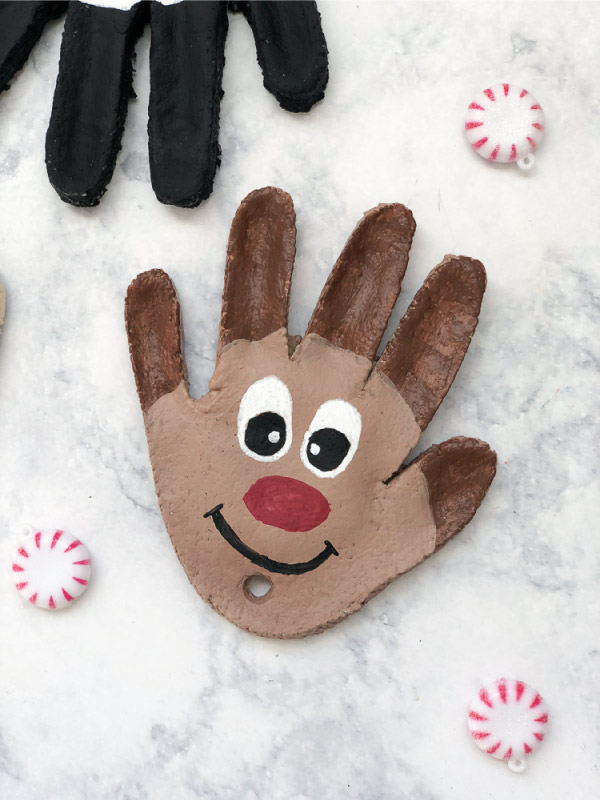
Reindeer Handprint Ornament
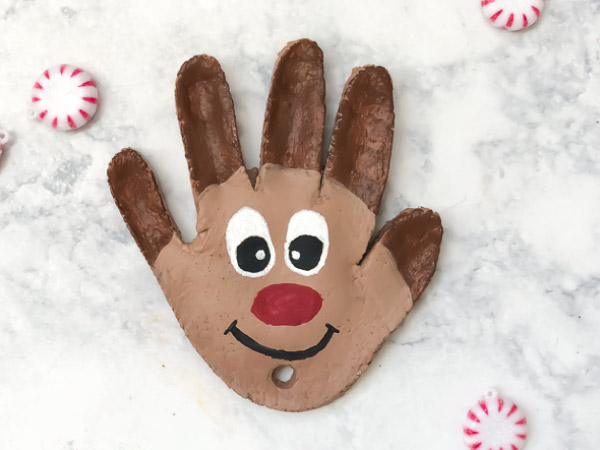
Paint the entire hand in a medium brown and let dry for a few minutes.
Paint the tips of the fingers dark brown. Using paint pens or a paintbrush, paint on the eyes, red nose, and smile.
Penguin Handprint Ornament
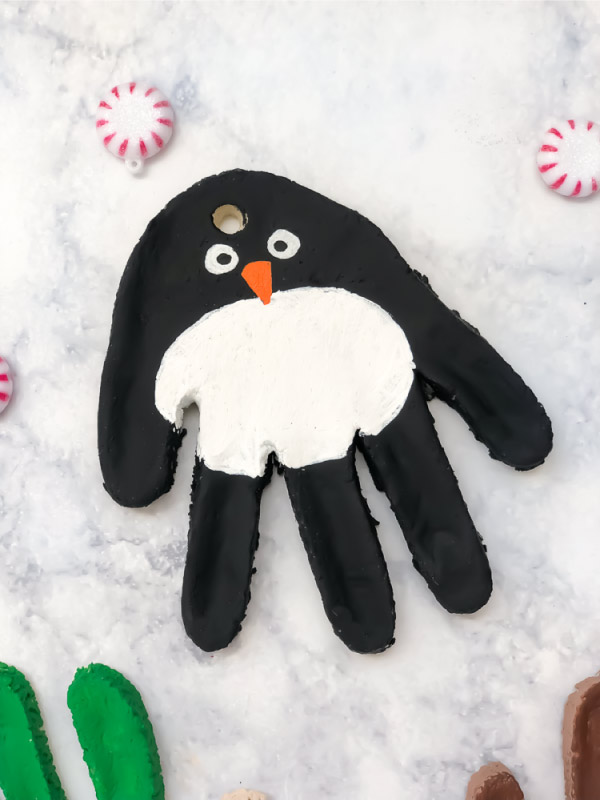
Paint the entire hand black and let dry for several minutes.
When the black is 100% dry (don’t rush this part or the paint will blend together), paint on eyes and a small orange beak on the bottom of the palm.
Next, paint a big, round white belly beneath the beak and down to the end of the palm.
Snowmen Handprint Ornament
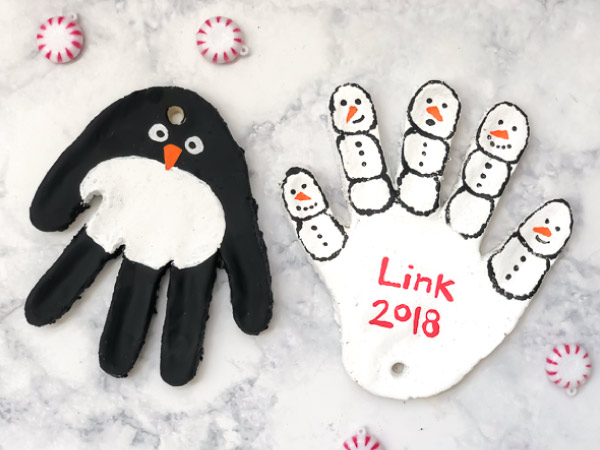
Paint the entire hand white and let it dry. Using a black paint pen or a dotting tool and paint, dot on the snowmen’s eyes, mouth, and coal buttons.
Use an orange paint pen to draw on the carrot nose. Next, outline the fingers to look like snowballs with black paint.
Have your child paint or write their name and the year in the middle of the palm.
Once you’ve finished painting your ornaments, spray or brush on a sealant to preserve them.These salt dough handprint ornaments are so cute and make a great keepsake for years to come!
Christmas Fun
- Have Santa accidentally drop his sleigh driver’s license for some festive magic!
- These reindeer candy cane sleeves are a great small gift for the classroom or friends.
- Grab your kids one of these cute personalized drink tumblers.
Share With Us
Did you make this handprint craft with your child or class? If so, we’d love for you to share it with us on our Facebook page.
Salt Dough Handprint Ornaments For Christmas
Equipment
- Non-Stick Rolling pin
- Cookie sheet
- Plastic straw
- Sharp knife
- Parchment paper
Materials
- 2 cups flour
- 1/2 cup salt
- 3/4- 1 cup water
Instructions
- Preheat the oven to 200 degrees.
- Mix the flour with the salt until it's fully incorporated.
- Add the water a little bit at a time until the mixture is soft and not crumbly.
- Using the kneading hook of a stand mixer or your hands, knead the dough for about 5-10 minutes.
- Roll the dough out to the desired thickness. I did mine about 1/4" thick.
- Press your child's hand firmly into the dough to get an impression of their hand and cut out around it using the knife.
- Use the straw to make a hole in the ornament where the ribbon will be. Note: Don't use my pictures for a reference! I didn't think about the direction the ornaments would hang and did all the holes in the same spot. Learn from my mistakes 🙂
- For the elf, reindeer, and snowmen make the hole towards the top of the middle finger.
- For the penguin, make the hole in the bottom of the palm.
- Place it on the parchment lined cookie sheet and bake for 1-2 hours.
- Let cool completely before painting.
Did you make this?
Don’t forget to leave a comment below and make sure to follow on Pinterest, Facebook and TikTok for more!

Meet Sam
Sam is the crafter and founder of Simple Everyday Mom. She has been featured in Oprah Mag, Good Housekeeping, The Spruce Crafts, Country Living, The Bump, and more.


Approximately how many ornaments does this recipe make?
Hmm, it’s been a while since we made this so I can’t remember exactly…It’ll depend on the size of hands and thickness but we made at least 4. Not sure if we had extra ?
How do you preserve these? I made one last year and when it was humid this summer, it started to get soft again. How do you permanently harden them? Is there a coating or something to dip them in?
You can coat it in Mod Podge or use a clear coat sealing spray like this one: https://www.amazon.com/dp/B001144TJC/ref=nav_timeline_asin