Unicorn Paper Bag Puppet Craft For Kids [Free Template]
All activities require adult supervision. By using this site, you agree to our terms of use. This post may contain affiliate links. As an Amazon Associate and a participant in other affiliate programs, I earn a commission on qualifying purchases. Read our disclosure policy.
Unicorns are more than just mythical creatures. They represent the magical and whimsical, which is exactly what kids love to explore!
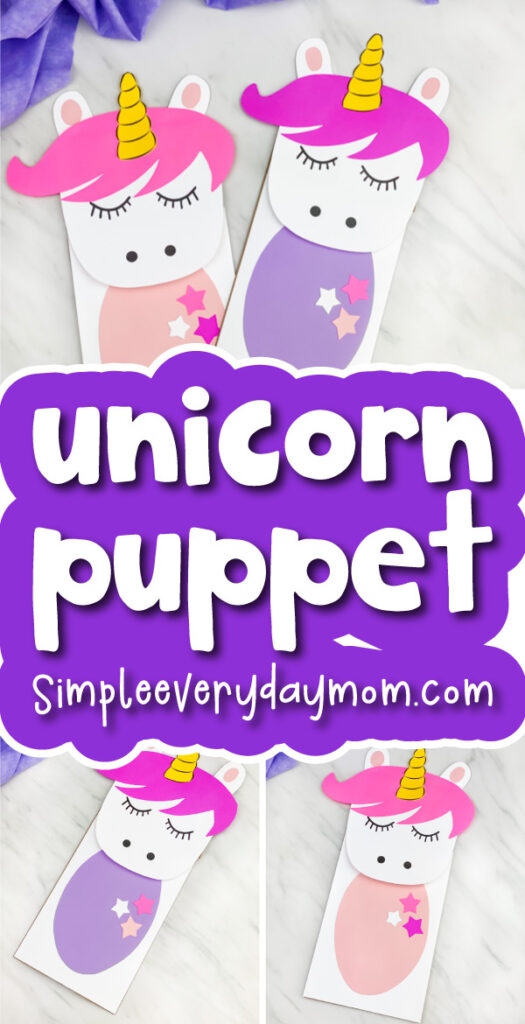
Bring the fun of unicorns into your home or classroom with this easy unicorn paper bag puppet craft! Kids will love creating their own unicorn puppet in just a few easy steps.
All you need are some paper bags and other simple supplies. This is the perfect project for kids of all ages – especially those who love unicorns! Your little ones can unleash their creativity and also work on fine motor skills as they assemble their cute unicorn paper bag puppet.
Download our free printable template and check out the step-by-step instructions below to get started!
We have many more fun unicorn crafts for you and your kids to enjoy! There’s something for everyone, so take a look at the whole collection and let the unicorn crafting begin.
Unicorn Puppet Craft
Even though unicorns have been popular for a few years now, we just can’t get enough.
This magical unicorn craft uses minimal supplies such as paper, a paper bag, and some common household crafting supplies. This means it is easy to get started and cheap to make!
We think this paper bag unicorn puppet would go perfectly as an activity at a little girl’s unicorn birthday party! You could have all the supplies ready to go or display them on the party table.
Supplies
- Brown or white paper bag
- Colored card stock (in yellow and unicorn colors like pink, purple, etc)
- White card stock
- Scissors
- Glue stick
- Unicorn template (click the “click here to get your freebie” image at the end of the post)
Directions
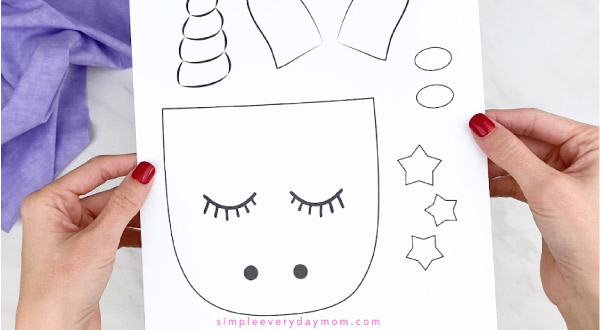
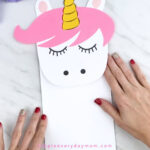
Download the unicorn puppet printable template, print it, and cut out the pieces.
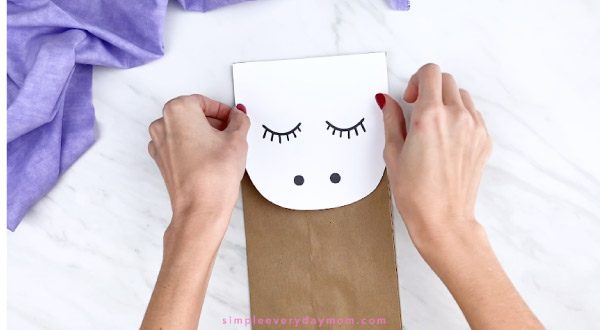
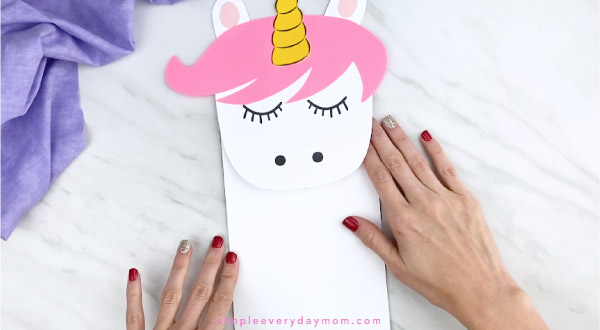
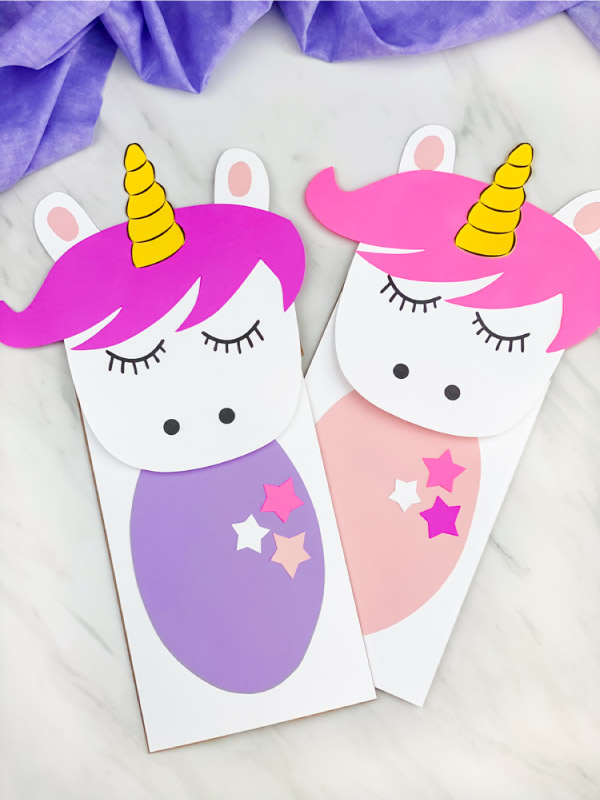
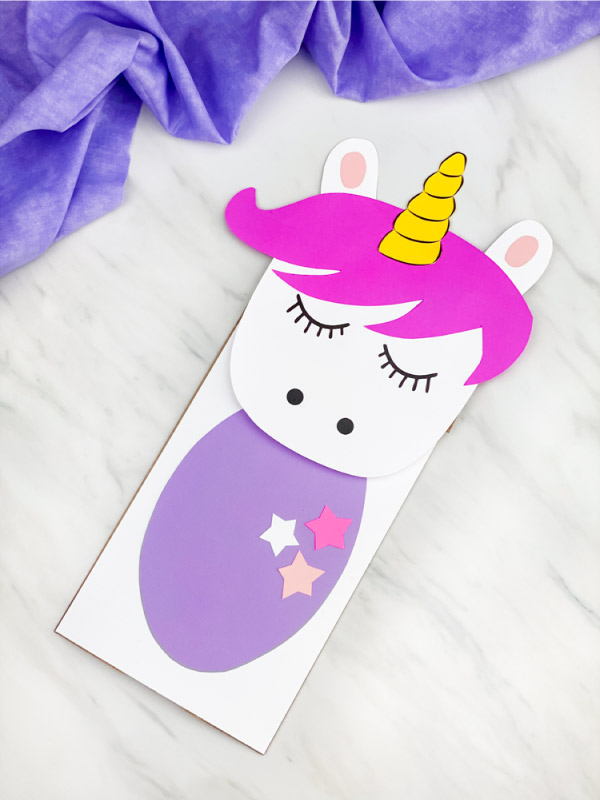
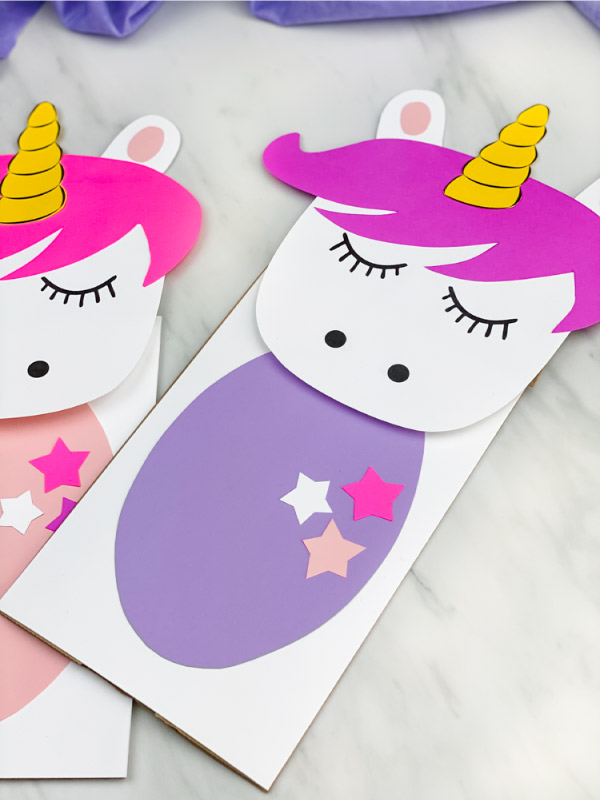
Glue the unicorn head to the top flap of the brown paper bag.
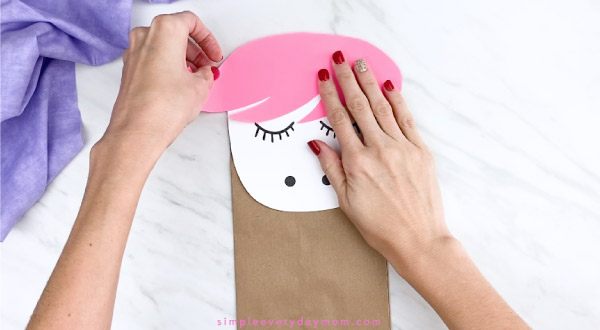
Place the unicorn’s mane on the top of the head and glue it in place.
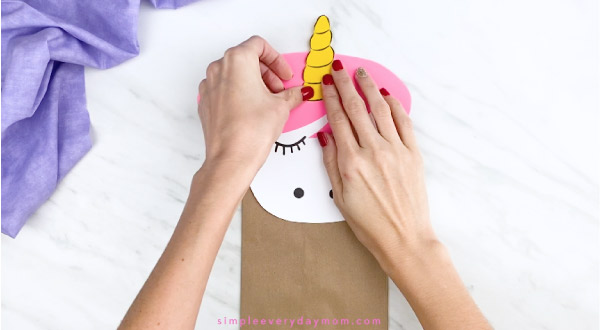
Position the unicorn’s horn in the middle of the mane and glue it down.
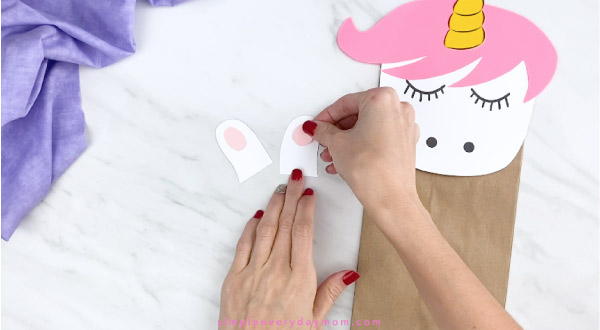
Assemble the ears by gluing the pink oval towards the top of the white ears.
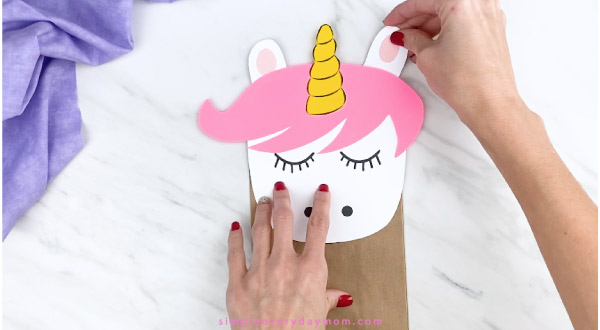
Glue the finished ears on each side of the back of the top flap of the paper bag.
Cut a white piece of card stock to fit the lower portion of the brown paper bag.
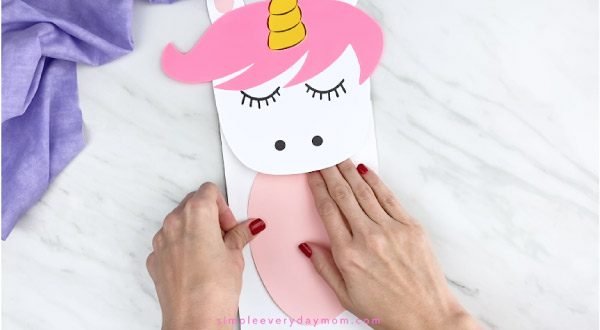
Take the unicorn’s belly piece and glue it onto the middle of the white piece you cut in step 7.
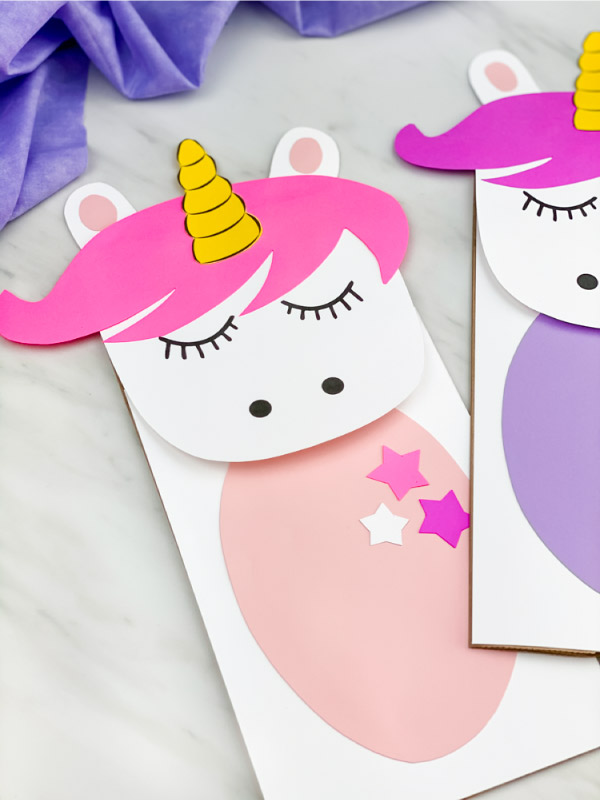
Add any extra embellishments like hearts or stars to the belly.

We love how these unicorn puppets look when they’re all finished!
The best thing about this is you can have hundreds of different combinations. Don’t feel the need to stick to our example.

Our free printable unicorn puppet template makes a great base for this fun and creative activity. You can let your child choose their own unicorn body, hair, embellishment, and horn colors!
And you don’t even have to stop there. We love the idea of getting some 3D flower stickers and making a flower tiara that’s so popular with unicorns. You can also choose to add glitter, googly eyes, or anything else that your little ones come up with!
Unicorn Template Notes
Normally when we make templates we have two versions, one for at home and one for use with groups of kids.
In this unicorn template, we only have the group option with several pieces on each page. We did this because both the unicorn horn and face need to be printed directly on the colored paper you choose. This way you won’t have to freehand the eyelashes, nose, and unicorn horn details.
Because of this, if you don’t want to waste your colored paper, be sure to invite several kids to make this craft together!
More Unicorn Ideas For Kids
We hope that you and your kids have a blast with this unicorn craft! Engagement in learning activities can be key for long-term success, so we’ve got some other great ideas to keep them busy.
Cute Unicorn Books
Reading books to kids has numerous benefits, including developing language and communication skills, improving concentration and focus, expanding their imagination and creativity, and fostering empathy and emotional intelligence.
Story time also provides an opportunity for bonding and quality time between parents and children, while instilling a love of learning that can last a lifetime.


Never Let A Unicorn Scribble! – This story is about a little girl who keeps hearing, “Never let a unicorn scribble!” But in her heart believes that people just don’t understand how beautiful scribbling can be.
How To Catch A Unicorn – Try to catch one of the world’s most elusive mythical creatures―the unicorn! Filled with zany traps and lots of rainbow unicorn fun, this is the unicorn book of the year!
Unicorn Day – The unicorns are celebrating their favorite day of the year, complete with rainbows, cupcakes, butterflies, and all sorts of joyful things. But when it’s revealed there’s an impostor in their midst, the party comes to a screeching halt
Unicorn Craft Ideas
The process of crafting can be engaging, creative, and focus-building! With so many different projects to choose from it’s never been easier or more fun than now. Check out these fun and easy crafts for kids:
Paper Plate Unicorn Craft – This unicorn craft is tons of fun and is the perfect craft for a rainy day activity. Plus, you don’t need any paint! Just download the free printable template and get started. Your kids will love this adorable unicorn craft.
Unicorn Headband Craft – Making this unicorn headband is so much fun, and it’s perfect for younger kids! You can either color in the black and white version or use construction paper to make it. Either way, it’ll look adorable on your little one.
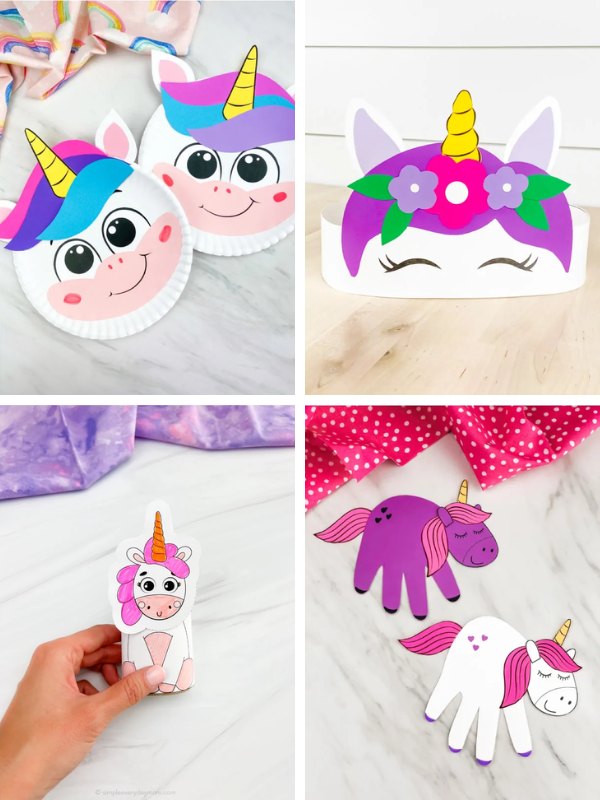
Unicorn Toilet Roll Craft – Have you ever seen a cuter craft than this? Transform a plain toilet roll into an adorable unicorn with our fun and easy-to-use templates. Your little one’s imagination will run wild as they choose the colors for their new unicorn friend. Let the magic begin!
Handprint Unicorn Craft – This fun craft is perfect for kids who love unicorns! They can practice their fine motor skills while creating a one-of-a-kind masterpiece. Use our free template and get ready for a world of whimsical fun!
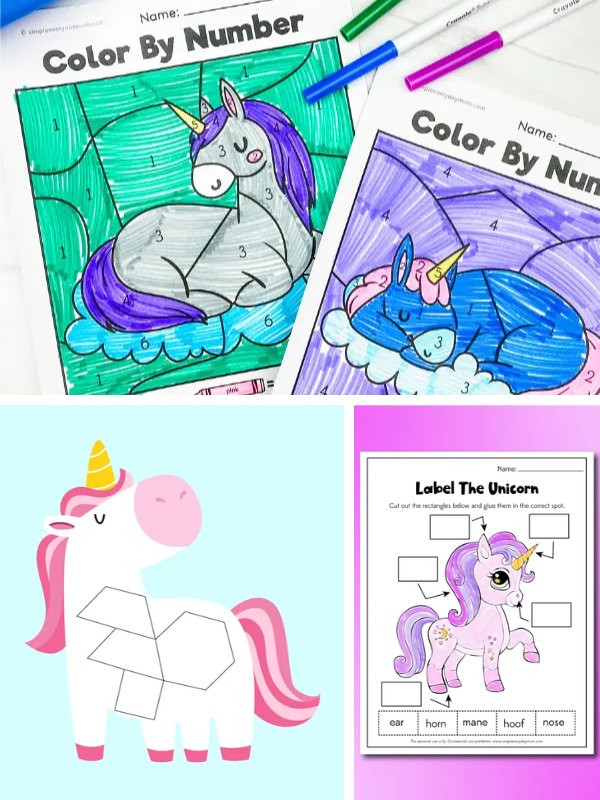
Unicorn Activities Printables
These unicorn color by number printables are a fun and easy way for kids to practice their fine motor skills and number recognition. Plus, it’s totally no prep, so you can just download and use it right away!
These fun unicorn pattern block mats are a creative way to help little kids with their fine motor skills and shape recognition.
They’ll have so much fun playing with these colorful unicorns that they won’t even realize they’re learning! Older kids can also use these mats as a guide to create their own unicorn designs with pattern blocks!
Have these cute unicorn worksheets be the star of your kids’ day! With our fun and engaging worksheets, they’ll practice handwriting and letter recognition – while also getting to label a unicorn! They’re great for multi-skill development and will bring lots of smiles all around.
This unicorn play dough kit is perfect for some sensory fun. Your kids will love exploring the different textures and colors of this magical dough. Plus, it’s a fun way to help them develop their exploratory skills. Who knows, they might even discover their hidden unicorn magic!
Share With Us
Did you end up making this unicorn puppet craft with your kids? We want to see how cute they all look!
Take a picture of your completed unicorn and share them with us on our Facebook page wall or post it in our private Facebook group.
Unicorn Activities
Unicorn Paper Bag Puppet
Video
Equipment
- Scissors
Materials
- Brown or white paper bag
- Colored cardstock or construction paper
- White card stock
- Glue stick
- Unicorn template
Instructions
- Download the unicorn template, print it and cut out the pieces.

- Glue the unicorn head to the top flap of the brown paper bag.
- Place the unicorn's mane on the top of the head and glue in place.
- Position the unicorn's horn in the middle of the mane and glue down.
- Assemble the ears by gluing the pink oval towards the top of the white ears.
- Glue the finished ears on each side of the back of the top flap of the paper bag.
- Cut a white piece of card stock to fit the lower portion of the brown paper bag.
- Take the unicorn's belly piece and glue it onto the middle of the white piece you cut in step 7.
- Add any extra embellishments like hearts or stars to the belly.
- Place the completed belly piece on the lower part of the brown paper bag and glue in place.
Did you make this?
Don’t forget to leave a comment below and make sure to follow on Pinterest, Facebook and TikTok for more!
Free Printable Unicorn Paper Bag Puppet Template


Meet Sam
Sam is the crafter and founder of Simple Everyday Mom. She has been featured in Oprah Mag, Good Housekeeping, The Spruce Crafts, Country Living, The Bump, and more.


Please send me the template for the unicorn paper bag puppet. I don’t know why the instructions are here, but not the template. Plus, tooooo many popups!
Of course! All you need to do is enter your email in the form at the end of the post and the link will be sent to you ?
Bdbbdh
My kids loved this one! I even made one too! 🙂
Haha, I love that!
My daughter will love this. Please send me the template. Thank you.
Of course! All you need to do is enter your email in the form at the end of the post and the link will be sent to you.
Hi, I would like the unicorn puppet template please for my daughter’s school project.
Thanks!
M-C
Of course! All you need to do is enter your email in the form at the end of the post and the link will be sent to you ?
Excellent
These are so cute! Please send me the templates for the unicorn and baby Yoda puppet bags.
To get a template, all you need to do is enter your email in the form at the end of each post to have the link sent to you ?
I would like the template
Of course! All you need to do is enter your email in the form at the end of this post to have the link sent to you.
I’d love the unicorn template
Of course! All you need to do is enter your email in the form at the end of this post to have the link sent to you ?
Please send unicorn paper bag template
Of course! Just enter your email in the form at the end of the post and the link will be sent to you ?
please send me the template
Of course! All you need to do is enter your email in the form at the end of this post and it’ll be sent to you ?
unicorn template
Of course! All you need to do is enter your email in the form at the end of this post and the link will be sent to you ?
unicorn template
Hey Amelia! All you need to do is enter your email in the form at the end of this post and the link will be sent to you ?
hi I want to print some unicorn activities
If you’d like this template, all you need to do is enter your email in the form at the end of the post and it’ll be emailed to you ?
I am trying to get a free template for this unicorn paper bag puppet
All you need to do is enter your email in the form at the end of the post and the link will be emailed to you ?