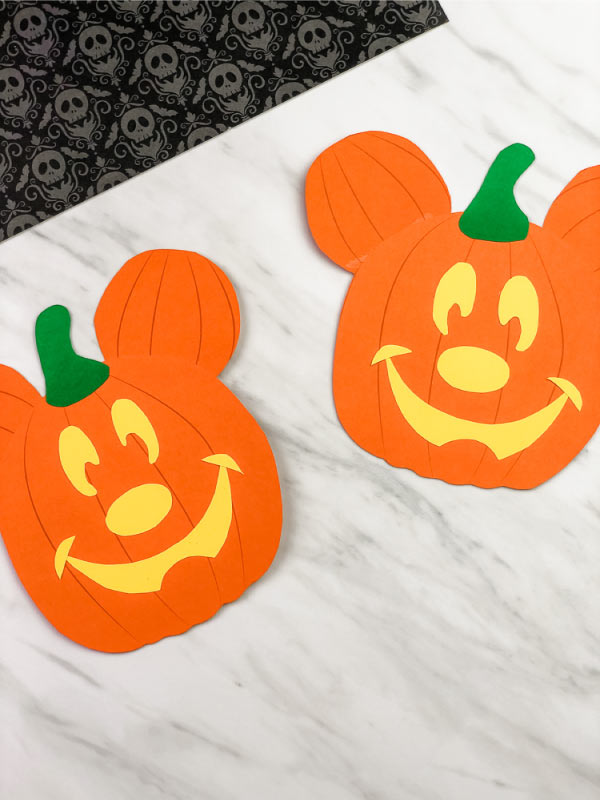
Mickey Mouse Pumpkin Craft For Kids [Free Template]
All activities require adult supervision. By using this site, you agree to our terms of use. This post may contain affiliate links. As an Amazon Associate and a participant in other affiliate programs, I earn a commission on qualifying purchases. Read our disclosure policy.

If you’ve ever been to Disneyland during October, you know how magical it can be! That inspired us to create this fun Mickey Mouse pumpkin craft—a non-scary, creative way to bring some Disney magic home this fall.
Want to know our favorite not-too-spooky part? Snapping a photo in front of the giant Mickey Mouse pumpkin on Main Street. This easy pumpkin craft for kids is perfect for practicing fine motor skills with little hands. Whether you’re crafting at home or in the classroom, it’s a festive way to celebrate the season without the fright!
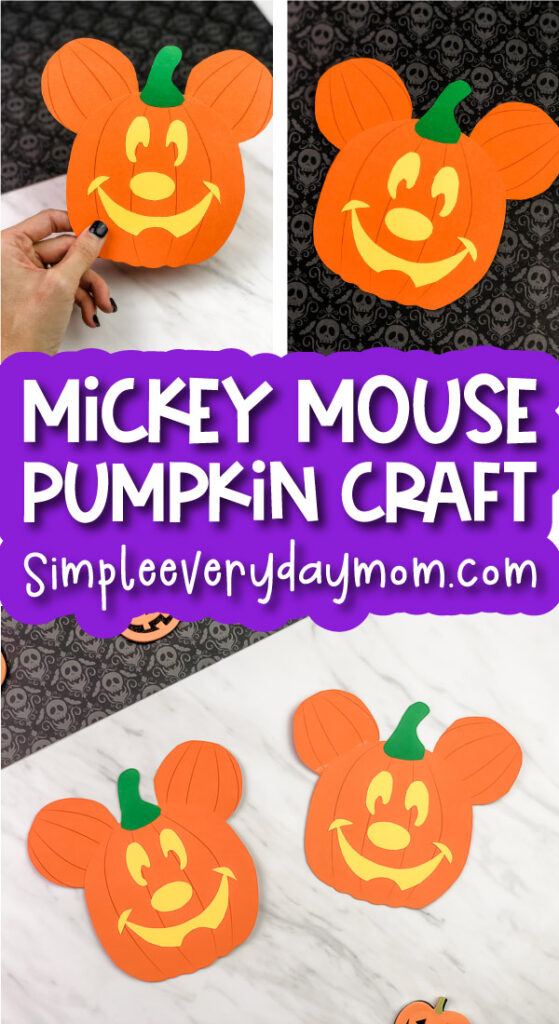
Mickey Pumpkin Craft
There are two things we love about this idea!
One, it requires only a few common supplies we bet you already have lying around the house. Two, it’s super short and easy for kids of all ages to help out with (or do it entirely on their own!).
Supplies
- Colored cardstock or construction paper
- Scissors
- Glue stick
- Mickey Mouse pumpkin template (click the “click here to get your freebies” image at the end of the post)
Directions
Start by downloading and printing the template. Once the template is printed, gather the materials for this fun activity. Get those scissors ready, and let’s help the kids bring this Mickey Mouse pumpkin to life!
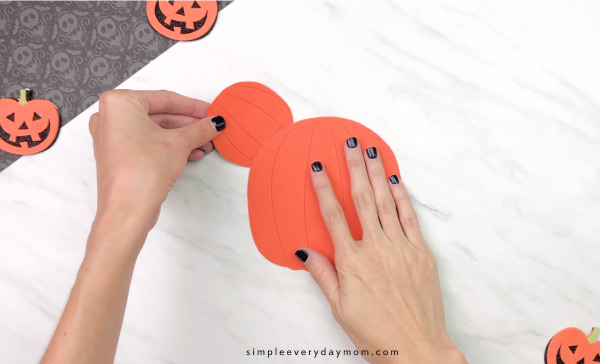
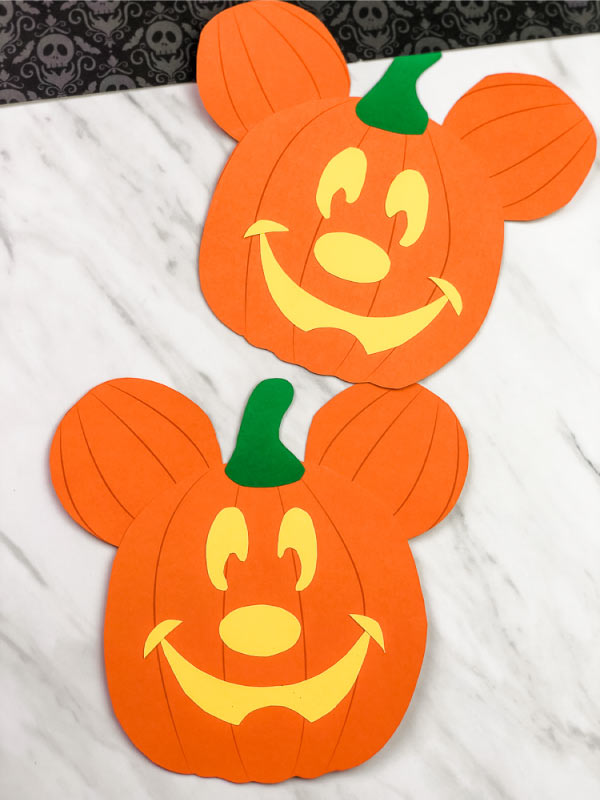
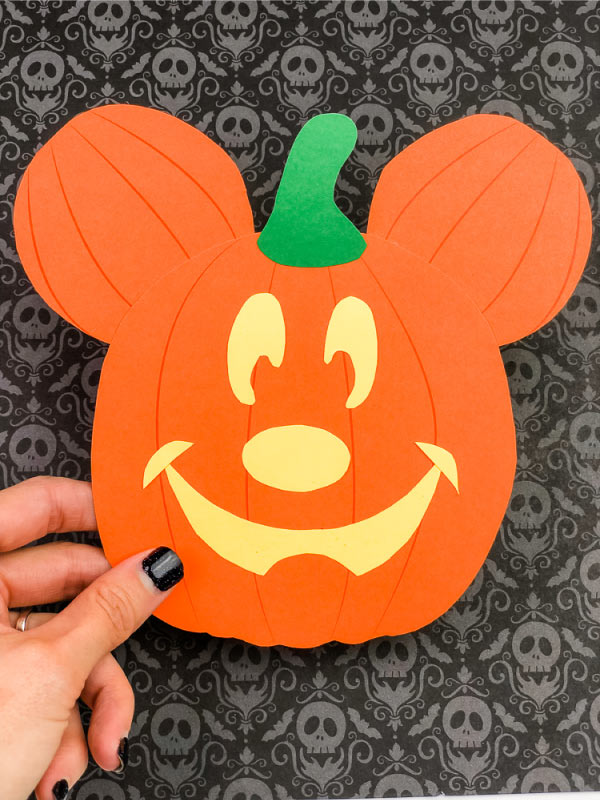
First, encourage your child to assemble the Mickey pumpkin by gluing each of the two smaller pumpkins on each side of the larger pumpkins. These are Mickey’s ears.
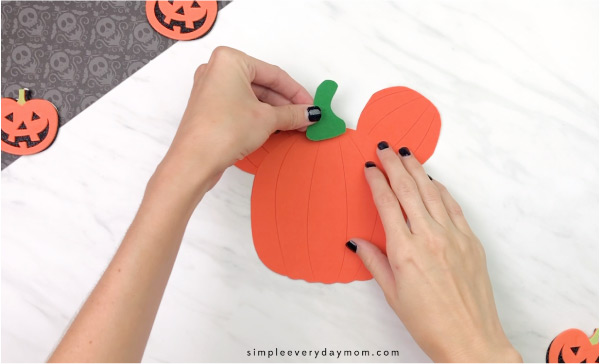
Next, guide your child to glue the green stem at the top of the pumpkin, in between the two ears.
Now, glue the eyes in the middle and slightly below the stem.
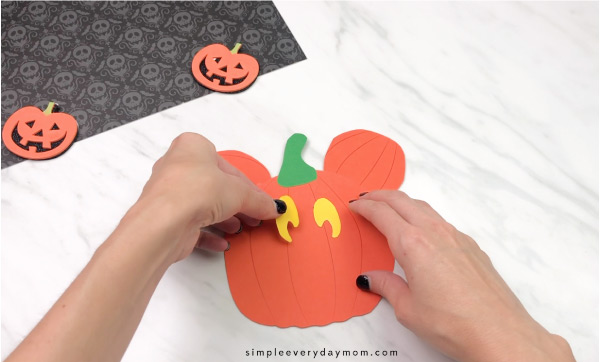
Help your child to glue the nose beneath the eyes.
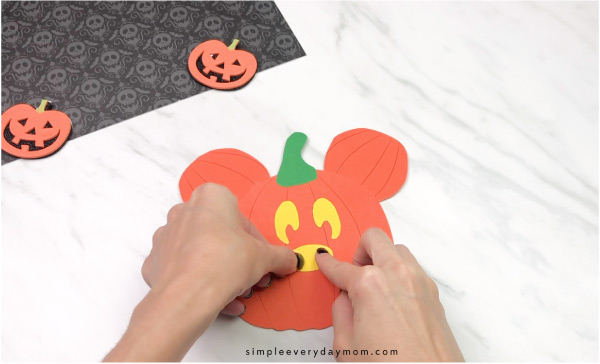
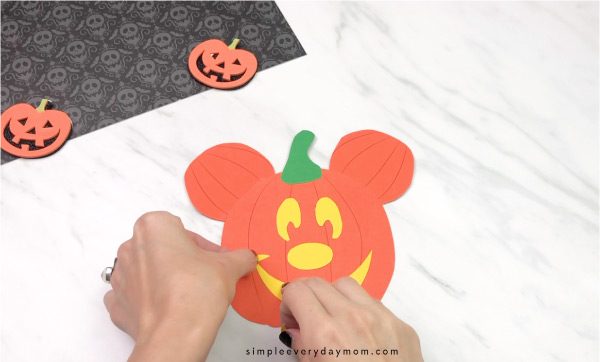
Finally, glue the main smile and the two smile lines below the nose, in the middle of the pumpkin.
Be sure to check out our Halloween crafts for kids while you’re here! Your kids will love creating more fun DIYs like this one!

Halloween Kids Books
Reading out loud to your child is so great for their development. It can help them with their language skills, patience, empathy, and literacy. For these reasons and more, we suggest starting all your unit studies with books.
Cute Bat Paper Cup Craft


Room On The Broom: This has to be one of our favorite Halloween books of all time! The story follows a witch and her cat as they happen upon some animals who help the witch. There’s danger, mystery, and friendship in this adorable children’s story.
5 Minute Spooky Stories: We love Disney’s 5-minute storybooks and this one is perfect for Halloween! See how all your favorite Disney characters celebrate this spooky holiday.
Ten Timid Ghosts: This is a fun countdown book about a witch who moves into a haunted house where 10 ghosts already live. The witch scares the ghosts out one by one until they devise a scheme to get her out of their house. This Halloween children’s book is good for kids who love rhyming stories!
Kids’ Halloween Crafts
Paper Plate Pumpkin Craft For Kids – This pumpkin project is the perfect way for kids to get into the Halloween spirit! Not only is it fun to make, but it also helps fine motor skills. All you need is an orange paper plate and our free template, and your little one will be ready to create their very own pumpkin.
Free Printable Witch Activity Sheets
Paper Bag Zombie Puppet Craft – Kids will love creating this easy zombie puppet from a brown paper bag and some colored paper. And when they’re done, they can play with their new zombie friend too! It’s the perfect Halloween DIY to get your kids excited about the spooky season!

Paper Plate Mummy Craft – These mummies are so much fun for kids to make. They’re creative and hands-on, and the end result is actually kinda adorable. Nothing scary here! Download the free printable template to get started!
Witches Brew Handprint Craft – For a ghoulishly good time, trace your kids’ hands and cut them out to create this creepy project! Your little monsters will love it getting into the Halloween spirit in a hands-on way. Not to mention, this makes a great Halloween decor keepsake to remember how little their hands were!


Fun Halloween Activities For Kids
Try our bat worksheets to get your little ones learning in a fun way! Each activity encourages them to practice their fine motor skills, letter recognition, and problem-solving skills as they complete the worksheets. They’re a fun and seasonal way for kids to brush up on their alphabet knowledge!
14 Spooky Fun Halloween Sensory Bins
Watch the classic Halloween treat come to life with our candy corn pictures to color. Kids can practice their coloring skills while learning about shapes and colors.
Each candy corn is also dressed up for the holiday season, adding a spooky twist to the fun! Kids will love bringing these colorful characters to life. We can’t think of a better way to get into the Halloween spirit than with some themed coloring activities!
These Halloween pattern block mats take STEM activities to a whole new level! Your little monsters must match the gaps in the images to their shaped blocks.
It’s an engaging way for kids to learn about different shapes and patterns! The fun Halloween-inspired designs also help make the activity even more enjoyable.

Are you wondering how you’ll keep your kids entertained over the fall break? Look no further than this Halloween matching game.
It’s a great activity for independent or group play, and it’ll work your kid’s memories, too! Simply download, print, and cut out the Halloween-themed cards and let your kids match them up!
Tracing is an invaluable skill for kids to practice handwriting and fine motor skills. These Halloween tracing worksheets are perfect for kids learning how to write! Alongside writing practice, each page also features cute and spooky pictures that will get your little ones in the holiday spirit.
Candy Corn Gnome Craft For Kids
Share With Us
Did you make this activity with your kids or students? We’d love to feature them on our social media!
For a chance to have your child’s project featured, simply snap a picture of the completed project and post it to our Facebook page, email it to us directly by clicking here, or use #simpleeverydaymom on your social media!
Mickey Mouse Pumpkin Craft For Kids
Video
Equipment
- Scissors
Materials
- Colored card stock
- Glue stick
- Mickey Mouse pumpkin template
Instructions
- Download the mickey mouse pumpkin template, print, and cut out the pieces you need.
- Begin to assemble the Mickey pumpkin by gluing each of the two smaller pumpkins on each side of the larger pumpkins. These are Mickey's ears.
- Next, glue the green stem at the top of the pumpkin, in between the two ears.
- Glue the eyes in the middle and slightly below the stem.
- Now, glue the nose beneath the eyes.
- Finish off by gluing the main smile and the two smile lines below the nose, in the middle of the pumpkin.
Did you make this?
Don’t forget to leave a comment below and make sure to follow on Pinterest, Facebook and TikTok for more!
Mickey Mouse Pumpkin Template


Meet Sam
Sam is the crafter and founder of Simple Everyday Mom. She has been featured in Oprah Mag, Good Housekeeping, The Spruce Crafts, Country Living, The Bump, and more.


Can’t wait to share with my classroom
Yay! Hope they enjoy it!
Thank you! These are really good tips for Halloween!
You’re welcome!
my class will enjoy making this!
Super cute!! Can’t wait to do this be with my kiddos.
Thanks! I hope they have tons of fun!
Very cute
THanks so much!
Can’t wait to try this.
Hope you guys love it! Happy Halloween 🙂
I would like a copy of the template please.
Of course! Simply enter your email in the form at the end of the post and the link will be emailed to you 🙂
Very cute!
Aw, thank you!
Thank You!
You’re very welcome!
This craft is super cute. I want to do it with my preschool class. Id like to have the template please.
Of course! If you put your email in the form at the end of the page, the link to download will be emailed to you ?
Download please
Of course! If you put your email in the form at the end of the page, the link to download will be emailed to you ?
I can’t wait to make this with me class.
I hope everyone enjoys it!
Thank you
No problem!
This is SO cute! You have the cutest crafts. How do I download this one?
Thanks, Katie! If you put your email in the form at the end of the page, the link to download will be emailed to you ?
Beautiful
Thank you!