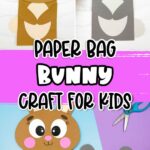
Easy Paper Bag Bunny Craft [Free Template]
All activities require adult supervision. By using this site, you agree to our terms of use. This post may contain affiliate links. As an Amazon Associate and a participant in other affiliate programs, I earn a commission on qualifying purchases. Read our disclosure policy.

Learning about animals can be a hop, skip, and a jump away when kids engage in activities that bring them to life. Hands-on activities like this one can make exploring different animals extra exciting, whether you’re teaching about forest animals, farm favorites, or springtime friends.
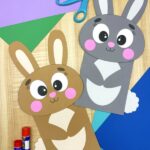
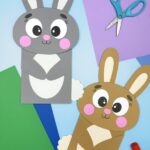
Invite your little learners to make an adorable puppet with this bunny paper bag craft. With the addition of their new bunny puppet, story time will become a hopping good time!
Don’t miss out on these other paper bag puppets, which will keep creativity and imaginations hopping throughout the year.

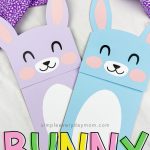
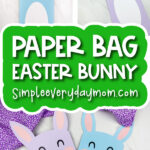
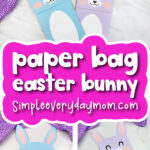
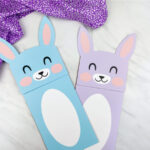
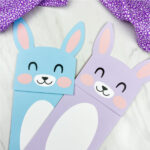
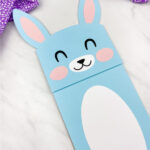
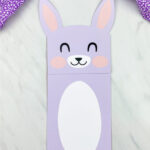
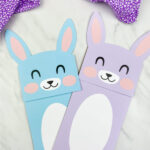
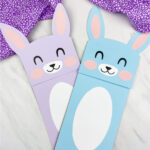
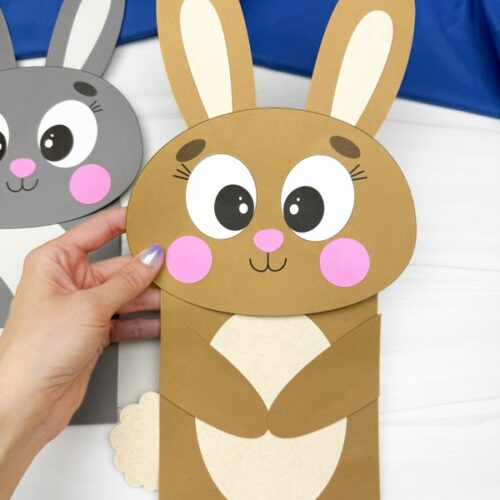
Bunny Paper Bag Puppet
This activity allows children to explore their creativity while developing fine motor skills, following directions, and practicing imaginative play. It’s a great addition to spring themes, Easter activities, or lessons focused on pets or woodland animals.
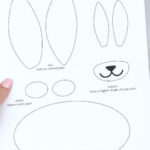
Be sure to download our free bunny template to make things easy and fun. Gather up a paper bag, colored paper, scissors, and glue to get kids started on bringing their bunny buddy to life!
Supplies
- Brown paper bag
- Colored cardstock or construction paper
- Scissors
- Glue stick
- Bunny template (click the “click here to get your freebies” image at the end of the post)

Directions
Start by downloading and printing the template. Once the template is printed, gather the materials for this fun activity. Get those scissors ready, and let’s help the kids bring this bunny to life!

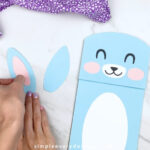
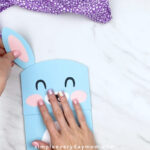
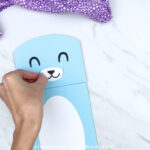
First, guide your child to glue the eyes below the eyebrows.

Place the pink cheeks on both sides of the nose and glue them in place.

Assemble the bunny’s ears by gluing the inner ear to the middle of the outer ear.

Next, help your child glue the finished bunny ears to the back of the head.

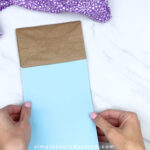
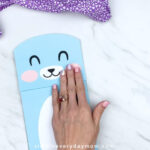
Position the body of the bunny on the main portion of the brown paper bag and glue it in place.

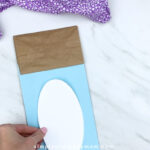
Glue the belly in the middle of the body.

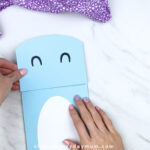
Now, glue the bunny’s arms on each side of the body, so it looks as if it is holding its belly.

Glue the tail to the back and left side of the body, in the fold of the paper bag.

Finally, encourage your child to glue the head to the flap portion of the lunch bag.

Be sure to check out our paper bag puppets crafts while you’re here! Your kids will love creating more fun DIYs like this one!

Easter Books For Kids


Happy Easter Mouse – Everyone knows Mouse from the classic If You Give A Mouse A Cookie book, but now he’s back and ready to celebrate Easter! Kids will love watching him as he goes on an Easter egg hunt!
Pete the Cat: Big Easter Adventure – Join Pete as he races to help the Easter bunny just in time for Easter! This is another new classic kids rate as a must-have!
It’s Not Easy Being A Bunny – Follow PJ the bunny as he tries to discover what kind of animal he’d rather be instead of a bunny! It’s a silly story with a great lesson.

Animal Arts And Crafts
Cat Puppet Craft – Calling all cat lovers! This easy and adorable paper bag cat puppet is a purr-fect way to mix creativity and pretend play. Whether you’re doing a pet theme, learning about the letter C, or just love furry friends, download our free template and let kids create their own cuddly kitty!
Easy Pom Pom Sheep Craft
Squirrel Handprint Craft – Let’s go a little nuts with creativity! Kids will love turning their handprint into an adorable squirrel friend. This activity is a fun way to celebrate fall and get creative with those tiny hands. Just grab the free template, some supplies, and let the squirrel making fun scurry into action!

Horse Paper Plate Craft – Giddy up for some creative fun if your little one is wild about horses! They’ll love turning a paper plate into a playful pony with a splash of paint, a bit of crafting, and our free printable template. Kids can trot into this adorable activity at home or in the classroom!
Llama Paper Plate Craft – No drama, just llamas! Kids will have a blast turning a paper plate into a fluffy llama friend with this easy farm animal project. It’s a fun way to get creative at home or in the classroom when kids paint and cut along with the help of our free template.

Animal Printables
If you’re on the hunt for a fun, low prep activity that will keep little hands busy and learning, then these animal do a dot printables are just the thing! These are great to break out whether it’s a rainy day or you just need a quick independent task for kids.
Try this Easter Bunny Basket Craft
They’ll love dotting their way through 29 pages of animal themed fun with coloring, counting, letter recognition, and more. These dot marker pages are a playful way to build key skills, and are great for toddlers, preschoolers, pre-k, and kindergarten kids who love animals and dotting!

Ready for some adorable woodland fun? These hedgehog tracing worksheets are a cute way to help preschoolers and kindergarteners sharpen their fine motor skills! As kids trace wavy lines, outline a cute hedgehog, and master the letter ‘Hh’, they’ll build confidence and coordination while having a blast.
This charming hedgehog is here to make writing practice extra exciting, so print the pages, grab some pencils, and let the tracing fun begin!

Swing into sharpening scissor skills with these monkey cutting activity pages! Kids will go bananas practicing their cutting skills as they zip along dashed lines, match up silly monkey pieces, and count their way through a troop of playful primates.
These hands-on worksheets are a wild way to build fine motor skills and boost problem solving while also having fun. They’re a great addition to any animal themed lesson – just print, grab some scissors, and let the monkeying around begin!

Get ready for some paws-itively fun learning with these pet shape matching worksheets! Kids will love matching circles, squares, and more to their favorite furry and feathered friends like cats, dogs, birds, and fish.
As they complete each activity, they’ll sharpen their shape recognition, build fine motor skills, and boost their shape vocabulary. It’s an engaging way to sneak in learning and set the stage for future math lessons!
Share With Us
Did you make this activity with your kids or students? We’d love to feature them on our social media!
For a chance to have your child’s project featured, simply snap a picture of the completed project and post it to our Facebook page, email it to us directly by clicking here, or use #simpleeverydaymom on your social media!
Paper Bag Bunny Puppet
Video
Equipment
- Scissors
Materials
- Brown paper bag
- Colored cardstock or construction paper
- Glue stick
- Bunny template
Instructions
- Download the bunny template, print, and cut out the pieces.
- Begin by gluing the eyes below the eyebrows.
- Place the pink cheeks on both sides of the nose and glue it in place.
- Assemble the bunny’s ears by gluing the inner ear to the middle of the outer ear.
- Next, glue the finished bunny ears to the back of the head.
- Position the body of the bunny on the main portion of the brown paper bag and glue it in place.
- Glue the belly in the middle of the paper.
- Now, glue the bunny’s arms on each side of the body to look as if it is holding its belly.
- Glue the tail to the back and left side of the body, in between the folds of the paper bag.
- Finish off by gluing the head to the flap portion of the lunch sack.
Did you make this?
Don’t forget to leave a comment below and make sure to follow on Pinterest, Facebook and TikTok for more!
Free Bunny Puppet Template


Meet Sam
Sam is the crafter and founder of Simple Everyday Mom. She has been featured in Oprah Mag, Good Housekeeping, The Spruce Crafts, Country Living, The Bump, and more.


So cute!
Thanks so much! That really means a lot.
I want to try this with my class
That’s wonderful! To get the template, click the “Click To Unlock!” button on the image at the end of the post, sign up or log in to your free SEM+ account, and then click the unlocked image to go to the download page.
gonna try this out with my kids
Love that! Wishing you all a great time!
Thanks for these cute templates.
No problem!
I would love to use this template for my little kiddos. Thank you
Since you’re already an email subscriber, all you need to do is enter your email in the form at the end of any post and it’ll automatically redirect you to the download page 🙂
Awesome
I am interested in the Bunny Paper Bag template. Where do I get it? Thank you
Of course! All you need to do is enter your email in the form at the end of this post to have the link sent to you 🙂
Hi! how do i print out the tremplate?
Since you’re already an email subscriber, all you need to do is enter your email in the form at the end of any post and it’ll automatically redirect you to the download page ?
I am having trouble download the bunny paper bag craft. I was able to get the sheep and I thank you for that. My Sunday School will love these.
Love your paper bag bunnies! My grandkids will love doing these.
Yay, so glad! Have fun!
Hi. I am having trouble printing the bunny paper bag template. Thank you for your help.
Um, hmmm…It’s so hard to help with printing because everyone’s printer is different. So sorry!