All activities require adult supervision. By using this site, you agree to our terms of use. This post may contain affiliate links, sponsored links, and ads. As an Amazon Associate and participant in other affiliate programs, I earn from qualifying purchases.. Read our disclosure policy.
As the weather warms and flowers begin to bloom, it’s a great time to introduce fresh creative activities for kids. This collection of spring art projects includes colorful ideas designed for preschoolers and elementary-aged children that work well at home, in classrooms, or during homeschool lessons.
Below you’ll find painting projects, simple printmaking ideas, and hands-on crafts that encourage creativity while helping kids practice fine motor skills. Most activities use basic supplies and are easy for parents, teachers, and caregivers to prepare.
If you’re planning seasonal activities, you can also explore our spring crafts for even more creative ideas to use at home or in the classroom.
Pin
Pin
www.projectswithkids.com
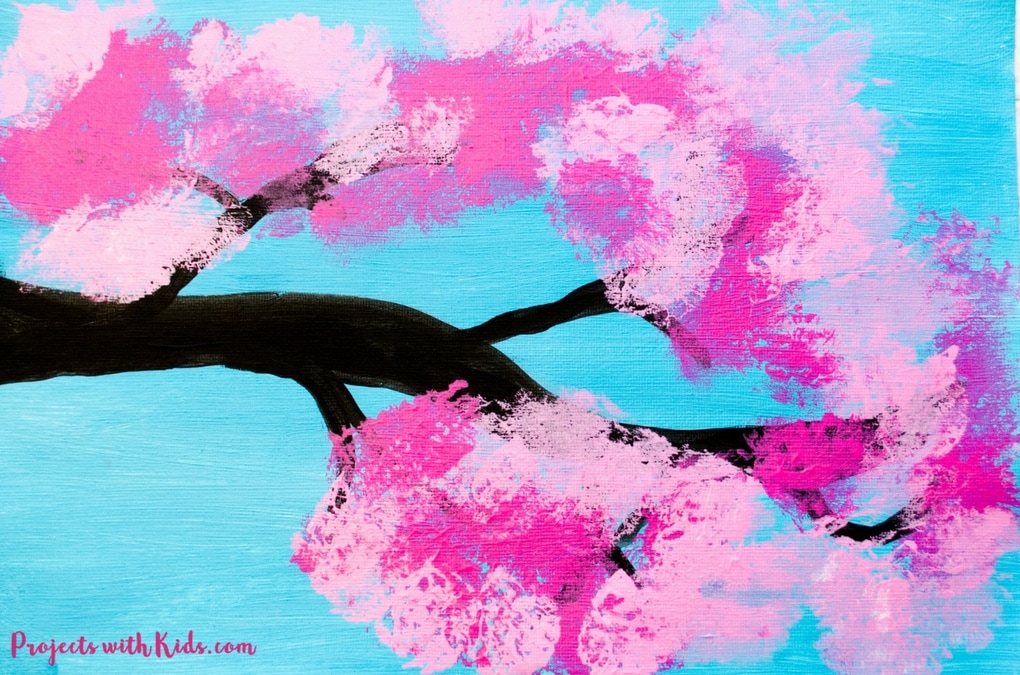
Cherry Blossom Painting with Cotton Balls
Paint a simple blue sky on canvas paper, add a pencil-drawn branch in black acrylic, then dab clusters of color using cotton balls clipped in clothespins. Using two shades of pink gives the dabs depth, and the cotton balls leave a soft, fluffy texture kids love.The “stamp and dab” feel keeps it easy for younger kids while still looking detailed on display.Related: Mother's Day Flower Craft
A recycled soda bottle becomes the paint tool—dip the bottom into pink or white paint, then stamp prints onto paper for instant petal shapes. Use brown paint—and even real twigs, if you'd like—to create the branch and add a bit of 3D texture without needing any fancy supplies.Kids enjoy the satisfying stamp motion, and the bottle-bottom pattern makes every print look “intricate” with almost no effort.Also try: Sunflower Mother's Day Card Craft
Cut toilet rolls into small rings, glue seven pieces together to form a stamp shape, then dip it in paint and press onto paper or cardboard. Because the stamp is homemade, kids can experiment with color mixing and spacing to quickly cover a whole page.Big, bold prints make the process feel like using fundamental art tools rather than careful drawing.Related: Sunflower Mother's Day Craft
Set out paper and paint, then let kids dip the bottoms of assorted water bottles into paint and stamp ring shapes across the page. Different bottle sizes create big-and-small prints, and a green marker can add quick stems and leaves once the paint dries.It works exceptionally well for groups, since kids can share bottles and colors while still making their own unique patterns.Also try: Flower Handprint Card Craft
An onion end becomes a stamp—paint it a solid color (or dab on multiple colors) and press it onto construction paper to make bold ring prints. After everything dries, a fingerprint and a few marker lines can turn one print into a cute little character, or you can mount the prints on cardstock for easy wall art.Kids love using real kitchen scraps as art tools, and the natural rings give the design a “fancy” look without tracing.Related: Paper Plate Sunflower Craft
Pour a few washable paint colors onto a paper plate so they touch (a quick swirl helps), then dip the edge of a cookie cutter into the paint to stamp an outline on white paper.Hold the cutter in place while brushing paint inside, grabbing color from where the paints meet to get that blended, marbled look. Kids enjoy the “stamp then paint” combo, and switching cookie-cutter shapes keeps the results fresh every time.Also try: Easter Pattern Block Mats
Scrunch a kitchen sponge and secure the middle with a hair elastic to create a quick stamp, then squirt paint onto one side. Fold and squish the sponge together and press it onto paper to make a mirrored wing print, adding dots with a cotton bud if you want extra pattern.The reveal is always fun, and kids can keep experimenting with color combos without needing a template.Related: Butterfly Torn Paper Craft
Printable wing shapes on white cardstock make prep easy, and kids use sponge brushes to dab 2–3 paint colors onto one half of the page. Fold the paper to “squish” the paint into a symmetrical print, then cut out the wings and glue them to a colored cardstock body from the template.A few white stripes (painted with a thin brush or drawn with an oil pastel) finish the look, and the symmetry makes the result feel extra satisfying.Also try: 3D Dragonfly Craft
Paint yellow and black stripes on one half of a folded sheet of white paper, then fold it shut to press the paint into a matching mirror print. After it dries, trace the body shape from the printable template, cut it out, and glue on simple wings and a head cut from white and black paper.Googly eyes and a few marker lines finish the face, and kids love the “magic print” moment when they open the paper.Related: Bee Tracing Worksheets
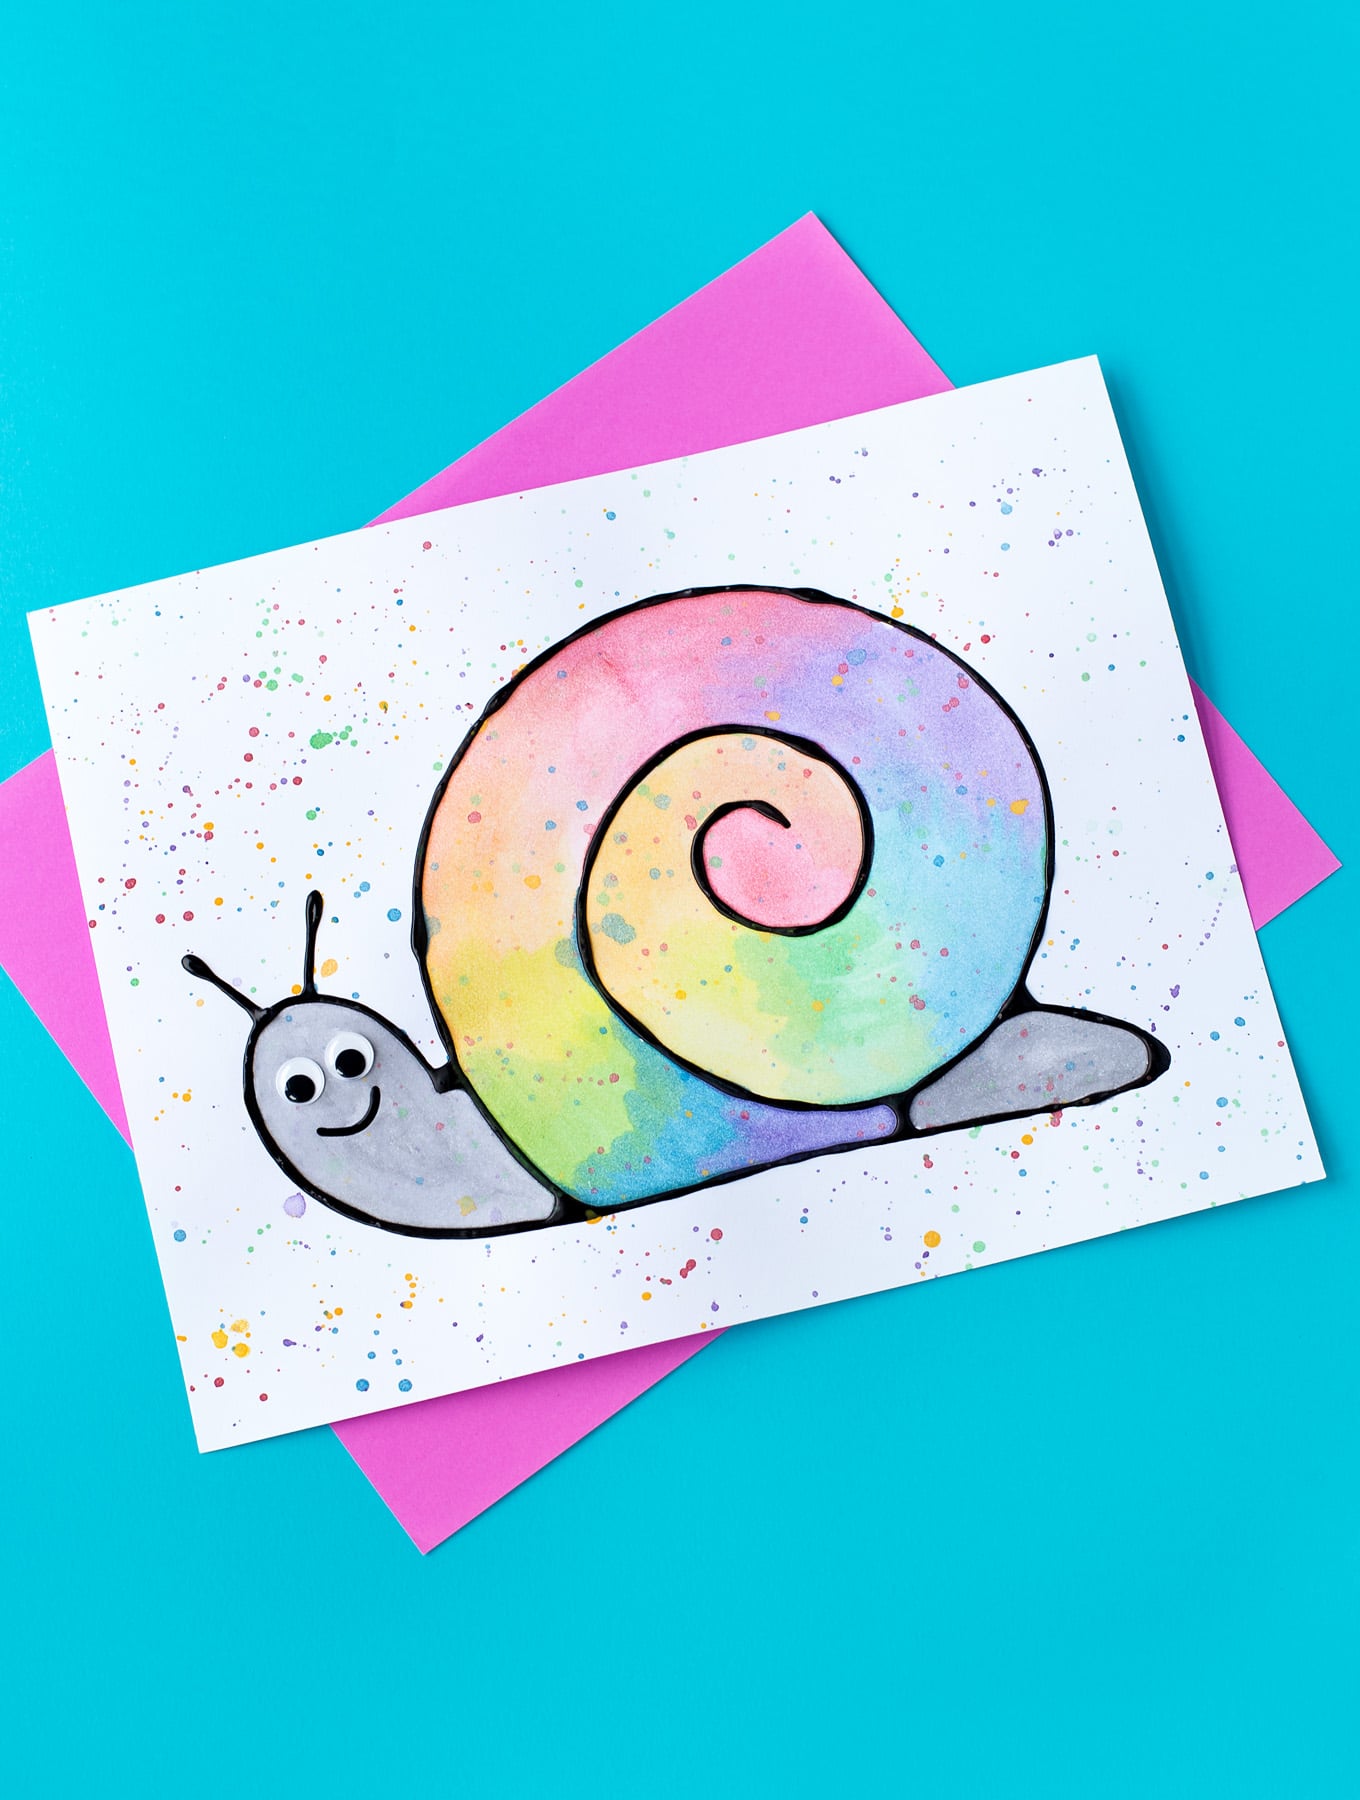
Mix 1/4 cup white glue with 1 teaspoon black acrylic paint, then pour it into an empty glue bottle so kids can “draw” thick outlines on the printable template.Once the raised lines dry (about a day), watercolor paints fill in the sections, creating a stained-glass look as the colors bump up against the black borders. Add wiggly eyes for extra personality, and kids will be proud of how bold and polished the finished art looks.Also try: Spring Tracing Worksheets
Create black glue by stirring black acrylic paint into school glue, then trace the template lines onto mixed-media paper and let the raised outlines dry overnight. Afterward, watercolor brush pens add bright color within the sections, and cutting everything out keeps the edges looking crisp.Tape a white string to the back and glue small bows along it for a dangling tail detail kids love to show off.Related: Spring Pattern Worksheets
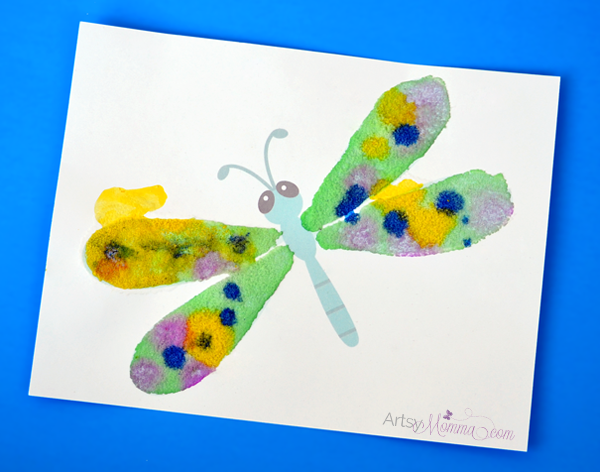
Templates on cardstock give kids a shape to follow while they pipe on white glue and cover it with a generous layer of salt. Using a paintbrush or squeeze dropper, they drip watered-down paint (or colored water made with food coloring) onto the salted lines and watch it travel on its own.The bumpy texture and color-spreading effect feel like a mini science moment, which is why kids stay interested from start to finish.Also try: Popsicle Stick Dragonfly Craft
Trace a circle on black card with a pencil, spread PVA glue inside it, and sprinkle salt generously to create a textured surface. Watercolors are tapped onto the salt (dipping the brush in water helps the color disperse), and flicking white paint on the background adds a starry splatter effect.Kids get the instant “spreading” payoff while painting, and the dark paper makes the colors pop with minimal effort.Related: Earth Day Dot Marker Pages
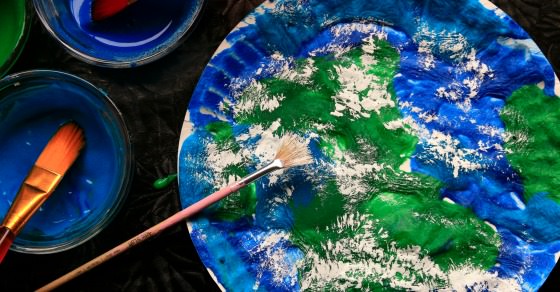
Color a batch of homemade puffy paint with liquid watercolors or food coloring, then paint thick blue and green patches onto a paper plate for a textured base. A quick trip through the microwave puffs the paint up and dries it fast, and dabbing on white art paint adds cloudy highlights.Kids love the “watch it rise” moment, and the finished plate has a bumpy texture that sets it apart from flat paintings.Also try: Earth Day Math Worksheets
Mix equal parts shaving cream and white school glue, tint each bowl with food coloring, and you've got paint that feels like frosting. Instead of brushing long strokes, kids dab the thick mixture onto cardstock in arched bands so the raised texture stays puffy.The bright colors look especially fun right away, making it a satisfying project for kids who love sensory art.Related: Rainbow Card Craft
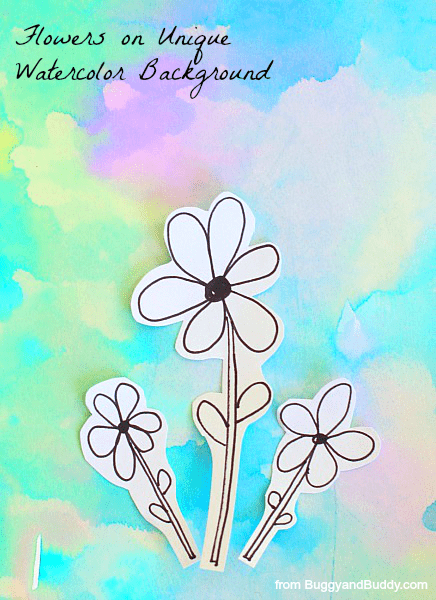
Grab bleeding tissue paper squares and watercolor paper, then lightly mist the page with water so the pieces stick in place. After another gentle spray and dry time, peel off the tissue to reveal soft color transfers, then add simple outlines with a thin black marker if desired.It's almost mess-free, and kids love how the colors “ghost” onto the paper in surprising patterns.Also try: Spring Math Worksheets
Kids paint a watercolor background on watercolor paper, then press a paper towel on top to lift paint and create instant texture. While it dries, they draw simple line-art shapes on white paper with a fine black marker, cut them out, and glue them onto the colorful backdrop.The mix of watery paint and bold cut-outs makes the final piece look detailed, even though the steps stay kid-friendly.Related: Flower Photo Preschool Craft
Mixing black and white tempera paint directly on the page helps kids create a range of gray shades for a moody background. Once it's painted, they cut raindrops from blue construction paper and lightning bolts from yellow, then glue the pieces on top.It doubles as a simple color-mixing lesson and a fun collage, especially for kids who like bold shapes and high contrast.Also try: Spring Color By Letters Printables
Make your own collage paper by placing small blobs of acrylic paint on white cardstock and dragging a squeegee (or old gift card) across to create a streaky texture. After it dries, trace the free templates onto the painted paper, cut out the pieces, and glue the layered shapes onto black cardstock.Marker or acrylic pen details add personality, and kids enjoy seeing how their painted paper becomes the star of the final design.Related: Spring Bird Craft
Start with a printable silhouette traced onto white cardstock (or a cereal-box panel), then paint it using cotton balls clipped in clothespins for a dotted, textured finish.Paint and cut paper plates into layered blooms, glue them on as decorations, and add a cotton ball tail plus small cut-paper details from construction paper. Because kids mix stamping, painting, and building 3D pieces, it feels like a mini art studio session rather than a single quick activity.Also try: Paper Bag Bunny Craft
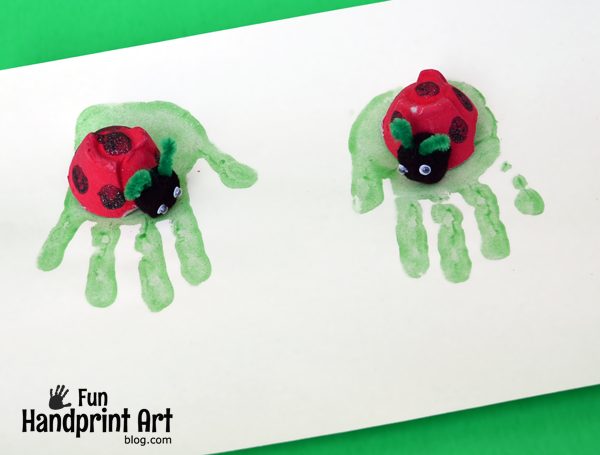
Cut an egg carton cup into a little dome, paint it red, and let it dry while kids make a green handprint based on construction paper. Black glitter glue (or black paint) creates dotted spots with fingertip presses, and a black pom-pom plus pipe-cleaner antennae finish the face.The mix of recycled materials and handprint art makes it extra fun for little ones who like art, and they can also play with it afterward.Related: Ladybug Paper Craft
Skip the paintbrush and use a scrap card to scrape blue and green paint across white cardstock for a quick sky-and-ground background. Then, kids print details using everyday tools like a pipe cleaner and a popsicle stick for stems, a pom‑pom in a clothespin for petals, and pencil erasers for tiny round blooms, finishing with black buttons glued in the centers.Trying each tool and seeing the textures appear makes the whole activity feel like an art experiment.Also try: Spring Activity Sheets
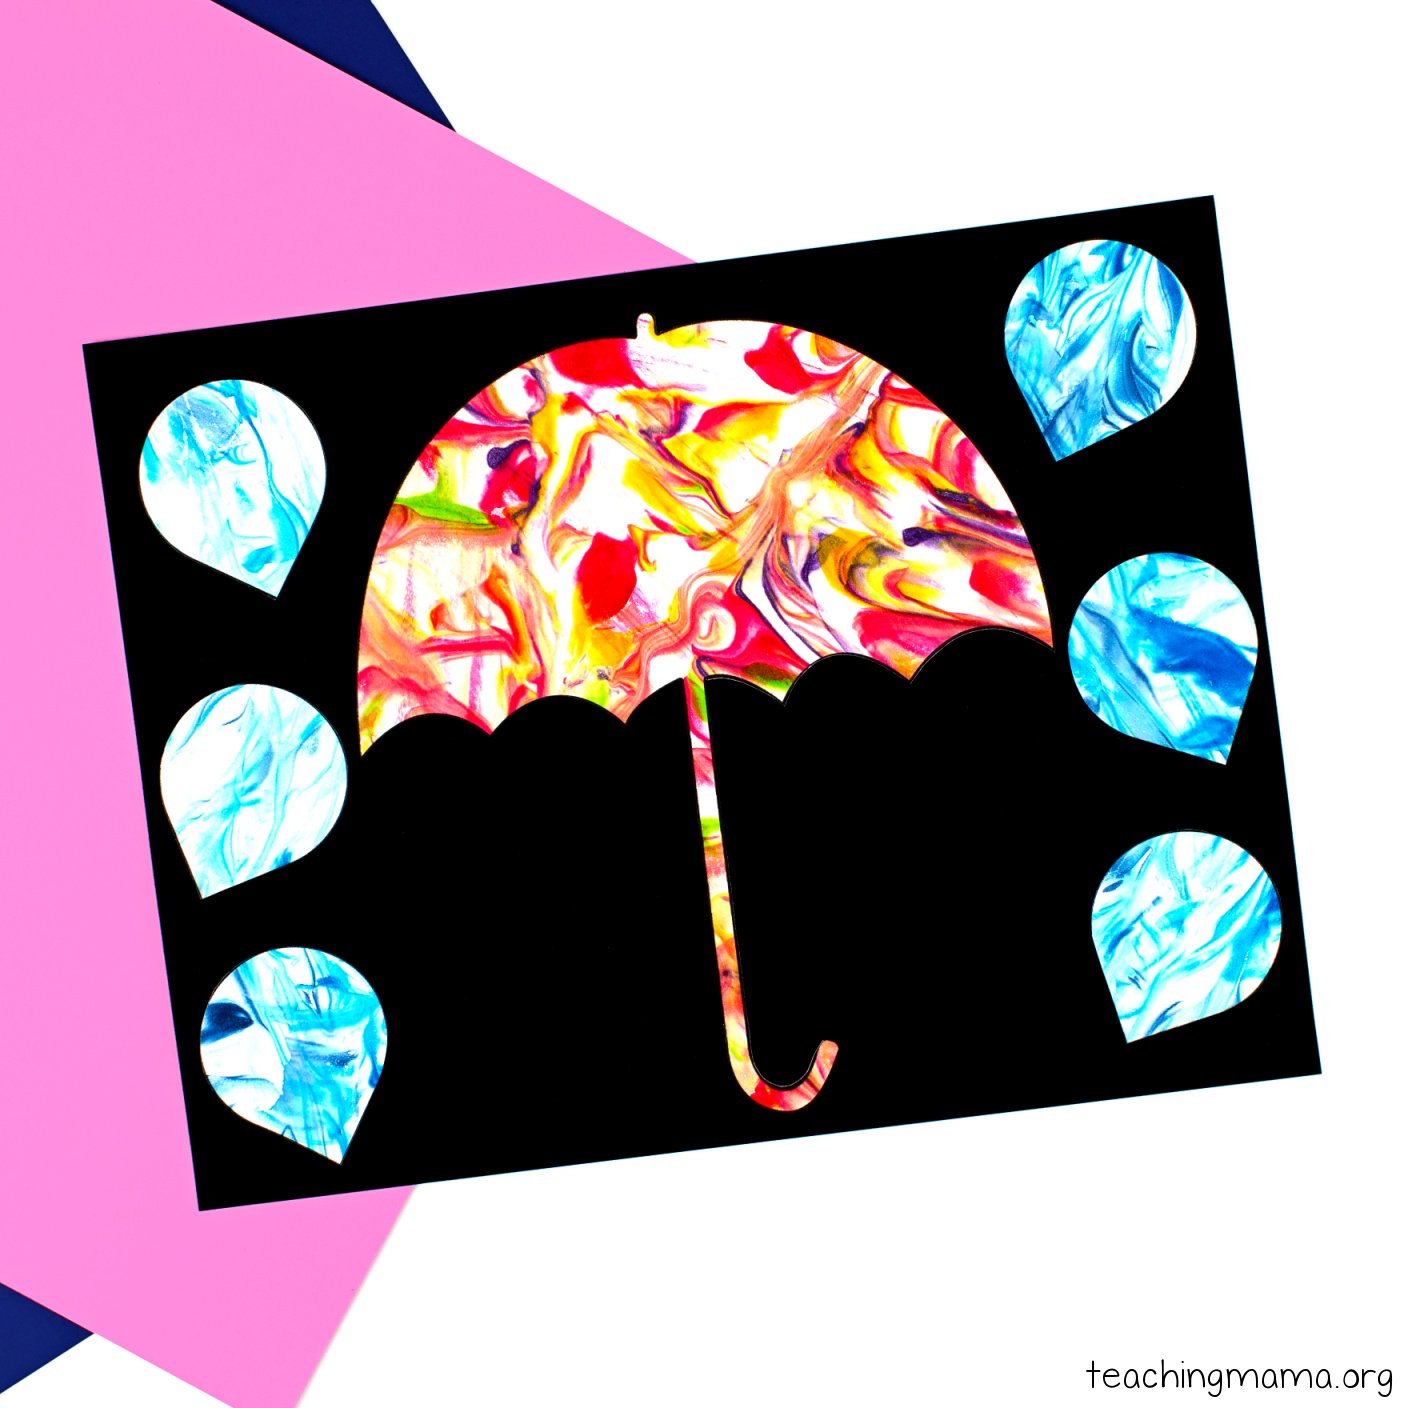
Swirl shaving cream and food coloring on a baking sheet, press cardstock onto the foam, and wipe it off to reveal marbled paper. Once dry, cut the template pieces from the swirled sheets and glue them onto black paper for bold contrast.Kids usually love the sensory swirling part most, and every finished cut-out looks totally one-of-a-kind.Related: Spring Do A Dot Printables
Kids trace a hand on a white paper square (with the thumb and pinky stretched out), then add a few pencil lines to turn the outline into a simple creature drawing. After outlining with a black marker, fill it in with crayons or markers in bright patterns and color-blocking.It's a great low-prep idea because the hand shape does most of the “design work,” which feels especially fun for younger kids.Also try: Spring Connect The Dots
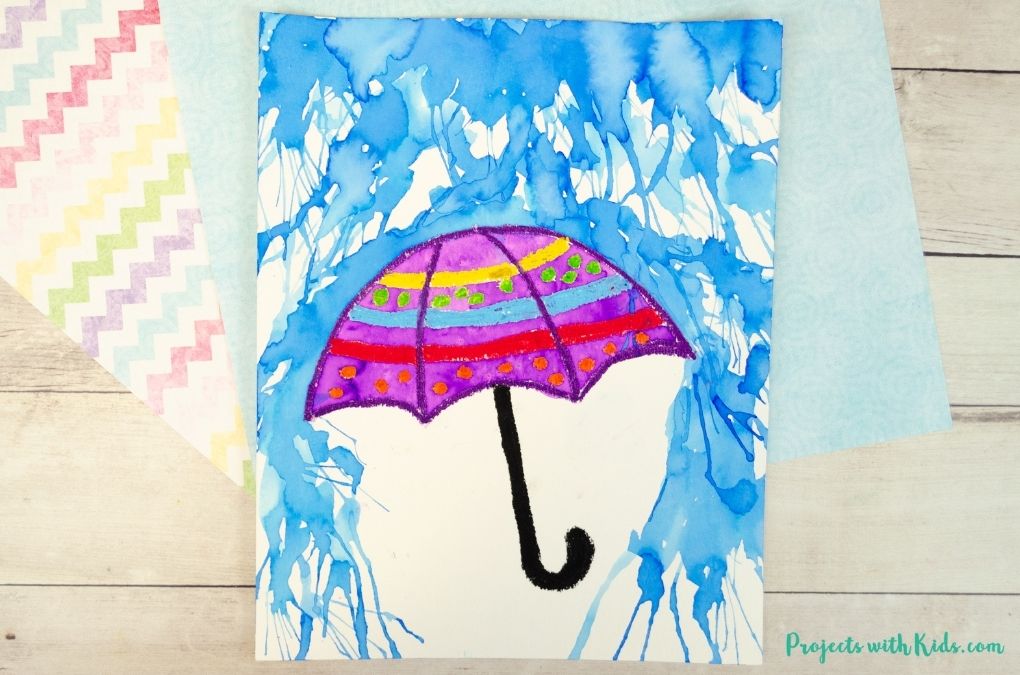
Use oil pastels to draw and decorate the printable shape on watercolor paper, creating a resist that repels paint. Kids brush watercolor around it, then use a straw to blow the wet paint downward into long drippy lines.The blow-painting step feels silly in the best way, and experimenting with gentle versus firm breaths keeps kids engaged.Related: Spring Pattern Block Mats
Sam is the crafter and founder of Simple Everyday Mom. She has been featured in Oprah Mag, Good Housekeeping, The Spruce Crafts, Country Living, The Bump, and more.