All activities require adult supervision. By using this site, you agree to our terms of use. This post may contain affiliate links, sponsored links, and ads. As an Amazon Associate and participant in other affiliate programs, I earn from qualifying purchases.. Read our disclosure policy.
April is a great time to pull out the markers, glue, and paper. There’s no shortage of inspiration, whether spring showers, Easter bunnies, or Earth Day! If you’re hunting for April crafts for kids, we’ve created some simple ideas that keep little hands busy and happy all month.
You can find even more inspiration at Simple Everyday Mom , where clever ideas and free printables make planning a breeze. Scroll down and see which one your kiddo will want to try first!
Pin
April Crafts For Kids
From upcycled art to bunny cards, there’s something here for everyone—especially for moms, teachers, and caregivers looking to fill a rainy afternoon or prep for a themed classroom activity.
Each idea uses everyday supplies and focuses on hands-on fun, making them perfect for preschoolers and big kids. Want to teach your kids about the planet? There’s a whole bunch of Earth-themed activities. Need something cute for Easter? We’ve got that too.
Earth Day
Pin
Handprint Earth
With this simple activity, little hands turn into our planet. They use a cut-out hand shape decorated in blues and greens to look like Earth. It's an easy, personal project that kids will love because they get to see their hands become a part of a bright Earth Day keepsake.
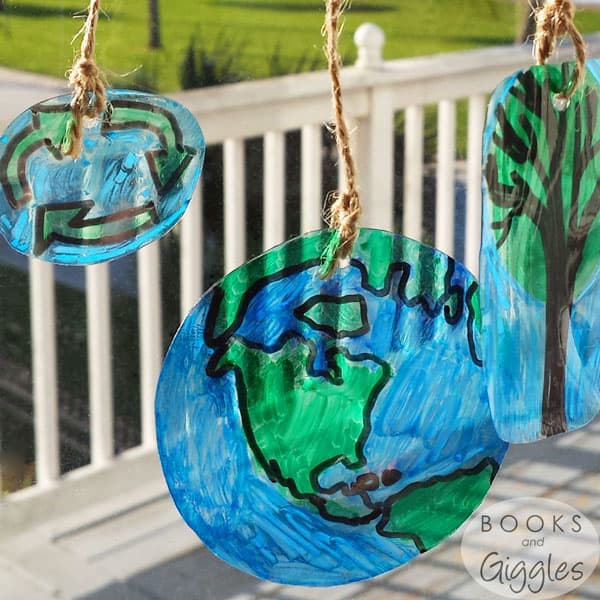
Recycled plastic transforms into a colorful suncatcher that looks amazing hanging in the window. This eco-friendly project lets kids color or paint on upcycled plastic to create art that shines in the sunlight. They'll love that they turned something old into something beautiful.Related: Earth Day Tracing Worksheets
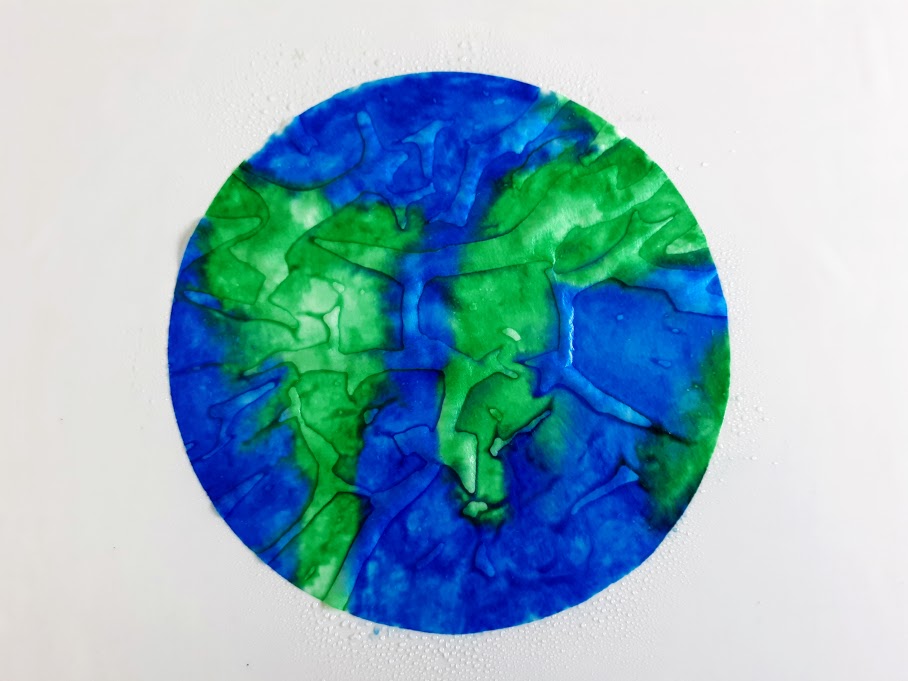
A plain coffee filter becomes a mini Earth when kids add blue and green colors and spritz it with water. They'll be delighted as the colors spread and blend into a swirly planet design. It's quick to make, so even the youngest can create their own Earth Day artwork.Also try: Earth Day Name Craft
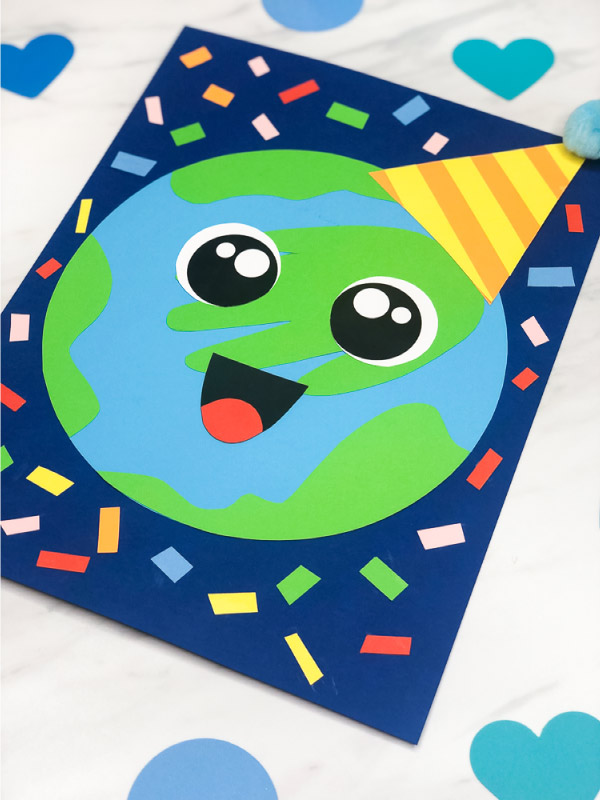
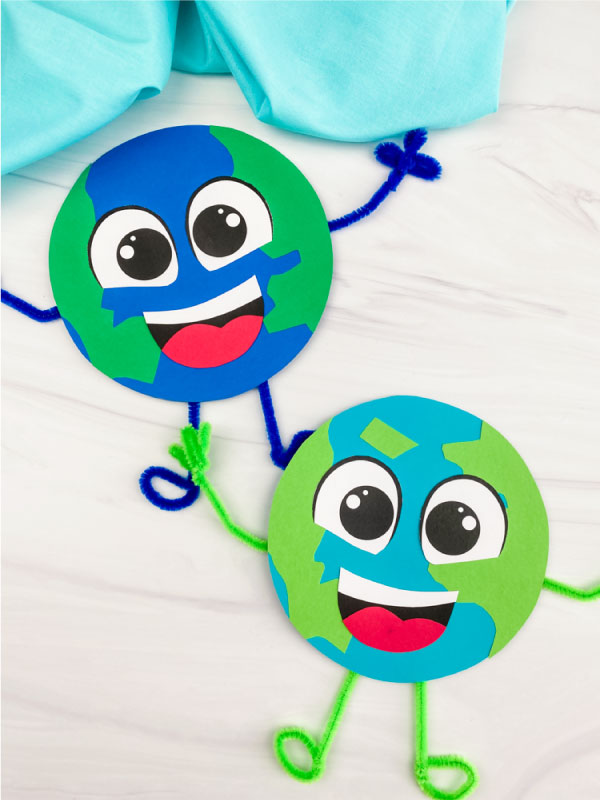
A few basic paper shapes form a cute little Earth with continents and maybe a smiling face. Kids can practice cutting and gluing while creating their planet and enjoy adding personal touches to make it unique.
Using a paper plate as a base, children paint soft cotton balls in blue and green and stick them on to create a fluffy Earth. This project gives kids a fun sensory experience with the fuzzy cotton, creating a cute, touchable 3D planet.Related: Earth Day Worksheets
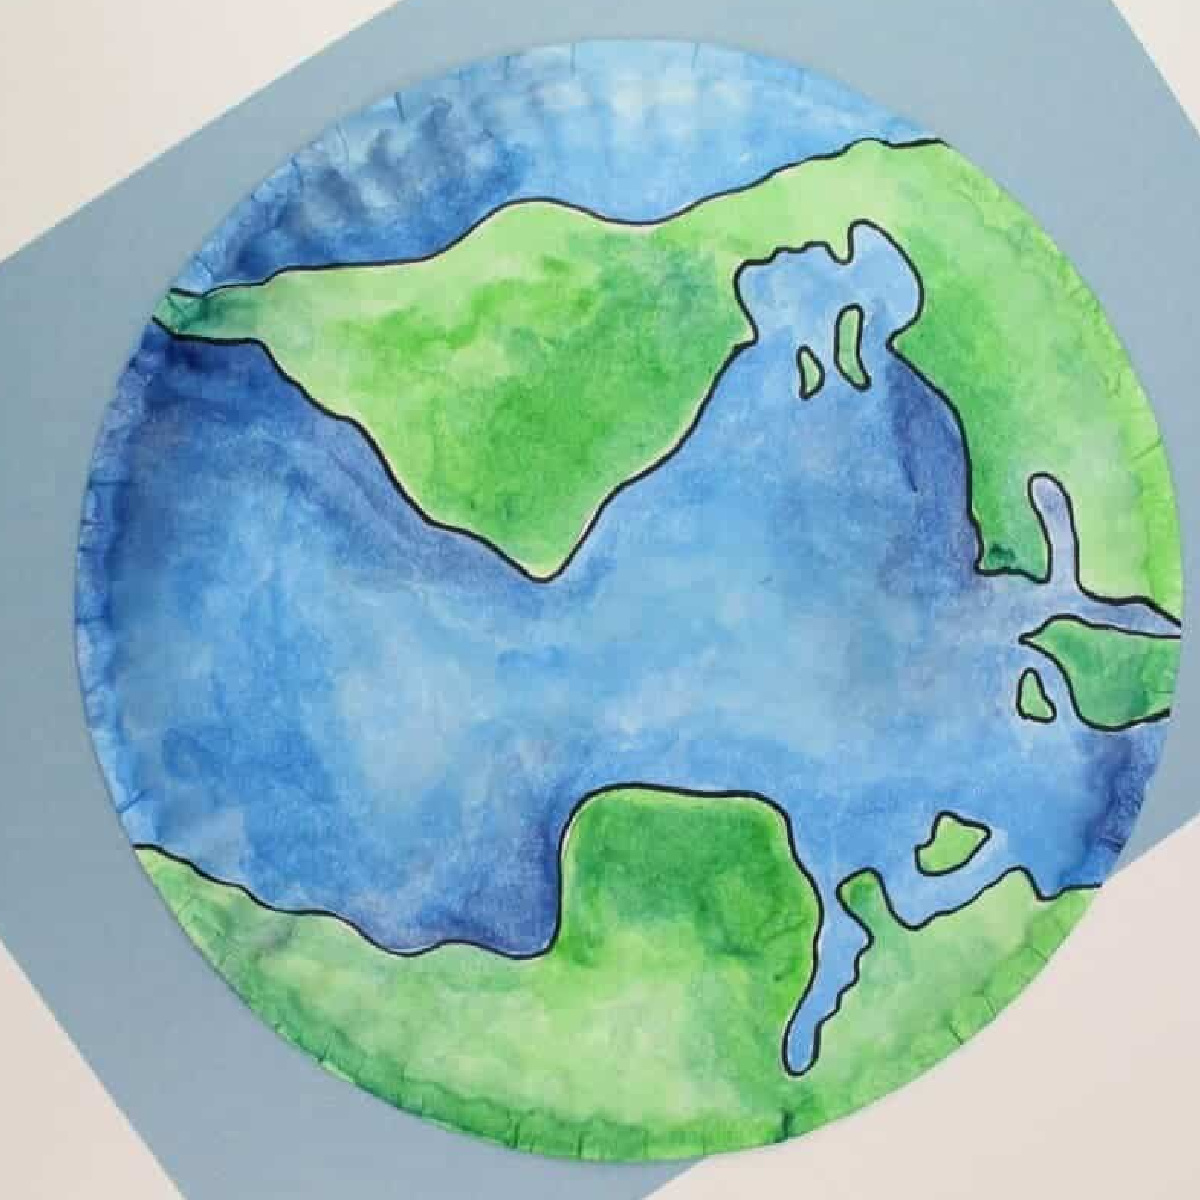
With just a paper plate and some paint or colored paper, kids can create their own Earth. It's a super simple activity perfect for toddlers and preschoolers — they'll have fun swirling blue and green onto the plate and feel proud showing off their planet.Also try: Earth Day Connect The Dots
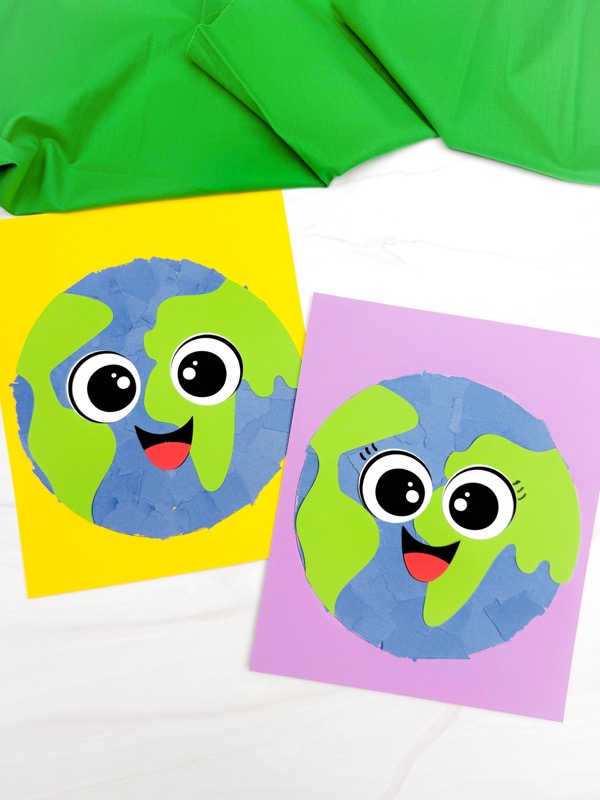
Kids tear up bits of colored paper and glue them onto a circle to make a textured Earth collage. Ripping paper is a blast for little ones, and the result is a unique Earth art piece that shows off a remarkable mosaic of blue oceans and green land.
This collection offers a variety of Earth Day project ideas tailored for the preschool crowd. Each activity uses easy materials (like recyclables, paint, and paper) so little ones can explore and create while learning about our planet in a hands-on way.Related: Earth Day Activity Pages
Painting a paper plate to look like Earth becomes a fun lesson about caring for our world. Children enjoy mixing blue and green paint to make their globe, and it opens up a chance to talk about why our planet is unique — all while they're busy creating a cute Earth of their own.Also try: Earth Day Hat
This activity turns a paper plate Earth into a heart-filled masterpiece by adding a simple yarn-sewing twist. Kids lace bright yarn through the plate to create a heart shape in the middle of their planet, giving them a fun first try at “sewing” and a lovely Earth Day decoration to display.Related: Earth Day Card Craft
In this creative alphabet project, the “E” becomes “E is for Earth” in the ” decorate a big letter E with the colors and shapes of Earth—thin—thinking green hues or tiny Earth cutouts.” This activity makes learning the letter extra memorable as it celebrates our environment.Also try: Earth Day Paper Plate Craft
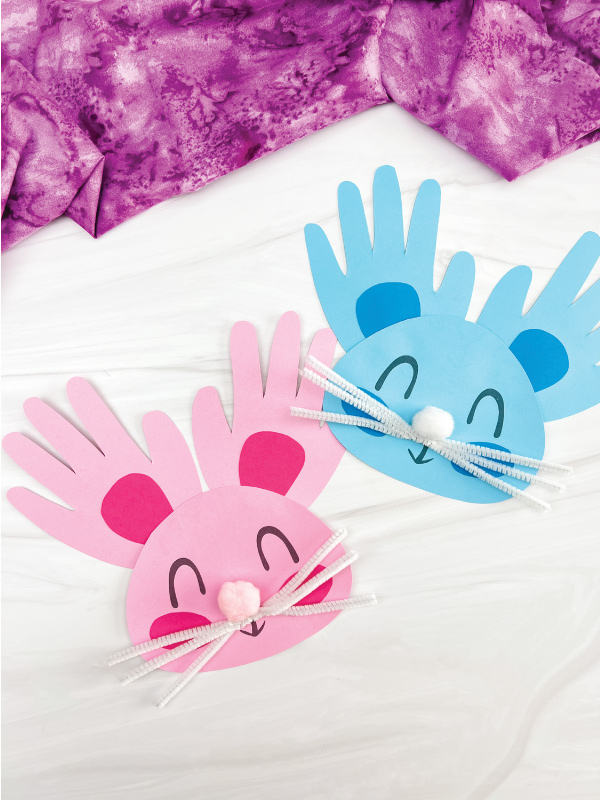
A child's hand outline becomes an adorable Easter bunny with just a bit of cutting and coloring. This project is simple and sweet, and kids will get a kick out of seeing their hand shape turned into a floppy-eared friend to celebrate the holiday.
This project combines a paper plate and a frilly paper doily to make one fancy-looking bunny. Children glue on fun details like wiggly eyes, whiskers, and a cute nose and end up with a bunny decoration that's as adorable as it is easy to create.Related: Easter Bunny Paper Craft
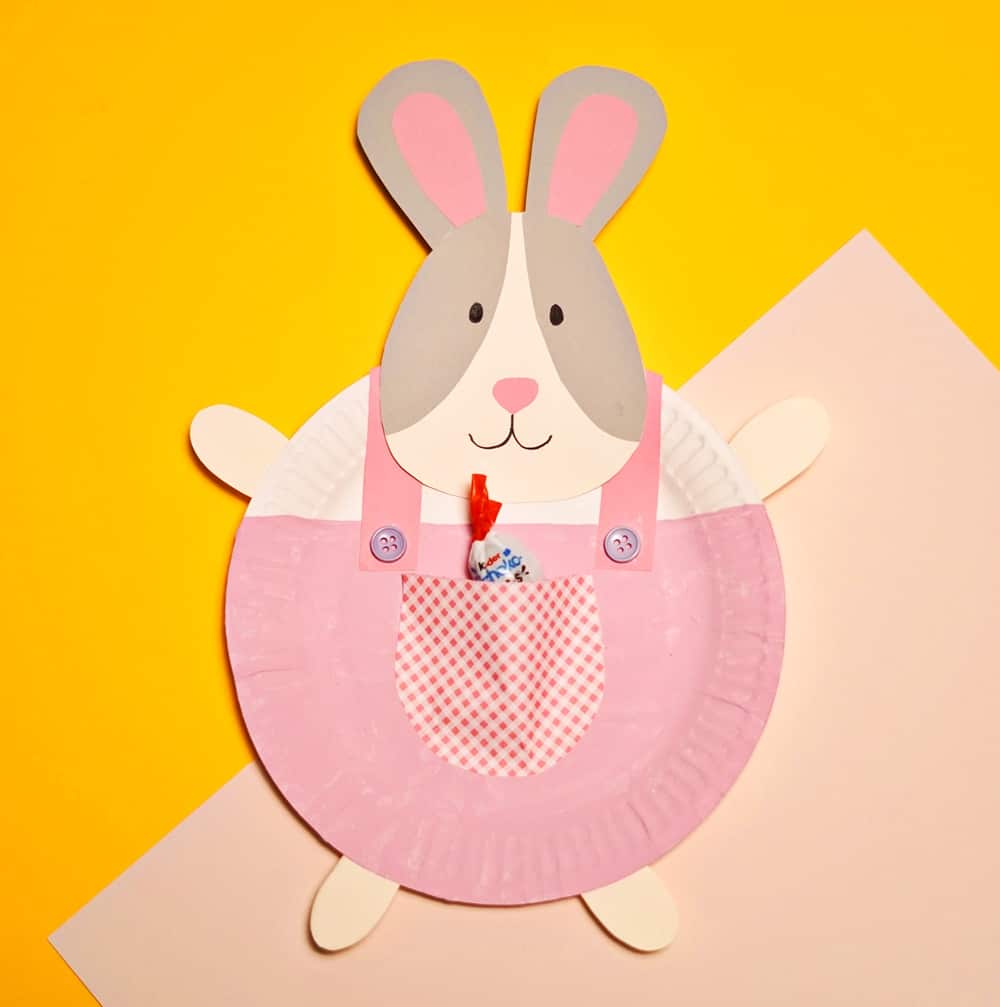
An ordinary paper plate turns into a cheerful bunny face with colorful details and even a little pocket for treats. Kids enjoy painting and decorating their bunny and will be thrilled to stash a small Easter surprise in its “belly.”Also try: Easter Bunny Activity Sheets
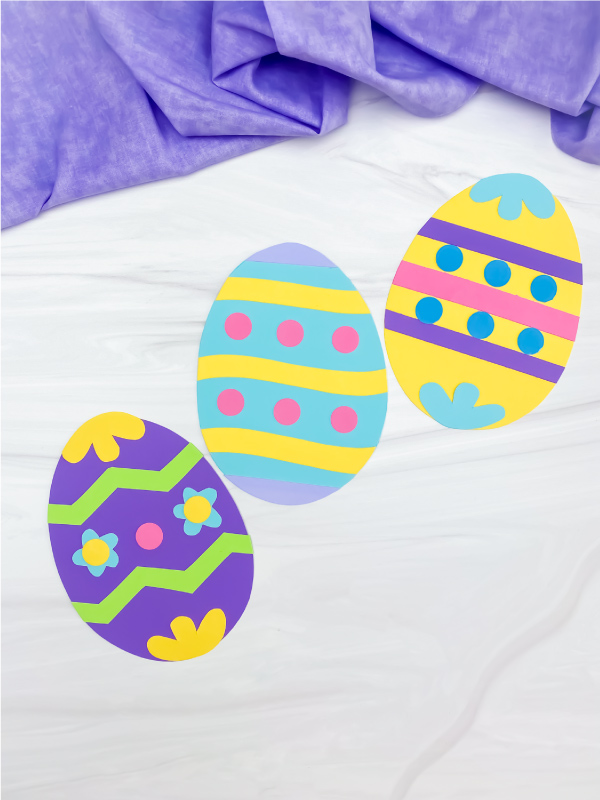
Kids design their own paper Easter egg, decorating a big egg shape with all sorts of paper cutouts, colors, or patterns. It's an excellent chance for them to practice scissor skills and creativity, and they'll have a blast making a bright, unique Easter decoration to show off.
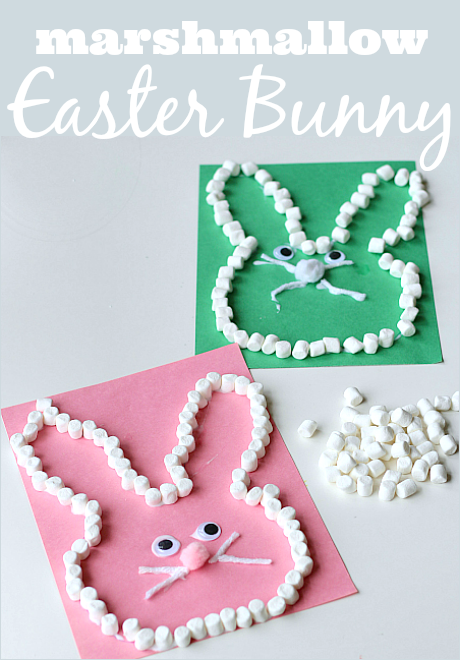
In this activity, soft marshmallows become art supplies, and kids glue them onto a bunny shape to make a fluffy white rabbit. It's a playful way to create because children love using a sweet treat as art material, resulting in a puffy bunny that looks good enough to hug.Related: Easter Bunny Cutting Practice Worksheets
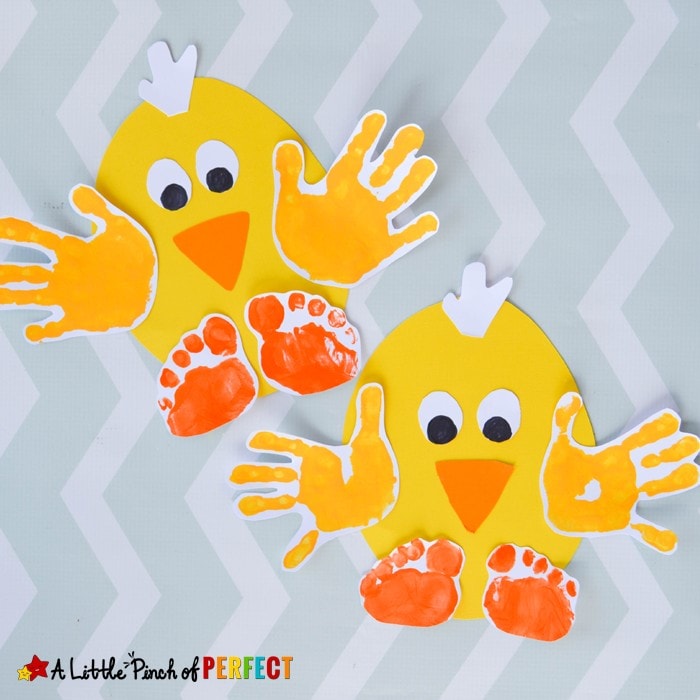
A splash of yellow paint and a handprint is all it takes to make this cute baby chick. Little ones will laugh at the tickle of paint on their hand and be proud of the adorable chick they create, complete with paper beak and feet once the paint dries.Also try: Chick Card Craft
With some folded paper and bunny decorations, kids can create an Easter card that opens up to a surprise bunny inside. This art makes for a heartfelt homemade card to give to someone special, and children enjoy adding personal touches and maybe a fun message or drawing inside.
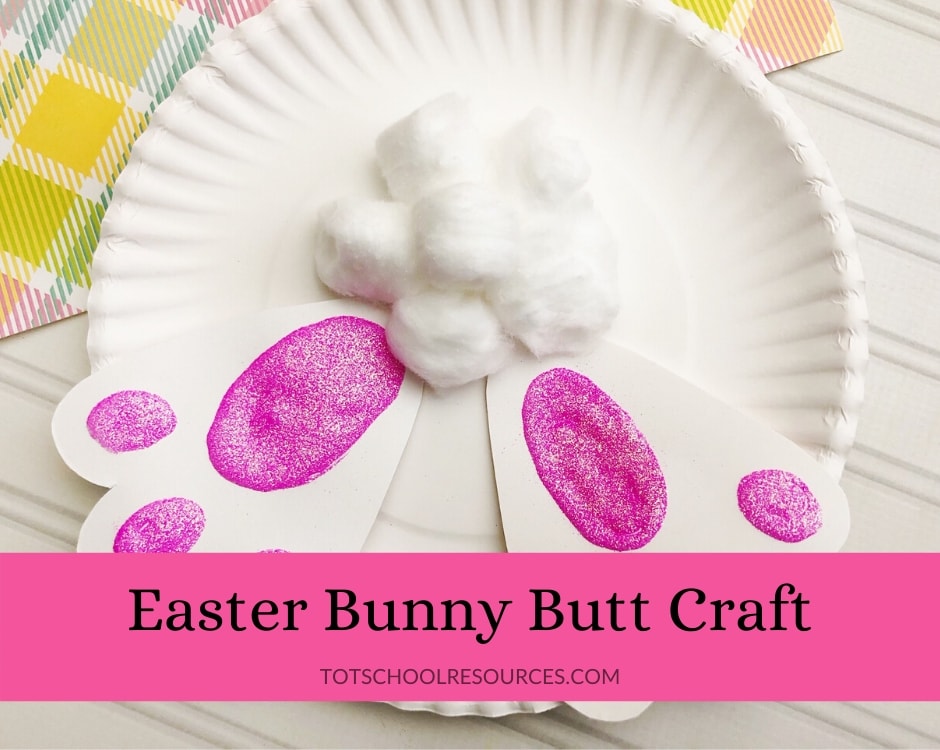
Toddlers can easily make this bunny project that shows the bunny's puffy tail end. Using a paper plate, they glue cotton balls to create a fluffy tail and add little paper feet, and they'll find it so funny to make the “bunny butt” with its big soft cotton tail.Related: Easter Bunny Name Craft
This meaningful art recreates the scene of three crosses on a hill against a sunset sky using simple paper and paint. Kids practice their cutting skills to make the cross silhouettes and blend warm colors for the sky, and it's a unique project that helps them connect with the Easter story.Also try: Easter Tracing Worksheets
These creative ideas use colorful yarn to make Easter art, like winding string, to form a cute baby chick design. Working with yarn gives kids a new texture to explore, and they'll enjoy the hands-on process of looping and gluing the yarn to bring their Easter creations to life.Related: Chick Name Craft
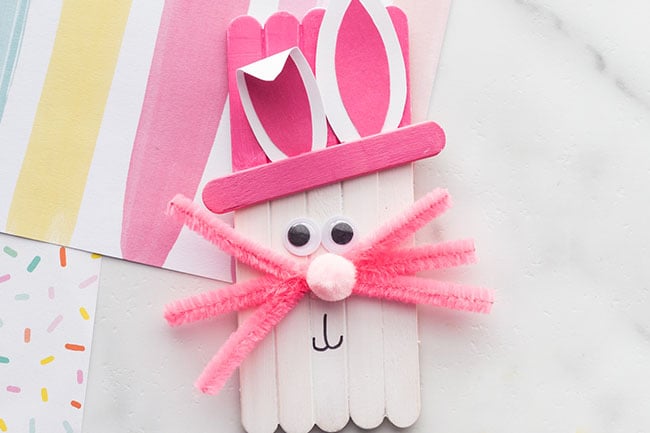
Popsicle sticks become the building blocks for an Easter project, such as piecing together a bunny or even a group of bunnies in different colors. It's a simple project with a bit of painting and gluing, and kids love that they can make a little bunny family using popsicle sticks and imagination.Also try: Easter Activity Sheets
In this recycling project, old egg cartons find new life as a litter of tiny Easter bunnies. Children paint each carton cup and add ears and faces to turn them into cute bunny heads, and they'll have fun making a bunch of little bunnies they can play with or display.Related: Easter Bunny Stick Puppet
In this eco-friendly Easter activity, kids decorate cardboard instead of plastic eggs. They can paint or color the sturdy cardboard egg shapes however they like and might even hide them or use them as ornaments, enjoying an Earth-friendly twist on traditional Easter eggs.Also try: Toilet Paper Roll Easter Bunny Craft
Kids create their Easter eggs by cutting egg shapes from old cardboard (like from a cereal box) and decorating them with paint or paper. After making a batch of these colorful eggs, they can place them into a homemade paper basket. This way, children create the eggs and enjoy “collecting” them in their basket.Related: Easter Bunny Craft
This bunny craft is interactive — it actually “chomps”! Made mainly from a paper plate, the bunny has a movable mouth that kids can open and close to pretend it's munching on a paper carrot. Kids are excited by how their bunny comes to life, and they'll have a blast feeding it and making it hop around.Also try: Easter Bunny Photo Craft
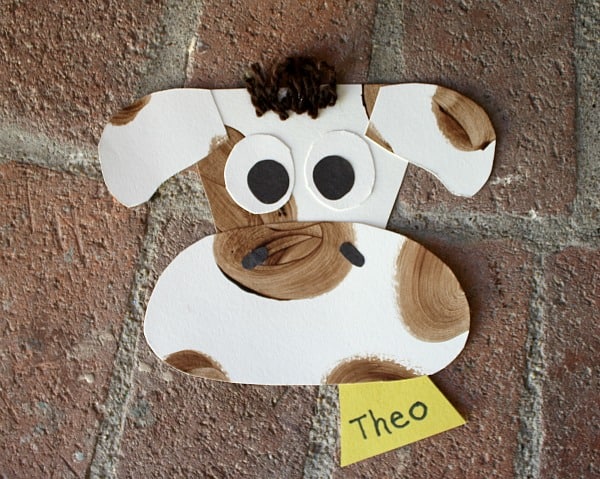
Kids can transform a tracing of their hand into a cute cow, complete with spots, ears, and a little tail. It's a fun farm project that feels personal — children love that their hand shape is the cow's body, and they'll have fun adding all its features.
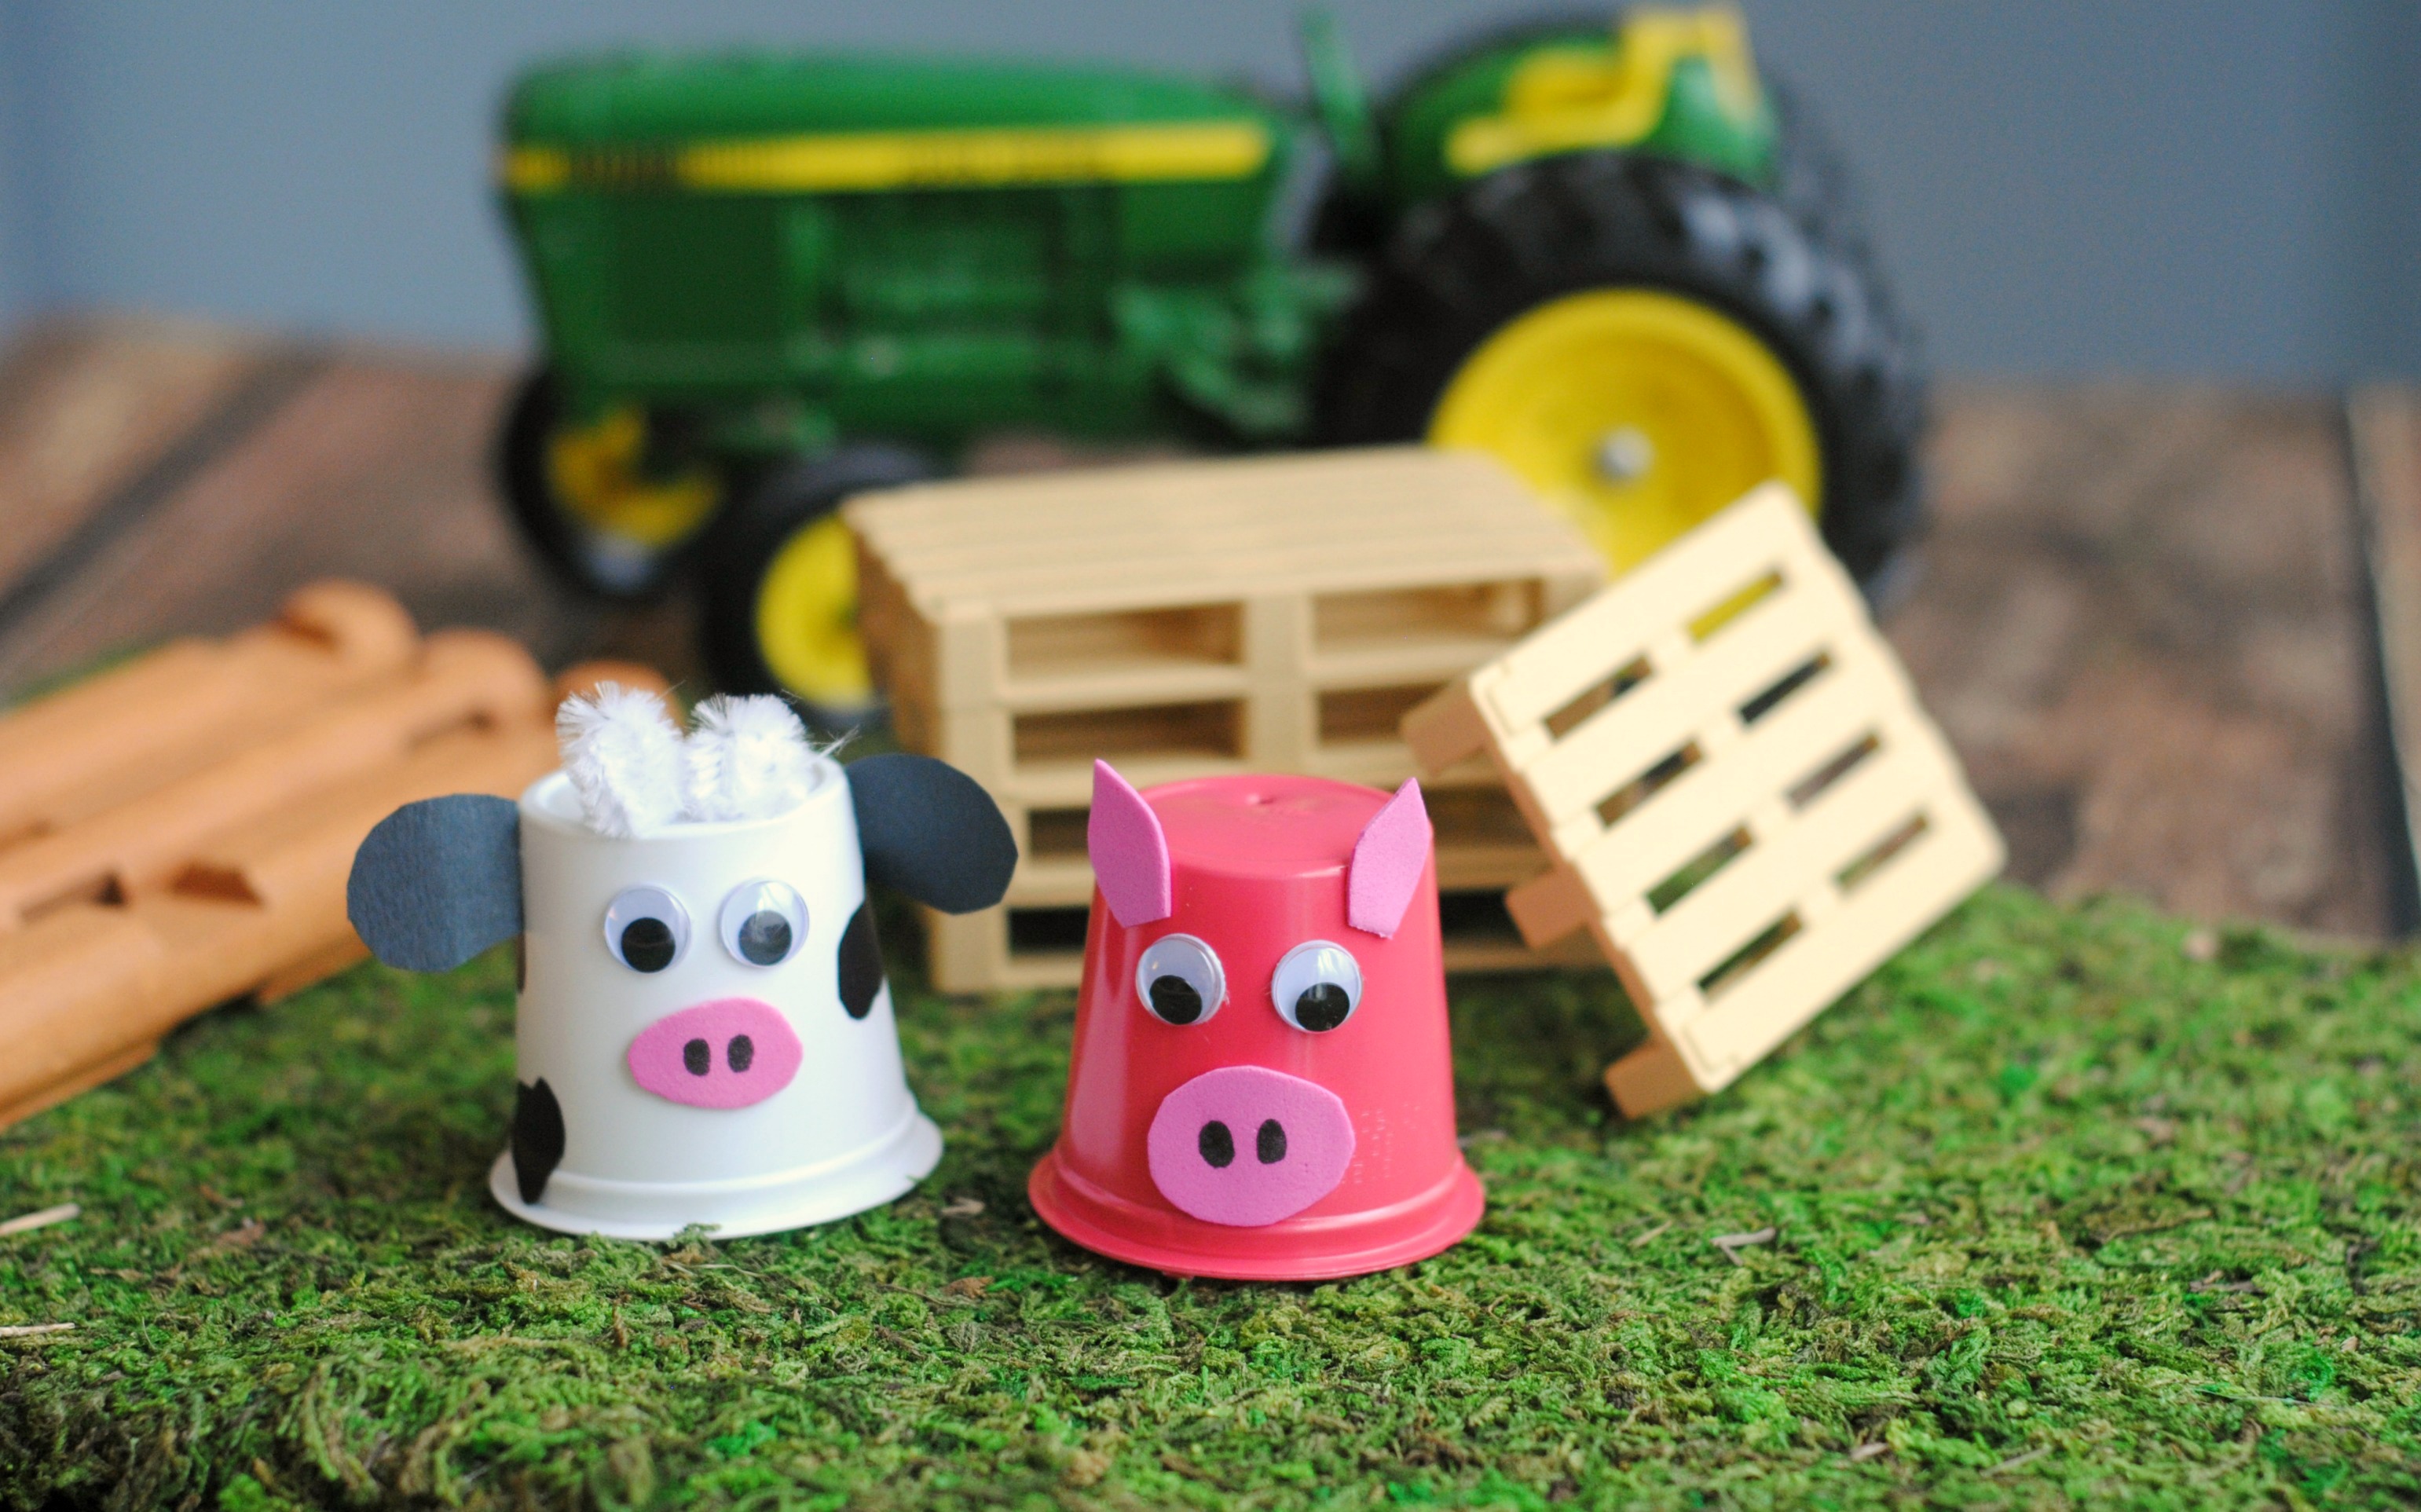
Don't toss those used K-Cup coffee pods because they make perfect mini farm animals! In this project, kids paint and decorate the small plastic cups to become cows, pigs, chicks, or any barnyard friend they like. They'll be proud of how they turned trash into a set of cute toys.Related: Farm Animal Printables For Preschool
A printable horse outline and four clothespins combine to create a standing horse ready for play. Kids color and cut out the horse, clip on the clothespin legs, and enjoy moving their creation across the table like it's trotting along.Also try: Horse Headband Craft
A fluffy sheep comes to life with just some paper and something soft for the wool (like cotton balls or pom-poms). Kids glue the “wool” onto their paper sheep and add a smiling face, and they adore how cuddly and cute their little lamb looks when it's finished.
This clever art turns the letter “C” into a cow by adding paper horns, ears, and spots to the letter's shape. It's a great way to mix learning and art, so kids practicing their alphabet also get to make a silly cow character, which helps them remember that “C is for Cow” in a memorable way.Related: Cow Headband Craft
By cutting a paper plate in half and decorating it, kids create a pig that rocks back and forth on its rounded edge. They can paint the plate pink and add a snout, legs, and a curly tail, then have fun tapping their pig to watch it wiggle like a real piglet trotting.Also try: Pig Headband Craft
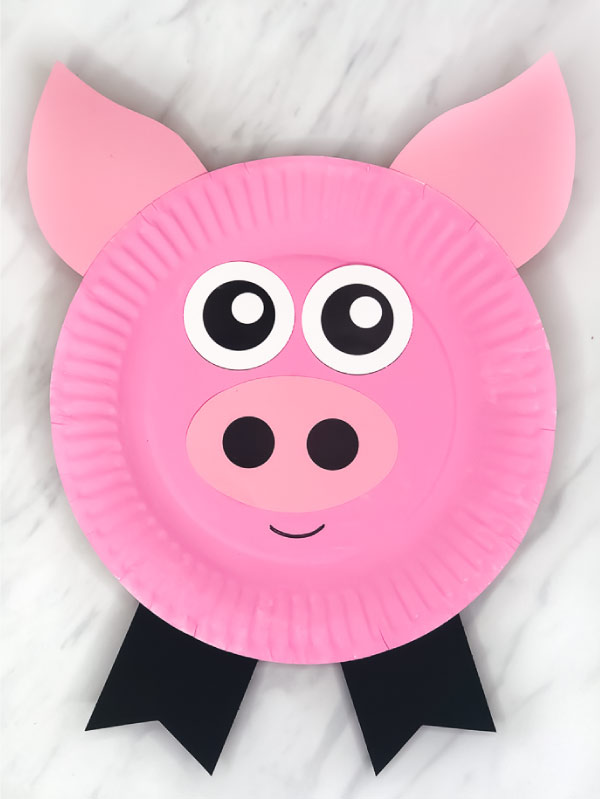
This simple activity turns a paper plate into a pig's face with pink paint and a few paper cutouts. It's easy enough for young kids—they'll enjoy painting the plate and sticking on the pig's big snout and ears, ending up with a friendly farm animal face they can hang up.
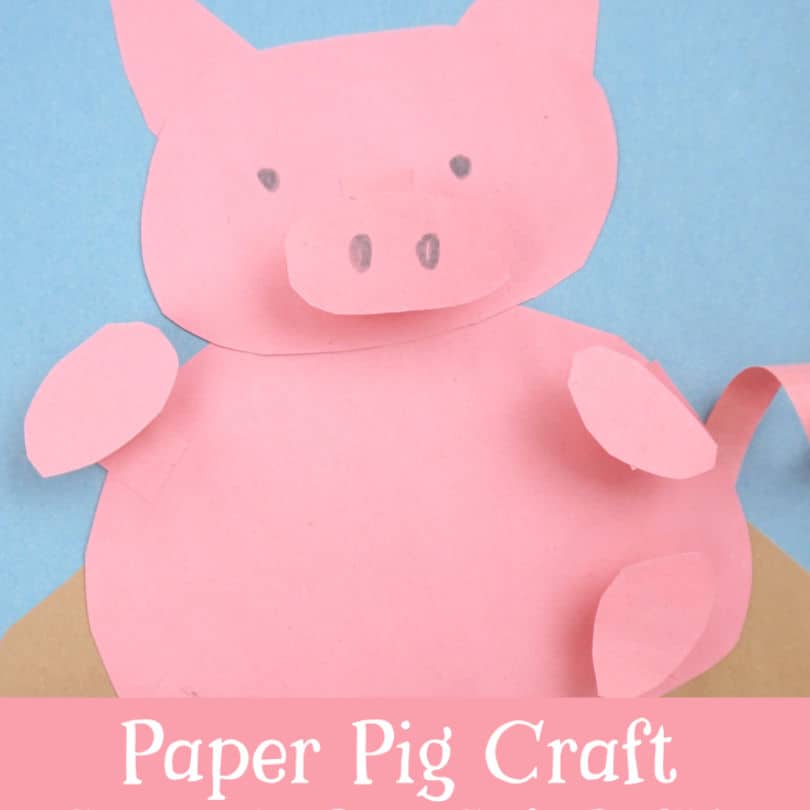
Kids use construction paper to create a pig with a little pop-out effect, like a 3D nose or curly paper tail. The instructions are easy to follow, and children get to practice simple folding or curling techniques, resulting in a cute piggy that isn't flat on the page but has some fun dimensions.Related: Paper Bag Pig Craft
All kids need to make this friendly cow is some construction paper and glue. They cut out simple shapes for each part (like an oval for the body and circles for spots) and glue them together into a cow. It's easy for preschoolers to manage, and kids can decorate their cows with whatever colors or patterns they imagine.Also try: Cow Paper Bag Puppet Craft
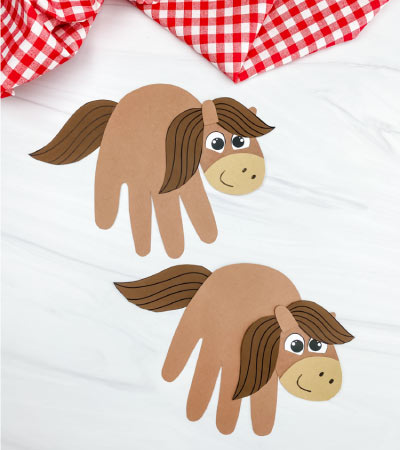
Tracing a hand can also make a trusty horse – one finger might become the head or tail, depending on the design! After cutting out their handprint, kids add details like a mane, eyes, and hooves, creating an exceptional horse with their “hand” in it. It's a keepsake and a farm friend all in one.
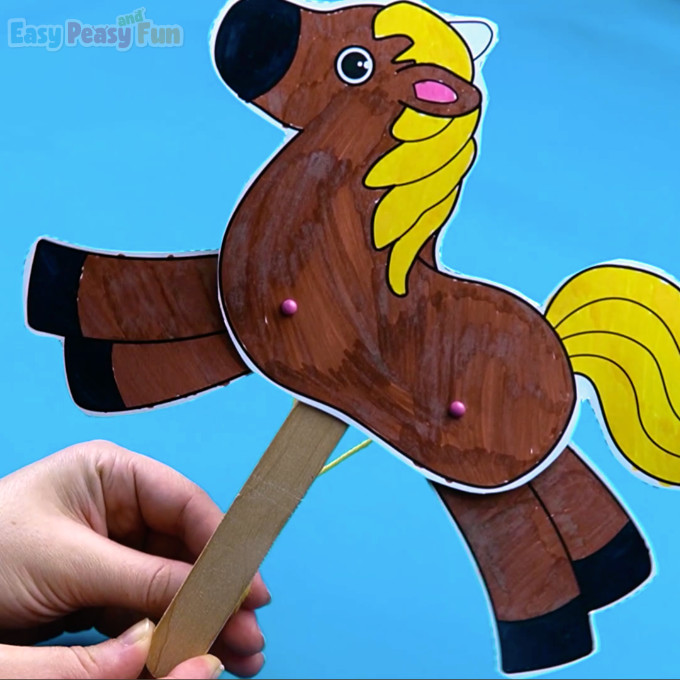
This paper horse features movable parts, letting kids make it trot, kick, or strike fun poses. By attaching the legs and head with brads, they create flexible joints—and once assembled, it's perfect for imaginative play or even setting up a little horse show.Related: Paper Bag Horse Craft
Inspired by the classic story, this project lets kids create their own billy goat (or all three!). Using paper plates and paint, they'll generate a goat complete with little horns and a beard. After making their goats, children often love to act out the Three Billy Goats Gruff tale, using this art as characters.Also try: Goat Headband Craft
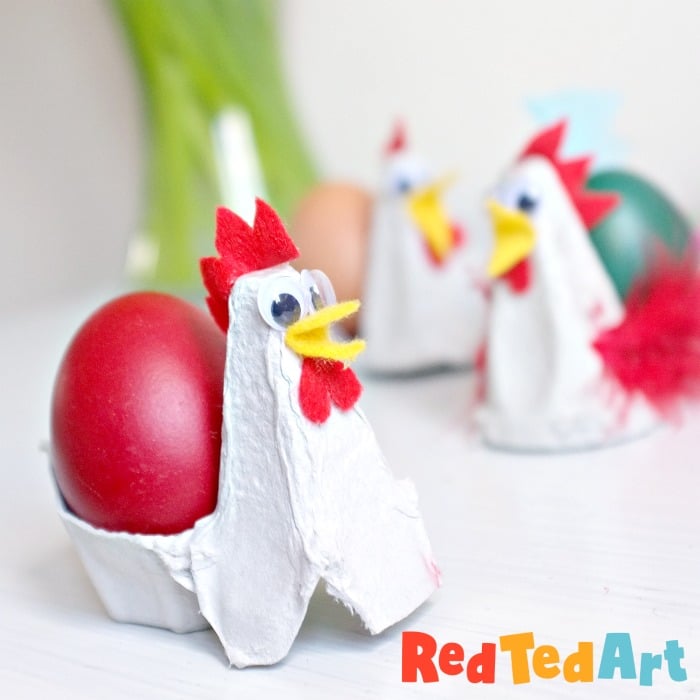
Kids can cut up an empty egg carton and paint it to become a flock of tiny chickens that hold real eggs. They paint the carton pieces yellow, add paper beaks and red combs, and then use them as egg cups—perfect for keeping Easter eggs or as a fun way to serve a hard-boiled egg. Children get a kick from turning egg packaging into a cute chicken family.Related: Toilet Paper Roll Chicken Craft
In this activity, two hand cutouts become the colorful wings of a butterfly. Kids can trace their hands on paper, cut them out, and decorate them with many colors or stickers. Once they add a body in the middle, they'll have a bright butterfly keepsake that shows off their unique “wing” patterns.
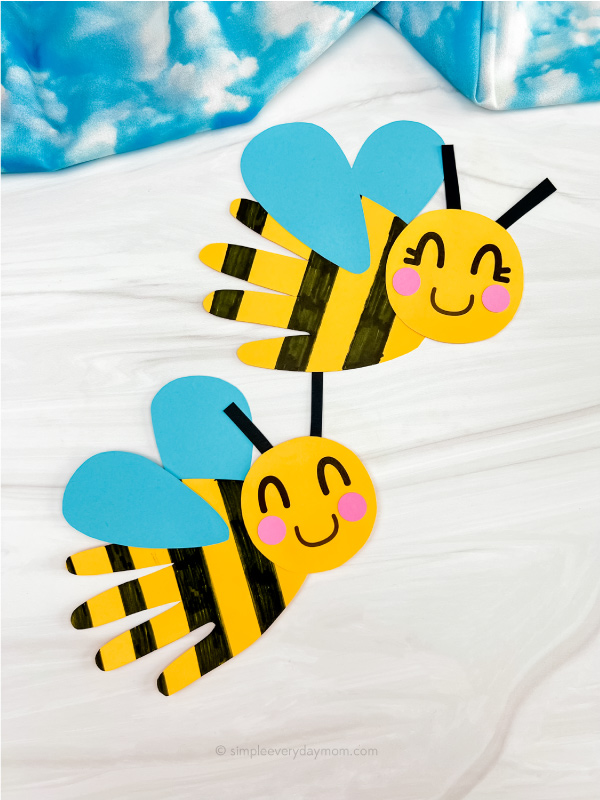
When kids use a handprint to make the bee's body or wings, Buzzing bees get a personal twist. After tracing or painting their hand, children decorate it with yellow and black stripes, add eyes and antennae, and turn it into a friendly bumblebee. It's a straightforward activity that combines messy painting fun with a sweet final product.
A small paper plate makes the perfect base for a big bumblebee. Kids paint it yellow and add black paper stripes and wings, turning the plate into a giant bee ready to take flight. They enjoy the bold, simple design and the chance to make an ordinarily minor bug into a jumbo decoration.
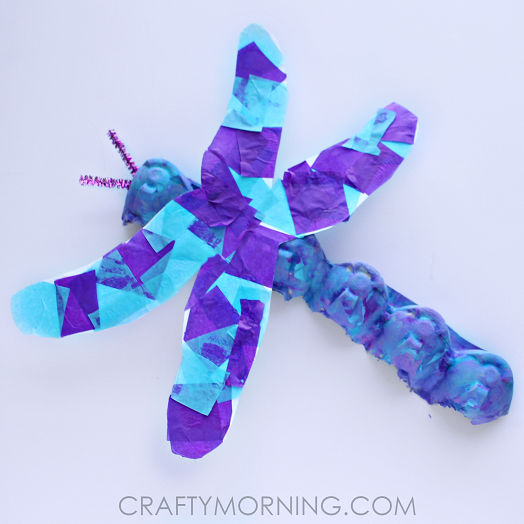
An egg carton isn't just for eggs – kids can turn it into a dragonfly! By taking a strip of connected carton cups and painting it, they create the dragonfly's long body. Adding some enormous wings (from paper or plastic) and googly eyes brings the insect to life, and children will love how a simple egg carton becomes a vibrant, buzzing bug.
This ant might wobble because its head is on a springy paper strip. Kids assemble a cute paper ant with three body sections and attach the head so it jiggles, giving the project a fun bobblehead effect. They'll laugh at their wiggly ant and enjoy making it “nod” as if it's alive.
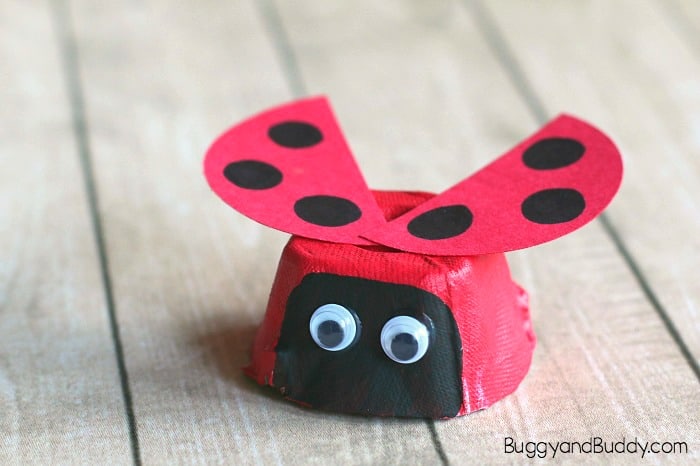
One section of an egg carton is all it takes to create a darling ladybug. Kids paint the little cup red, add black spots and paper legs, and suddenly, they have a tiny ladybug friend. It's a quick activity, but children get excited seeing how a plain egg carton piece can transform into a bright ladybug they can play with.
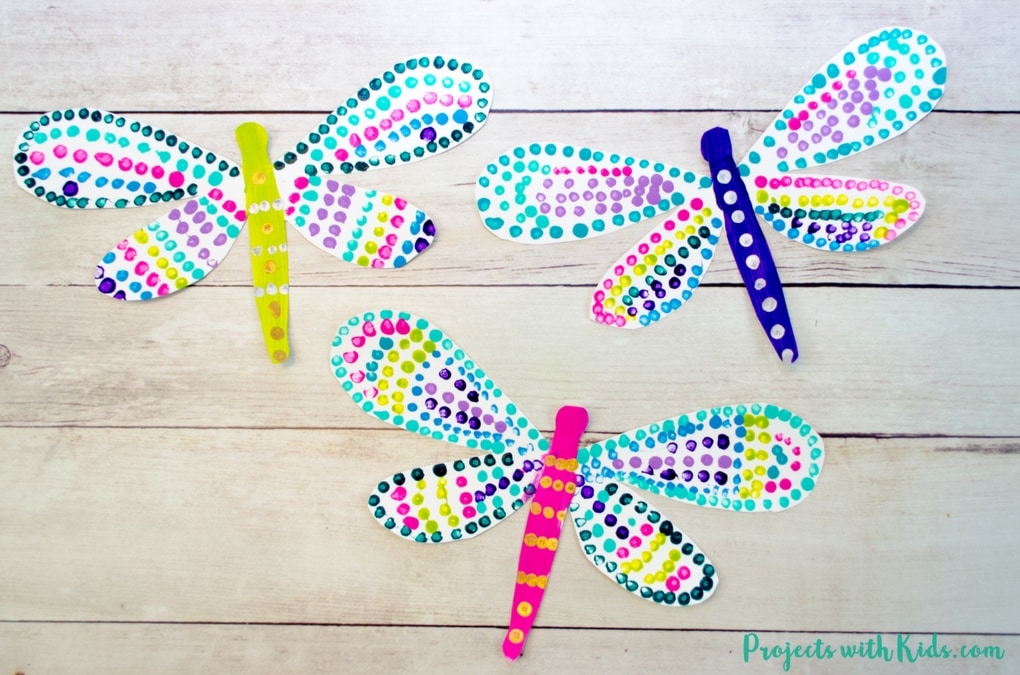
Instead of a paintbrush, kids use cotton swabs (Q-tips) to dot colorful paint onto a dragonfly's wings. This technique creates beautiful dotted patterns that make each dragonfly unique. Children find it relaxing to dot the paint and love the delicate, rainbow-like wings they create for their dragonflies.
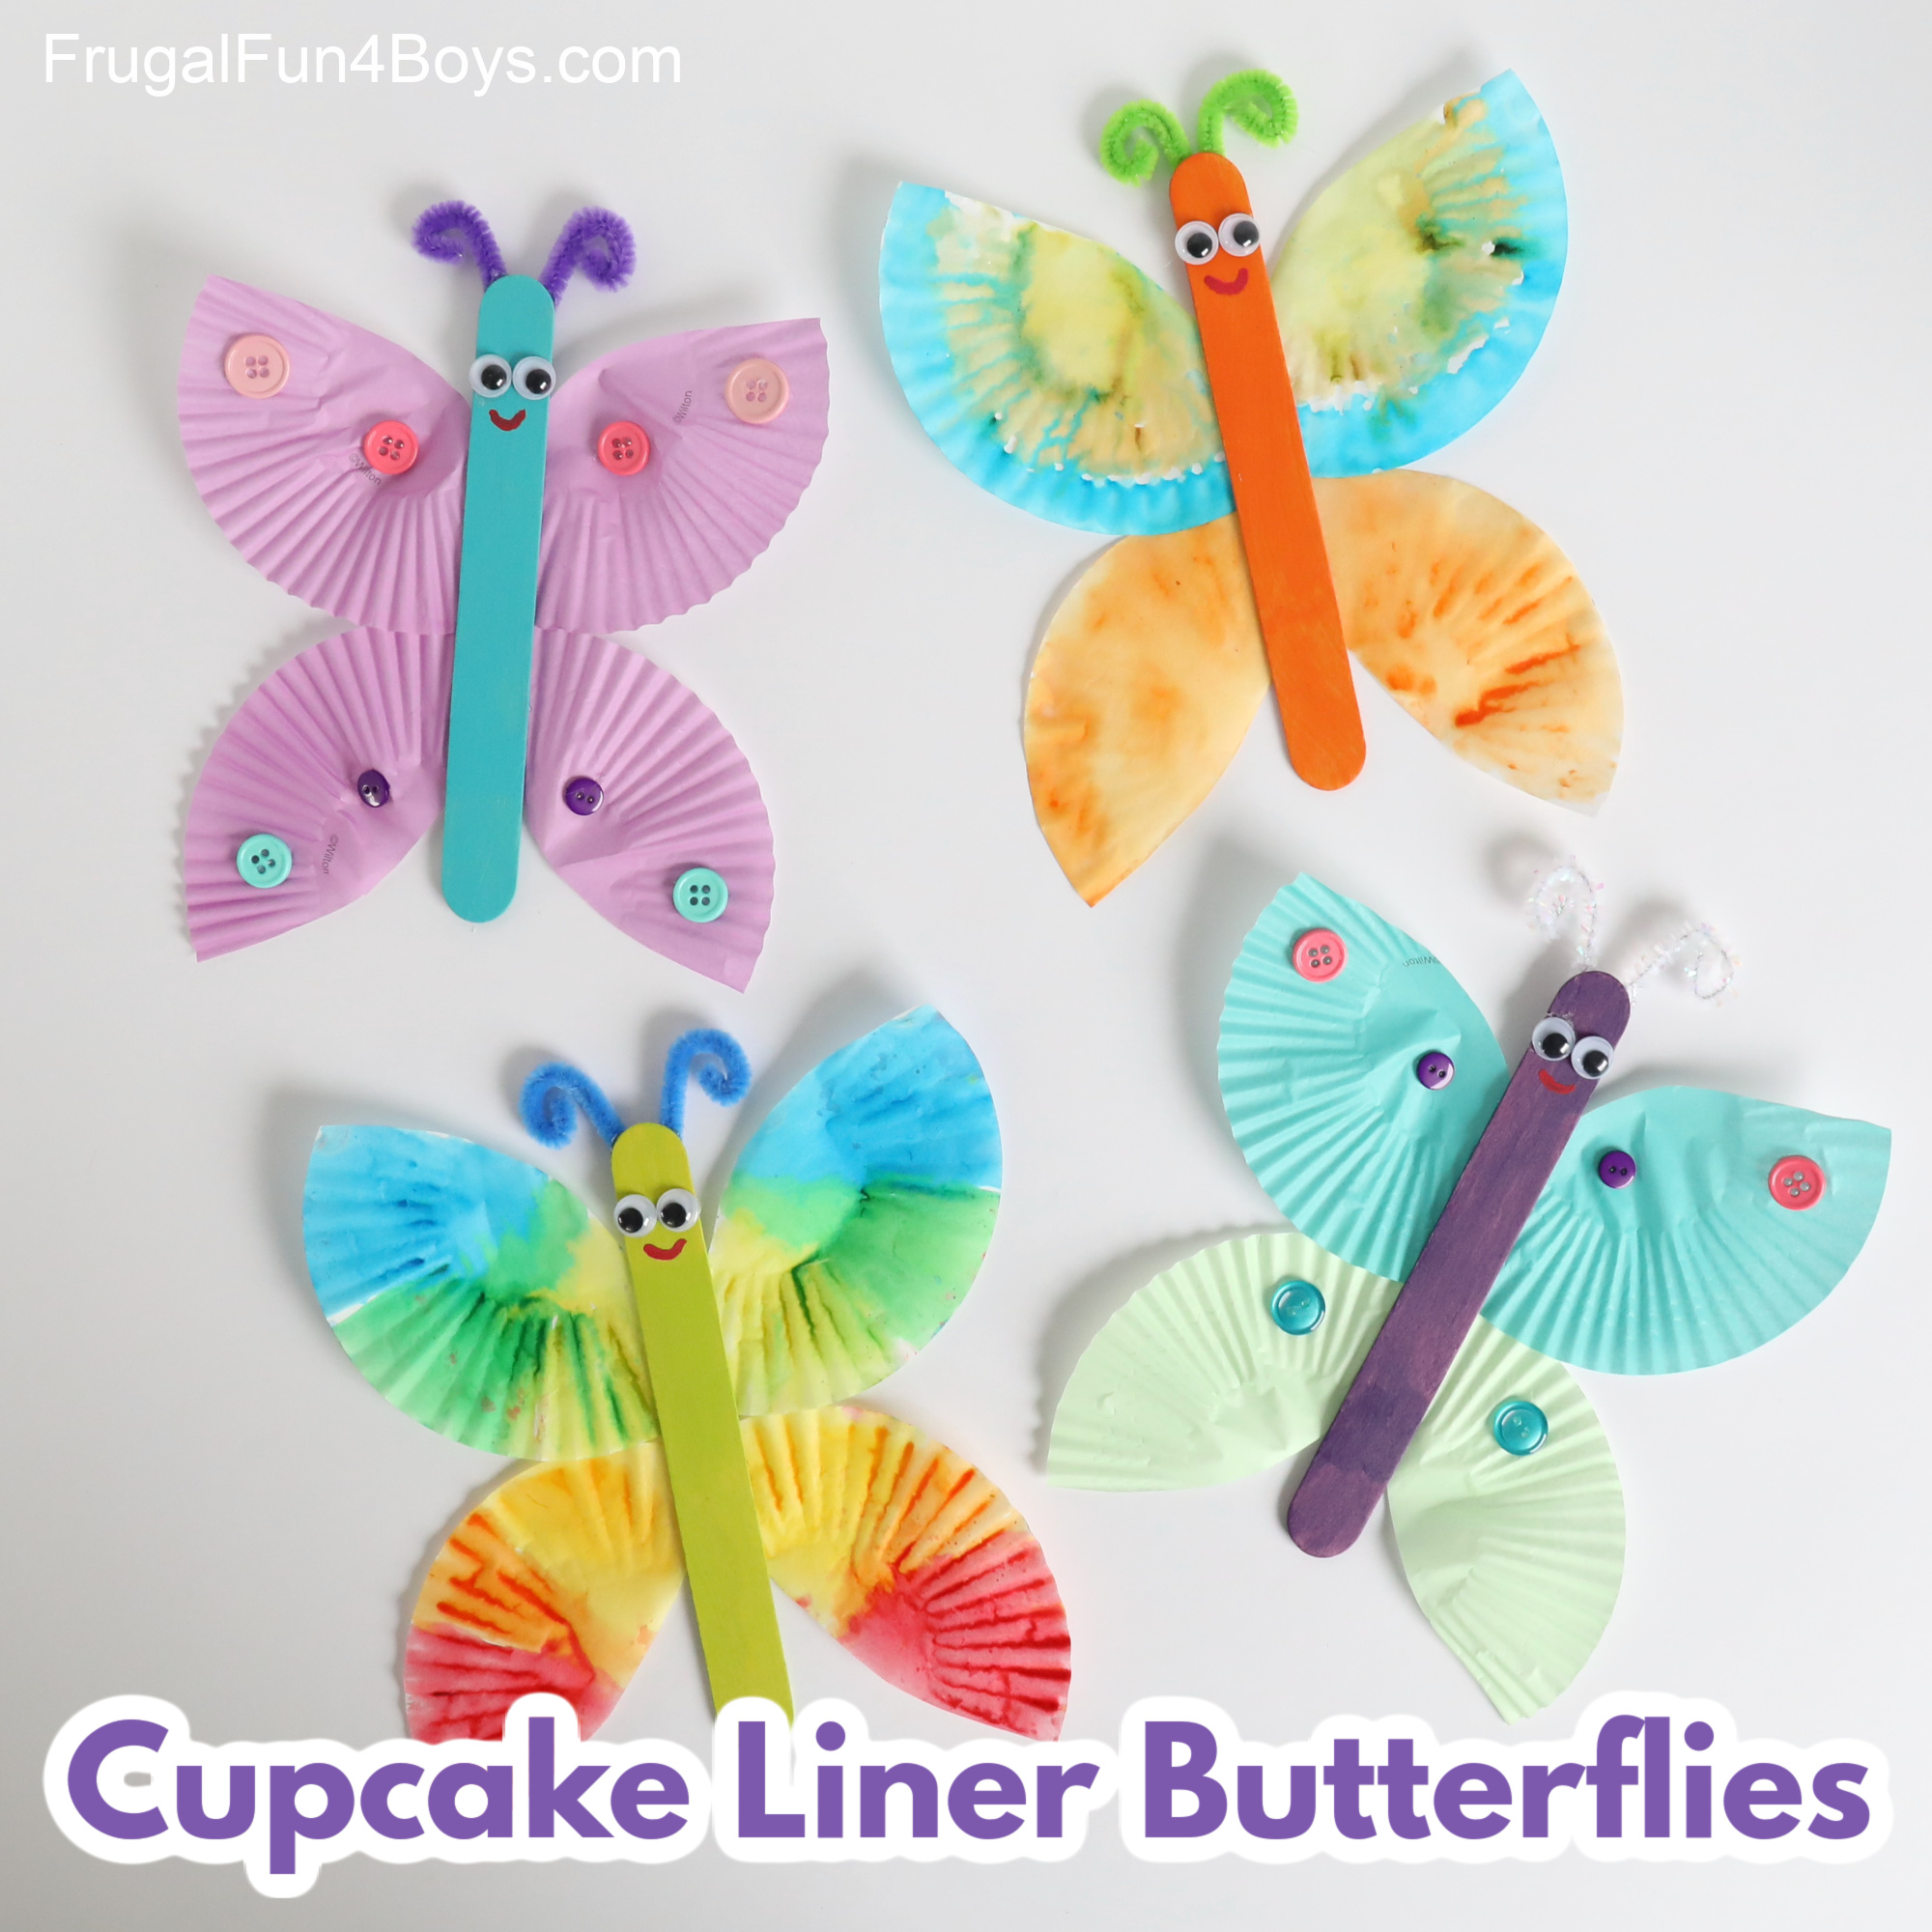
Cupcake liners aren't just for baking – they fold and fan out perfectly as butterfly wings. In this simple activity, kids flatten or accordion-fold the liners and attach them to a paper body, making a butterfly in just a few easy steps. Picking out the liners' colors and patterns is half the fun; kids will flutter their paper butterflies.
Children create a butterfly's wings with a cool plaid or checkerboard pattern by weaving paper strips together. They start with a butterfly wing cutout that has slits, then weave colored paper through it over-and-under style. It's like making a placemat, and kids stay engaged as they see a vibrant pattern forming on their butterfly, ending up with art that's both artistic and educational.
This project results in a paper ant that can “walk” or move like a puppet. Kids assemble the ant with its three body parts and six legs, and there's a clever string or stick mechanism that lets them make the ant scuttle along. Children are thrilled when they pull the strings and watch their art come to life.
This easy activity turns A child's handprint into a cute paper puppy. Kids trace and cut out their hands (using a simple template) and add a few paper pieces like ears and a tail. They love seeing their hand shape become a dog, and the finished pup makes an adorable keepsake.
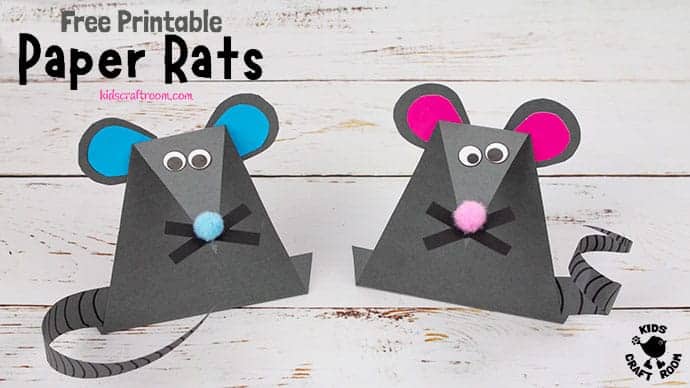
An ordinary sheet of paper becomes a cute little mouse that can stand up independently. Kids use a free template to cut and fold the pieces into a three-dimensional mouse with big ears and a tail. It's super simple to make and gives children an adorable paper pet to play with or display.Related: Mouse Handprint Craft
Kids can create their cat-ear headbands. Using a printable template, they cut out and decorate the cat's face and ears from paper. Once assembled into a headband, it becomes a fun dress-up accessory that lets little feline fans meow and pounce in style.
A simple paper plate becomes a colorful fish in this adorable preschool project. Kids paint or color the plate to make the fish's body, then add a tail and fins cut from paper. It's easy enough for little hands and makes a bright, happy fish friend they'll be proud of.Also try: Fish Handprint Craft
Kids can create a pet fish that lives in a paper plate “fishbowl” instead of water. Using a paper plate as the bowl, kids glue on a paper fish, seaweed, and bubbles (with help from a template) to create a mini underwater scene. They end up with a colorful, fishy friend that doesn't need any feeding, which is part of the fun.
This alphabet project uses the letter “I” to make an iguana with cool, scaly textures. Kids cut out the letter and paper lizard pieces using a printable template, then add spikes or spots to transform the letter I into a friendly iguana. It's a fun way to practice the alphabet while creating a neat little reptile, and kids enjoy the quirky idea of a letter turning into a lizard.
A simple paper lunch bag becomes a slithering snake puppet in this imaginative project. Kids decorate the bag with a snake face, tongue, and bright patterns (using a handy template for the pieces), then slip their hands inside to make the snake hiss and move. They'll love creating their snake and then putting on a pretend reptile show.
In this simple art, a paper plate becomes the shell of a cute little turtle. Kids paint or color the plate and add a paper head, legs, and tail (with help from a template) to bring their turtle to life. It's an adorable project that uses everyday supplies, and children love making the turtle's shell as colorful or spotted as they like.Related: Turtle Handprint Craft
This project turns a plain paper bag into a colorful pet bird puppet. Children glue on bright paper feathers, a beak, and big eyes (with pieces from a template) to create a cute bird character. After creating, they can flap their paper wings and make it “chirp,” sparking lots of imaginative play.
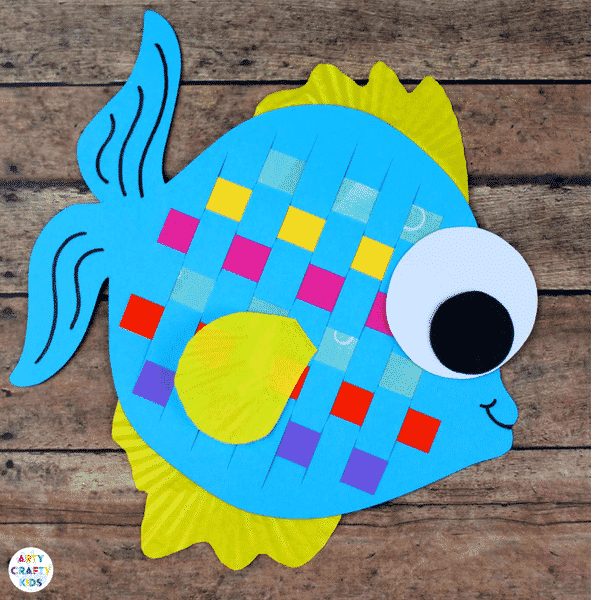
Kids weave strips of colored paper through a fish-shaped cutout to create a bright, patterned fish. This art uses a simple over-under weaving technique with a provided fish template, which is excellent for fine motor skills. Children enjoy how the weaving gives their fish a cool “scaly” look, and the finished artwork is as colorful as a rainbow fish.Also try: Fish Paper Bag Puppet Craft
A brown paper bag turns into a funny frog puppet that kids can make, hop, and “ribbit.” Children cut and glued on big googly eyes, a long tongue, and froggy feet (using a simple template) to create their frog. They practice scissor skills while building and then have a blast playing with their new frog friend, making this both educational and fun.
In this project, a paper plate becomes the snail's shell, complete with a colorful swirl. Kids paint or color the plate however they like, then attach a cute paper snail body peeking out. It's easy to make (even preschoolers can do it), and each snail turns out unique, showing off the little artist's favorite colors.
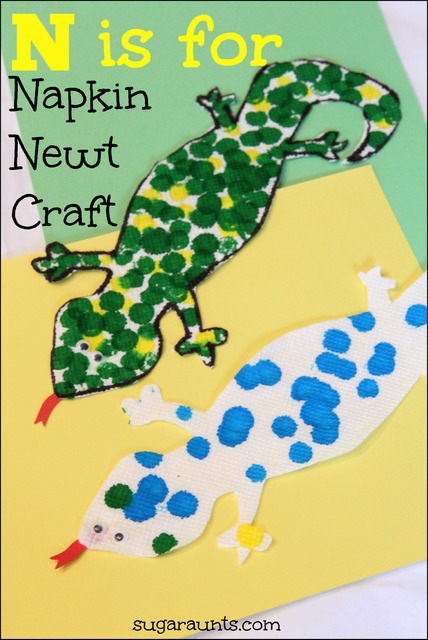
This alphabet activity uses the letter “N” to create a newt with napkin textures. Kids tear or cut pieces of napkin and glue them onto a newt-shaped letter N, giving the little lizard a scaly, speckled look. They enjoy the soft, crinkly fun of working with napkins, which sneaks in some fine motor practice while learning about the letter N.
In one hands-on project, kids create the frog's life cycle, from egg to tadpole to frog. They cut out and assemble each stage of the frog's life using paper and fun bits (like little paper eggs and a tiny frog shape), which is excellent fine motor practice. Not only do they learn how frogs grow, but they also get to display all the stages together, making science learning stick.Related: Frog Name Craft
This playful snail art has a surprise — it can hide in its shell and pop out again. Kids create a cute paper snail with a big spiral shell and use a simple sliding mechanism (with the help of a template) to make the snail peek in and out. They'll play peek-a-boo with their finished snail, turning the art into an interactive toy.
This activity lets kids make a mini kite that looks like flying. They create a paper kite and use a clever pulley-like string setup attached to a background. They can pull the string and watch the kite slide across the paper sky. It's a fun interactive project that brings the joy of flying a kite indoors.
A paper plate becomes a spring sky for this interactive kite scene. Kids decorate the plate as a sky (blue background, maybe cotton ball clouds) and attach a paper kite with a string through a small slit, allowing the kite to move around. After creating, they can slide the kite back and forth across the plate, “flying” it up high, which adds an extra layer of fun to traditional art.
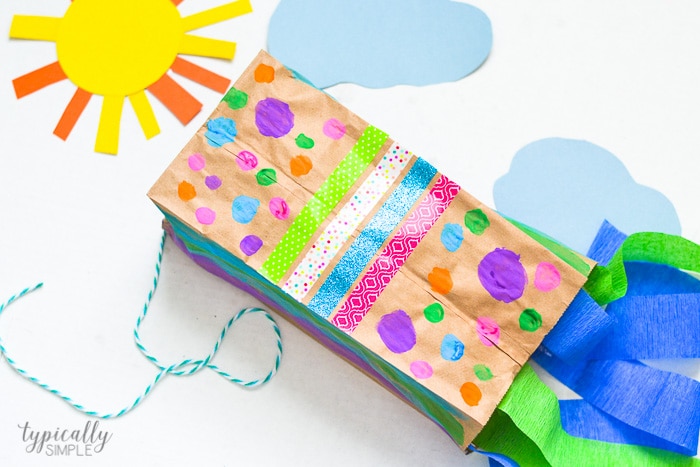
This simple activity uses a paper lunch bag to create a kite kids can run with. Children decorate the bag with markers or stickers, attach ribbon or paper streamers to one end as a fluttering tail, and tie a yarn string to the other end as the kite's line. Take it outside on a breezy day, and the paper bag kite will catch the wind as they run. Kids get to both make and fly their very own little kites.
It is a simple paper kite activity that's just right for preschoolers on a breezy day. Children use a printable template to cut out the classic kite shape, decorate it with crayons, markers, or stickers, and attach a yarn tail with paper bows. It's a bright, playful spring craft that lets kids explore windy weather through hands-on creativity.
In this creative project, a colorful cupcake liner turns into a mini kite. Kids flatten or fold a paper cupcake liner to form the kite sail, glue it onto a background (often withdrawn or cotton-ball clouds), and attach a string and a tiny paper tail. It's an adorable and easy spring activity that reuses a household item in a fun way, and children love how quick it is to make their kite “soar” on paper.
Kids recreate an ant's life cycle using recycled materials in this science-focused project. Using bits of egg carton, pom-poms, and yarn, they design each stage of the ant's life—eggs, larva, pupa, and adult ant—and arrange them in order. Children love the tactile fun of making tiny ant eggs and wrapping yarn for the larva, and building the stages helps them remember how ants grow.
This wearable project teaches the butterfly life cycle by turning each stage into a necklace. Kids create a tiny egg, caterpillar, chrysalis, and butterfly using simple materials (like beads, pasta, or paper cutouts) and then string them in order on a piece of yarn. Preschoolers especially enjoy that they can wear their science project proudly, and it helps them retell how a butterfly grows every time they show it off.
Through this fun project, kids create the four stages of a butterfly's life and interactively assemble them. They design an egg, caterpillar, chrysalis, and butterfly with simple supplies and then place them on a rotating wheel flip-book-style chart that shows each stage in order. This project lets children move from one phase to the next, making it easier to grasp and remember how a caterpillar transforms into a butterfly.
Children learn how a bee grows by making a spinning life cycle wheel. Using a printable template, they cut out and color each stage of the honey bee's life (egg, larva, pupa, adult) and attach the pieces to a paper circle with a fastener. They can then turn the wheel to reveal each phase individually, an engaging way to combine art with science learning.Related: Fork Painted Bee Craft
Kids can make a mini display of the honey bee's life cycle with just a few household supplies. They create each stage—egg, larva, pupa, and adult bee—using paper, pasta, or cotton balls to represent each part and then glue them sequentially on a board or paper. It's an easy, hands-on project that helps children visualize and remember how bees grow while having fun being creative.Also try: Bee Popsicle Stick Craft
Sam is the crafter and founder of Simple Everyday Mom. She has been featured in Oprah Mag, Good Housekeeping, The Spruce Crafts, Country Living, The Bump, and more.